Model Trimming
Contents
Model Trimming
The model trimming tool is part of the Orthodontic and Impression additional modules. It takes one or two aligned jaws acquired from the scanner and closes the jaw meshes with a trimmed base.
The tool is launched by clicking on the ![]() button, in the Main Toolbar that appears when the project has at least one jaw mesh ready.
button, in the Main Toolbar that appears when the project has at least one jaw mesh ready.
Interface
The interface of the Model Trimming tool is different from the rest of the software. On the top right, there are 4 tabs, one for every step of the process. The rest of the screen is either one or three 3D Views:
- One View : during the Cut Margins step, it shows only one jaw at a time
- Three Views : during the other steps, all the information is shown together to allow the user to see everything from three different points of view at the same time
Steps
The procedure develops in 4 steps:
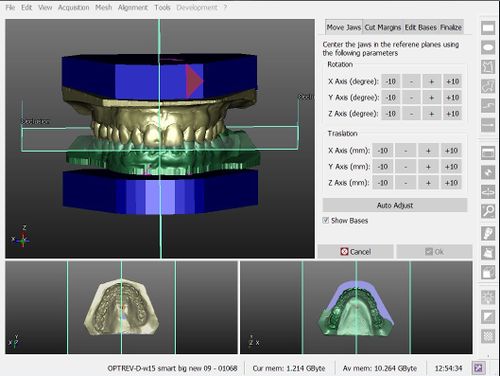
- Move Jaws : adjusts the position of the jaws to respect some reference planes (occlusal plane and simmetric plane)
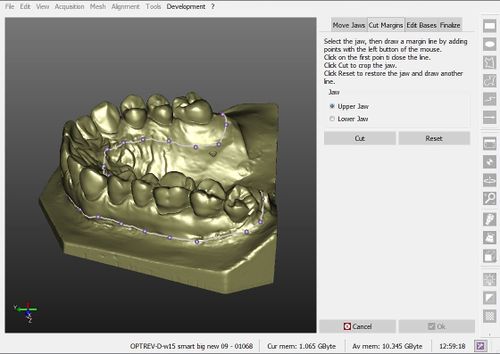
- Cut Margins : draws a margin line on the mesh to cut away all the information that will be replaced by the trimmed base
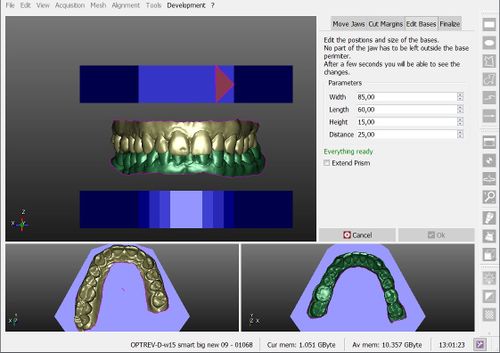
- Adjust Bases : changes the shape/position of the trimmed bases to adapt to the jaws
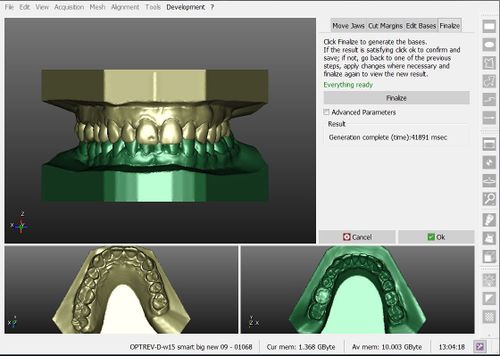
- Finalize : creates the finalized meshes, merging the cut jaws with the trimmed bases
Move Jaws
The positions of the jaw meshes, acquired from the scanner, may vary. This tool allows the user to adjust the position of the meshes with the aid of some commands.
For each movement there are 4 buttons (-10, -, +, +10), which apply a specific movement to the objects.
All the movements (rotations and translations) are defined according to an Axis. The axis can be seen in the 3D views, on the bottom-left angle.
There's an additional option, Show Bases, that allows the user to see a preview of where the trimmed bases will be, in order to aid the positioning process.
Cut Margins
The jaw meshes acquired from the scanner often have residual unnecessary parts of information. This parts have to be removed before merging the data with the new trimmed base.
Fort his purpose, an interactive tool that can draw a line on the mesh surface is provided:
- The first left mouse click on the mesh surface creates a point and starts the margin definition
- Any additional left mouse click adds a point to the margin and connects it to the previous one
- A left mouse click on the first point closes the margin
- After the margin is closed, the user can:
- drag one point with the left mouse button to move it to a different position
- click between two points, to add a new point in the middle
- press ESC to delete the margin and start again
When the margin is defined, a click on the Cut button will remove all the parts of the mesh below the margin.
Adjust Bases
The user can change 4 different parameters of the bases. When a parameter is changed, the 3D view updates in approximately 2 seconds.
- Width : the maximum width of the base
- Length : the maximum length of the base
- Height : the base height
- Distance : distance between the two bases, which are symmetric to the occlusal plane
After the cut, the jaw meshes have to be completely fitted in the bases. If the bases are too small a warning message will appear below the parameters.
Finalize
This last page shows only the Finalize button. When clicked, the software takes all the data and computes the new, closed, mesh. This process can take up to 2 minutes.
If the result is not satisfactory for the user, it is possible to return to one of the previous steps, change parameters and positions and then return to the Finalize step and compute the meshes again.
Otherwise, if the finalized mesh is satisfactory, click Ok to confirm the base trimming and save the new meshes.


