Model Trimming
Contents
Modelo Aparamento
A ferramenta de aparamento de modelo faz parte dos módulos adicionais Ortodontia e Moldagem. Ela pega uma ou duas arcadas alinhadas adquiridos do escaner e fecha a malhas da arcada com uma base aparada.
A ferramenta é lançada clicando no botão Template:Inline, nas Barra de Ferramentas Principal que aparece quando o projeto tem pelo menos uma malha de arcada pronta.
Interface
A interface da ferramenta de corte é diferente do resto do software. No canto superior direito, existem 4 guias, uma para cada etapa do processo. O resto da tela é feita por um ou três Vistas 3D:
- Uma Vista : durante a fase de corte das margens, ele mostra apenas uma arcada de cada vez
- Três Vistas : durante as outras etapas, eles mostram todas as informações juntas e permite ao usuário ver tudo a partir de três pontos de vista diferentes ao mesmo tempo
Etapas
O procedimento é feito em 4 etapas:
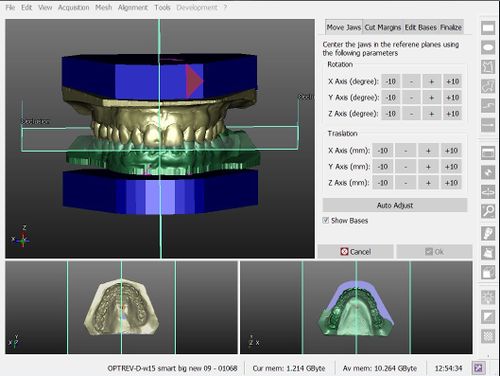
- Mover Arcada : ajusta a posição aquisição das arcadas com respeito a alguns planos de referência (plano oclusal e plano simetrico)
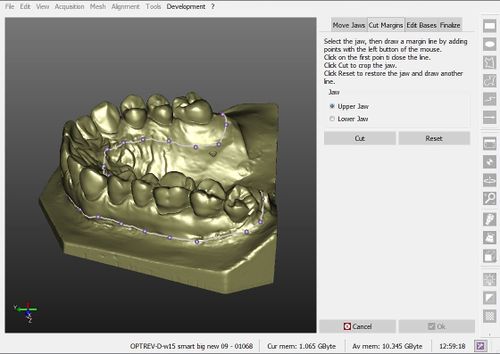
- Cortar Margens : desenha uma linha de margem na malha para cortar toda a informação que será substituído pela base aparada.
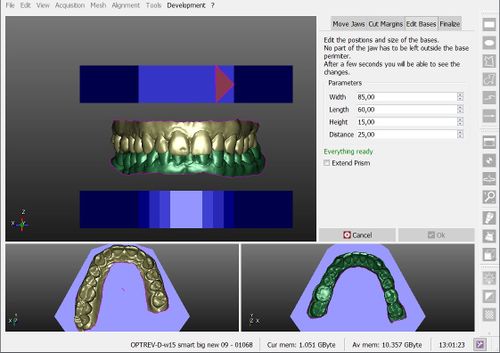
- Ajustar Bases : altera a forma / posição das bases aparadas para se adaptar à específica arcada para se aparar
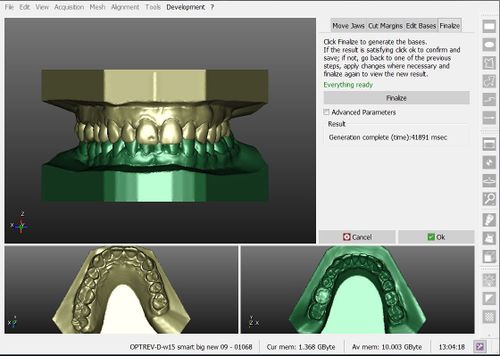
- Finalizar : cria as malhas finalizados, fundindo as arcadas cortadas com as bases aparadas
Mover Arcadas
As posições das malhas da arcada, adquiridos a partir do escaner, nem sempre são as mesmas. Esta ferramenta permite ao utilizador ajustar a posição das malhas com o auxílio de alguns comandos.
Para cada movimento há 4 botões (-10, -, +, +10), que aplicam um movimento específico para os objetos.
Todos os movimentos (rotações e translações) são definidos de acordo com um eixo. O eixo pode ser visto nas vistas 3D, no ângulo inferior esquerdo.
Há uma opção adicional, Mostrar Bases , que permite que o usuário veja uma prévia de como as bases aparadas serão, a fim de auxiliar o processo de posicionamento.
Cortar Margens
The jaw meshes acquired from the scanner may have a part of the surfaces that is not part of the jaw but of the old base or support. This parts have to be removed before merging the data with the new trimmed base.
This page gives the user an interactive tool that can draw a line on the mesh surface:
- The first left mouse click on the mesh surface creates a point and starts the margin definition
- Any additional left mouse click adds a point to the margin and connects it to the previous one
- A left mouse click on the first point closes the margin
- After the margin is closed, the user can:
- drag one point with the left mouse button to move it to a different position
- click between two points, to add a new point in the middle
- press ESC to delete the margin and start again
When the margin is defined, a click on the Cut button will cut away all the part of the mesh below the margin.
Adjust Bases
In this page the user can change 4 different parameters of the bases. When a parameter is changed, the 3D view is updated after 2 seconds.
- Width : the maximum width of the base
- Length : the maximum length of the base
- Height : the base height
- Distance : the bases are always positionated symmetric to the occlusal plane. This is the distance between the two bases
The jaw meshes, after the cut, have to be completely fitted in the bases. If the bases are too small a warning message will appear below the parameters.
Finalize
This last page has only one button: Finalize. When the button is clicked, the software takes all the data and computes the new, closed, mesh. This can take up to 2 minutes.
If the result is not good enough, the user can return to one of the previous steps and change some parameters and positions and then return to the Finalize step and compute the meshes again.
When the result after the Finalize button click is good, the user can click Ok to confirm the base trimming and save the new meshes.


