Model Trimming
Contents
Base Ortodonzia
Lo strumento Base Ortodonzia è disponibile solo nei moduli aggiuntivi Ortodonzia e Impronta. La sua funzione è di creare una base regolare per chiudere una o entrambe le arcate del progetto.
Per avviare lo strumento cliccare sull' icona ![]() nella Barra degli Strumenti Principale, disponibile solo nel momento in cui il progetto contiene almeno una mesh.
nella Barra degli Strumenti Principale, disponibile solo nel momento in cui il progetto contiene almeno una mesh.
Interfaccia
L'interfaccia per creare la base da ortodonzia è diversa dal resto del software. In alto a destra vengono mostrate le 4 schede relative a ogni passo del processo. Il resto della finestra è composta da una o tre finestre di vista 3D:
- Vista Singola : nel passo di taglio dei margini la vista è singola e mostra un arcata alla volta.
- Tre Viste : in tutti gli altri passi, vengono mostrate entrambe le arcate per permettere all'utente di controllare la base
Passi
La procedura si divide in 4 passi:
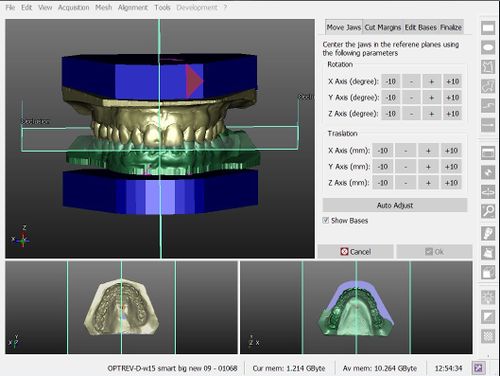
- Muovi Arcate : in cui si possono sistemare le arcate rispetto a dei piani di riferimento (piano occlusale e piano simmetrico)
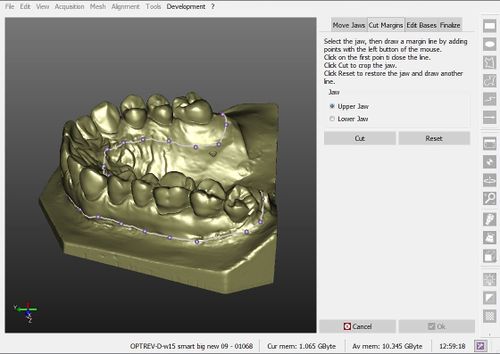
- Taglia Margini : in cui si disegna una linea di margine sulle mesh per tagliare tutte le informazioni che verranno rimpiazzate dalla base geometrica
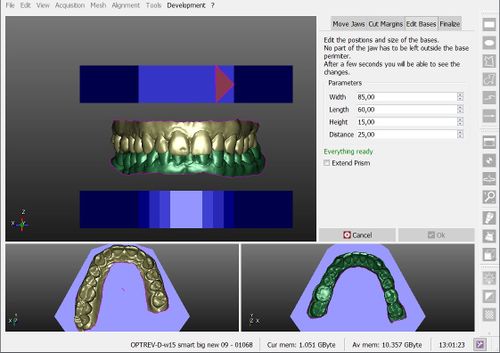
- Aggiusta Basi : in cui si cambiano la forma e posizione delle basi geometriche per adattarle alle arcate
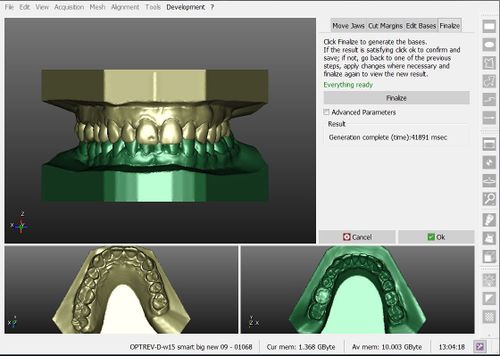
- Finalizza : crea la mesh finalizzata, unendo le arcate ritagliate alla base geometrica
Move Jaws
The positions of the jaw meshes, acquired from the scanner, may vary. This tool allows the user to adjust the position of the meshes with the aid of some commands.
For each movement there are 4 buttons (-10, -, +, +10), which apply a specific movement to the objects.
All the movements (rotations and translations) are defined according to an Axis. The axis can be seen in the 3D views, on the bottom-left angle.
There's an additional option, Show Bases, that allows the user to see a preview of where the trimmed bases will be, in order to aid the positioning process.
Cut Margins
The jaw meshes acquired from the scanner often have residual unnecessary parts of information. This parts have to be removed before merging the data with the new trimmed base.
Fort his purpose, an interactive tool that can draw a line on the mesh surface is provided:
- The first left mouse click on the mesh surface creates a point and starts the margin definition
- Any additional left mouse click adds a point to the margin and connects it to the previous one
- A left mouse click on the first point closes the margin
- After the margin is closed, the user can:
- drag one point with the left mouse button to move it to a different position
- click between two points, to add a new point in the middle
- press ESC to delete the margin and start again
When the margin is defined, a click on the Cut button will remove all the parts of the mesh below the margin.
Adjust Bases
The user can change 4 different parameters of the bases. When a parameter is changed, the 3D view updates in approximately 2 seconds.
- Width : the maximum width of the base
- Length : the maximum length of the base
- Height : the base height
- Distance : distance between the two bases, which are symmetric to the occlusal plane
After the cut, the jaw meshes have to be completely fitted in the bases. If the bases are too small a warning message will appear below the parameters.
Finalize
This last page shows only the Finalize button. When clicked, the software takes all the data and computes the new, closed, mesh. This process can take up to 2 minutes.
If the result is not satisfactory for the user, it is possible to return to one of the previous steps, change parameters and positions and then return to the Finalize step and compute the meshes again.
Otherwise, if the finalized mesh is satisfactory, click Ok to confirm the base trimming and save the new meshes.


