Difference between revisions of "Man ModelTrimming/fr"
L.leonardi (talk | contribs) (Created page with "Pour chaque mouvement on a 4 touches (-10, -, +, +10) qui appliquent à l’objet un mouvement spécifique.") |
L.leonardi (talk | contribs) (Created page with "Tous mouvements (rotation et translation) sont définis par rapport à un Axe. L’axe est montré dans la vue 3D dans le coin en bas à gauche.") |
||
| Line 29: | Line 29: | ||
Pour chaque mouvement on a 4 touches (-10, -, +, +10) qui appliquent à l’objet un mouvement spécifique. | Pour chaque mouvement on a 4 touches (-10, -, +, +10) qui appliquent à l’objet un mouvement spécifique. | ||
| − | + | Tous mouvements (rotation et translation) sont définis par rapport à un Axe. L’axe est montré dans la vue 3D dans le coin en bas à gauche. | |
There's an additional option, ''Show Bases'', that allows the user to see a preview of where the trimmed bases will be, in order to aid the positioning process. | There's an additional option, ''Show Bases'', that allows the user to see a preview of where the trimmed bases will be, in order to aid the positioning process. | ||
Revision as of 14:35, 2 February 2016
Contents
Base Orthodontie
L’outil base Orthodontie est disponible seulement dans les modules adjonctifs Orthodontie et Empreint. Il sert à créer une base régulière pour fermer l’une ou les deux arcades du projet.
Pou démarrer l’outil, cliquer sur l’icône ![]() dans la Barre d’Outils Principale, disponible seulement où le projet a déjà une maille
dans la Barre d’Outils Principale, disponible seulement où le projet a déjà une maille
Interface
L’interface pour créer la Base d’Orthodontie est différente que le reste du logiciel. En haut à droite on a les 4 cartes relatives aux étapes du processus. Le reste de la fenêtre se compose d’une ou trois fenêtres de vue 3D :
- Vue Individuelle: lorsqu’on coupe les margines la vue est individuelle et elle montre une arcade à la fois.
- Trois Vues: en toutes les outres étapes, on montre les deux arcades en permettant à l’utilisateur de contrôler la base
Etapes
La procédure se compose de 4 étapes :
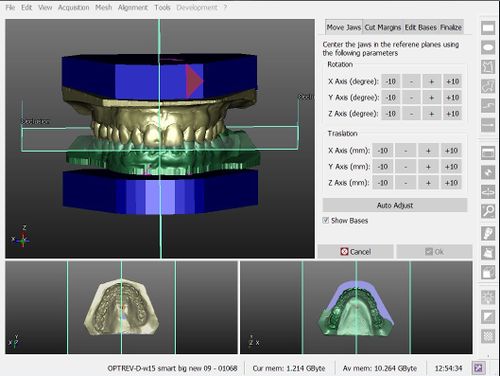
- Déplacer Arcades: on peut déplacer les arcades par rapport aux plans de référence (plan occlusal et plan symétrique)
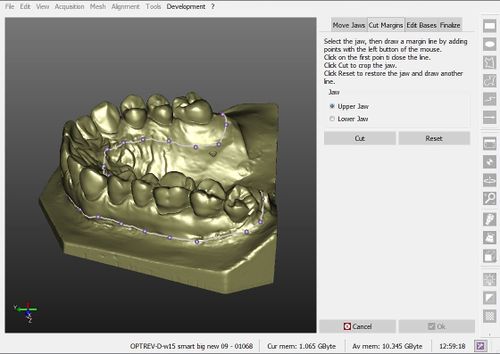
- Marge de Coupe: on peut dessiner une ligne de marge sur les mailles pour couper les informations à remplacer avec la base géométrique
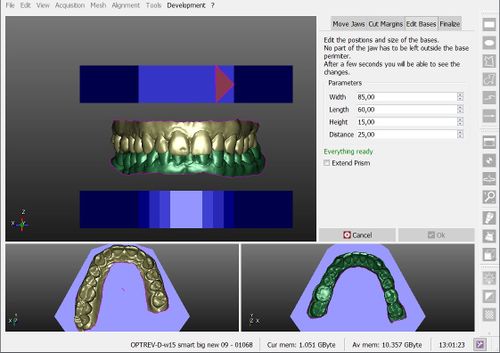
- Ajuster Bases: on change la forme et le placement des bases géométriques pour les adapter aux arcades
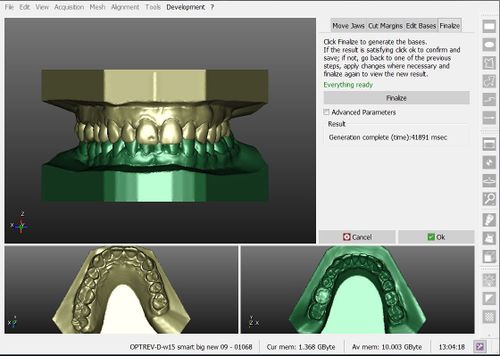
- Finaliser:on crée la maille finale, en unifiant les arcades coupées à la base géométrique
Déplacer Arcades
La position des mailles des arcades numérisées n’est pas toujours la même. Cet outil permet d’ajuster la position des mailles en utilisant des commandes.
Pour chaque mouvement on a 4 touches (-10, -, +, +10) qui appliquent à l’objet un mouvement spécifique.
Tous mouvements (rotation et translation) sont définis par rapport à un Axe. L’axe est montré dans la vue 3D dans le coin en bas à gauche.
There's an additional option, Show Bases, that allows the user to see a preview of where the trimmed bases will be, in order to aid the positioning process.
Cut Margins
The jaw meshes acquired from the scanner often have residual unnecessary parts of information. This parts have to be removed before merging the data with the new trimmed base.
Fort his purpose, an interactive tool that can draw a line on the mesh surface is provided:
- The first left mouse click on the mesh surface creates a point and starts the margin definition
- Any additional left mouse click adds a point to the margin and connects it to the previous one
- A left mouse click on the first point closes the margin
- After the margin is closed, the user can:
- drag one point with the left mouse button to move it to a different position
- click between two points, to add a new point in the middle
- press ESC to delete the margin and start again
When the margin is defined, a click on the Cut button will remove all the parts of the mesh below the margin.
Adjust Bases
The user can change 4 different parameters of the bases. When a parameter is changed, the 3D view updates in approximately 2 seconds.
- Width : the maximum width of the base
- Length : the maximum length of the base
- Height : the base height
- Distance : distance between the two bases, which are symmetric to the occlusal plane
After the cut, the jaw meshes have to be completely fitted in the bases. If the bases are too small a warning message will appear below the parameters.
Finalize
This last page shows only the Finalize button. When clicked, the software takes all the data and computes the new, closed, mesh. This process can take up to 2 minutes.
If the result is not satisfactory for the user, it is possible to return to one of the previous steps, change parameters and positions and then return to the Finalize step and compute the meshes again.
Otherwise, if the finalized mesh is satisfactory, click Ok to confirm the base trimming and save the new meshes.


