Model Trimming
Contents
Model Trimming
Instrumentul de tăiere a modelului face parte din modulele suplimentare ortodontice și de amprentă. Este nevoie de una sau două arcade aliniate achiziționate de la scaner și închideți meshurile modelelor cu o bază tăiată.
Instrumentul este lansat făcând clic pe butonul ![]() din Main Toolbarcare apare când proiectul are cel puțin un mesh de model gata.
din Main Toolbarcare apare când proiectul are cel puțin un mesh de model gata.
Interfață
Interfața instrumentului Model Trimming este diferită de restul software-ului. În partea dreaptă sus, există 4 tabele, câte unul pentru fiecare etapă a procesului. Restul ecranului este unul sau 3D:
Rumeno
- One View: în timpul fazei Margini tăiate, aceasta arată doar un maxilar la un moment dat
- Three Views: în timpul celorlalți pași, toate informațiile sunt afișate împreună pentru a permite utilizatorului să vadă totul din trei puncte de vedere diferite în același timp
Steps
Procedura se desfășoară în 4 pași:
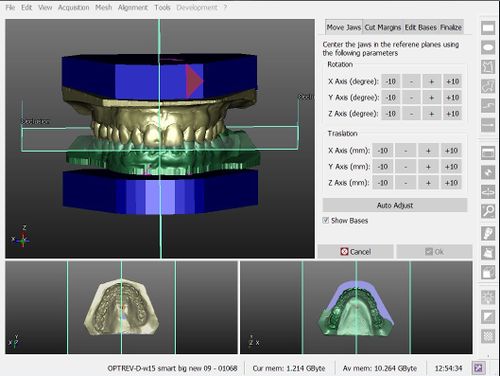
- Move Jaws: reglează poziția arcadelor pentru a respecta unele planuri de referință (plan ocluzal și plan simetric)
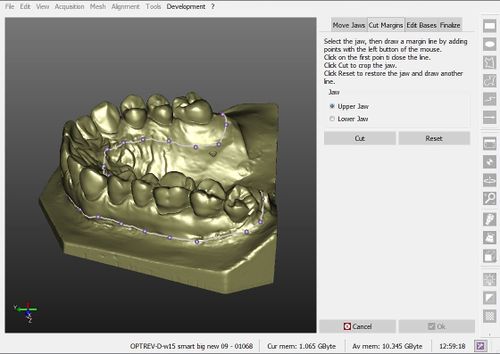
- Cut Margins : atrage o linie pe marginea meshurilor pentru a elimina toate informațiile care vor fi înlocuite de baza decupată
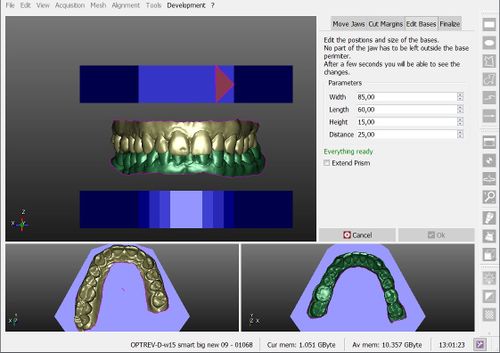
- Ajustarea bazelor: schimbă forma / poziția bazelor tăiate pentru a se adapta la arcade
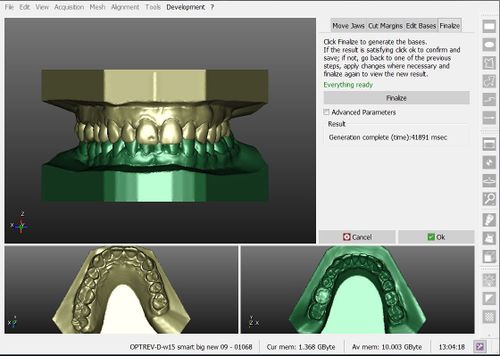
- Finalize: creează meshurile finalizate, îmbinând arcadele tăiate cu bazele tăiate
Move Jaws
Pozițiile meshurilor maxilare, achiziționate de la scaner, pot varia. Acest instrument permite utilizatorului să ajusteze poziția meshurilor cu ajutorul unor comenzi.
Pentru fiecare mișcare există 4 butoane (-10, -, +, +10), care aplică o mișcare specifică obiectelor.
Toate mișcările (rotațiile) sunt definite în funcție de o axă. Axa poate fi văzută în vizualizările 3D, în unghiul din stânga jos.
Există o opțiune suplimentară,Show Bases , care permite utilizatorului să vadă o previzualizare a locului în care vor fi bazele tăiate, pentru a ajuta procesul de poziționare.
Cut Margins
The jaw meshes acquired from the scanner often have residual unnecessary parts of information. This parts have to be removed before merging the data with the new trimmed base.
Fort his purpose, an interactive tool that can draw a line on the mesh surface is provided:
- The first left mouse click on the mesh surface creates a point and starts the margin definition
- Any additional left mouse click adds a point to the margin and connects it to the previous one
- A left mouse click on the first point closes the margin
- After the margin is closed, the user can:
- drag one point with the left mouse button to move it to a different position
- click between two points, to add a new point in the middle
- press ESC to delete the margin and start again
When the margin is defined, a click on the Cut button will remove all the parts of the mesh below the margin.
Adjust Bases
The user can change 4 different parameters of the bases. When a parameter is changed, the 3D view updates in approximately 2 seconds.
- Width : the maximum width of the base
- Length : the maximum length of the base
- Height : the base height
- Distance : distance between the two bases, which are symmetric to the occlusal plane
After the cut, the jaw meshes have to be completely fitted in the bases. If the bases are too small a warning message will appear below the parameters.
Finalize
This last page shows only the Finalize button. When clicked, the software takes all the data and computes the new, closed, mesh. This process can take up to 2 minutes.
If the result is not satisfactory for the user, it is possible to return to one of the previous steps, change parameters and positions and then return to the Finalize step and compute the meshes again.
Otherwise, if the finalized mesh is satisfactory, click Ok to confirm the base trimming and save the new meshes.


