Model Trimming
Model Trimming
模型修整工具是正畸與印模附加模塊的一部分.它需要從掃描儀獲得的一或兩個對準的顎與封閉顎嚙合修剪底座。
該工具啟動通過點擊![]() 鈕, 在 主工具列 ,出現在專案至少有一個顎網格做好準備
鈕, 在 主工具列 ,出現在專案至少有一個顎網格做好準備
界面
模型修整工具的界面與軟體的其餘部分是不同的.在右上方有4個標籤,一個用於過程的每一步.在螢幕的其餘部分可以是一個或三個3D視角:
- 單一視角 : 在修剪多餘步驟期間, 他一次只顯示一個顎
- 三方視角 : 在其他步驟期間, 所有的訊息被顯示在一起允許使用者從三個不同的視角觀點同時看見一切
步驟
過程展開有4個步驟:
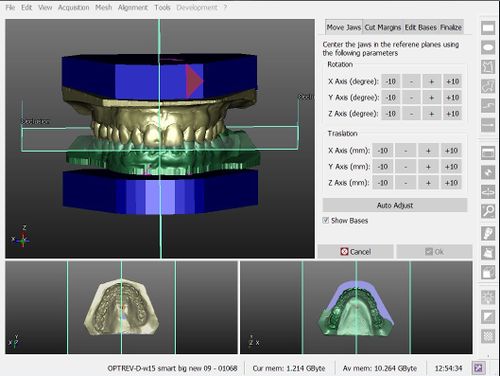
- Move Jaws : adjusts the position of the jaws to respect some reference planes (occlusal plane and simmetric plane)
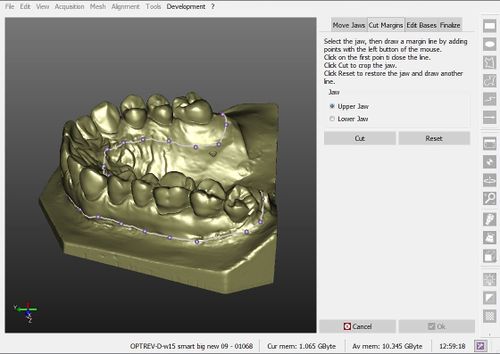
- Cut Margins : draws a margin line on the mesh to cut away all the information that will be replaced by the trimmed base
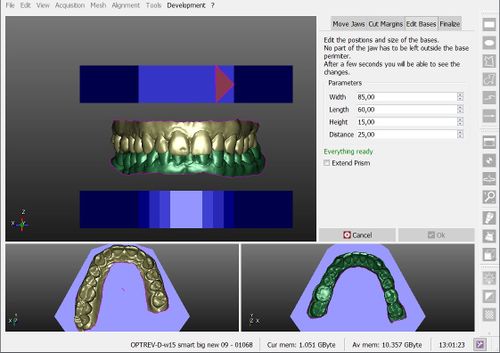
- Adjust Bases : changes the shape/position of the trimmed bases to adapt to the jaws
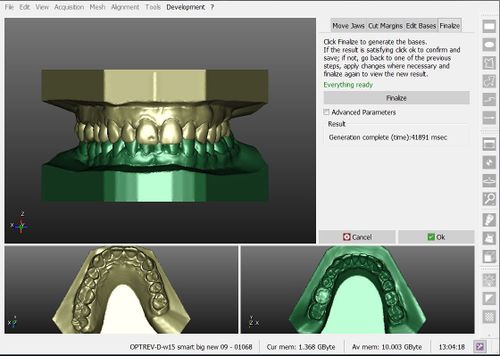
- Finalize : creates the finalized meshes, merging the cut jaws with the trimmed bases
Move Jaws
The positions of the jaw meshes, acquired from the scanner, may vary. This tool allows the user to adjust the position of the meshes with the aid of some commands.
For each movement there are 4 buttons (-10, -, +, +10), which apply a specific movement to the objects.
All the movements (rotations and translations) are defined according to an Axis. The axis can be seen in the 3D views, on the bottom-left angle.
There's an additional option, Show Bases, that allows the user to see a preview of where the trimmed bases will be, in order to aid the positioning process.
Cut Margins
The jaw meshes acquired from the scanner often have residual unnecessary parts of information. This parts have to be removed before merging the data with the new trimmed base.
Fort his purpose, an interactive tool that can draw a line on the mesh surface is provided:
- The first left mouse click on the mesh surface creates a point and starts the margin definition
- Any additional left mouse click adds a point to the margin and connects it to the previous one
- A left mouse click on the first point closes the margin
- After the margin is closed, the user can:
- drag one point with the left mouse button to move it to a different position
- click between two points, to add a new point in the middle
- press ESC to delete the margin and start again
When the margin is defined, a click on the Cut button will remove all the parts of the mesh below the margin.
Adjust Bases
The user can change 4 different parameters of the bases. When a parameter is changed, the 3D view updates in approximately 2 seconds.
- Width : the maximum width of the base
- Length : the maximum length of the base
- Height : the base height
- Distance : distance between the two bases, which are symmetric to the occlusal plane
After the cut, the jaw meshes have to be completely fitted in the bases. If the bases are too small a warning message will appear below the parameters.
Finalize
This last page shows only the Finalize button. When clicked, the software takes all the data and computes the new, closed, mesh. This process can take up to 2 minutes.
If the result is not satisfactory for the user, it is possible to return to one of the previous steps, change parameters and positions and then return to the Finalize step and compute the meshes again.
Otherwise, if the finalized mesh is satisfactory, click Ok to confirm the base trimming and save the new meshes.


