Model Trimming
Contents
Model Trimming
The model trimming tool is part of the Orthodontic and Impression additional modules. It takes one or two aligned jaws acquired from the scanner and closes the jaw meshes with a trimmed base.
The tool is launched by clicking on the ![]() button, in the Main Toolbar that appears when the project has at least one jaw mesh ready.
button, in the Main Toolbar that appears when the project has at least one jaw mesh ready.
Interfaz
La interfaz del ?? se diferencia del resto del software. En la parte superior derecha hay 4 pestañas relativas a cada paso del proceso. El resto de la pantalla está compuesto por una o tres ventanas de Vista 3D:
- Vista Individual": durante el paso "Cortar Margenes" muestra una arcada a la vez
- Tres Vistas": durante los otros pasos, muestra ambas arcadas para permitir al usario utilizar tres puntos de vista diferentes al mismo tiempo.
Pasos
El procedimiento se divide en 4 pasos:
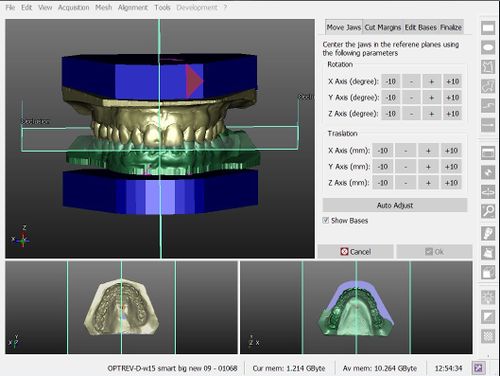
- Mover Arcadas : ajusta la posicion de las arcadas en base a unos planos de referencia (plano oclusal y plano simetrico)
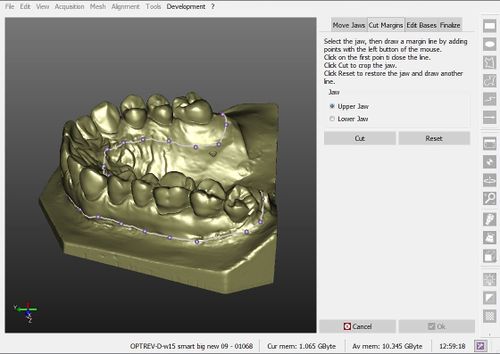
- Cortar Margenes : dibuja una lina de margen en las mallas para cortar todas las informaciones que seran sustiduidas por la ?
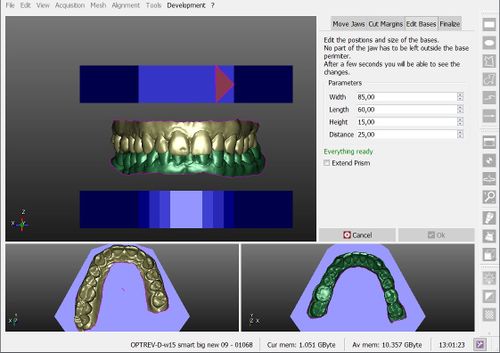
- Ajustar Bases : modifica la forma/posicion de las bases para adaptarlas a las arcadas
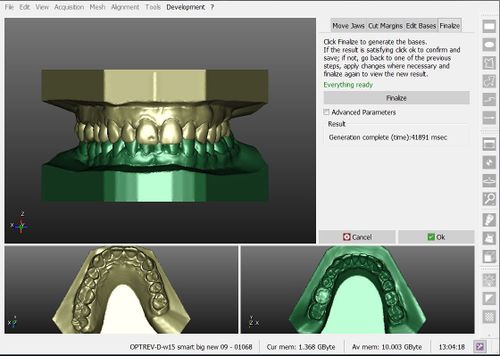
- Finalizar : crea las mallas finalizadas, uniendo las arcadas cortadas con la base ?
Mover Arcadas
Las posicion de las mallas de las arcadas, capturadas por el escaner, puede variar.
Hay 4 botones para cada movimiento(-10, -, +, +10) que aplican un movimiento especifico del objeto.
All the movements (rotations and translations) are defined according to an Axis. The axis can be seen in the 3D views, on the bottom-left angle.
There's an additional option, Show Bases, that allows the user to see a preview of where the trimmed bases will be, in order to aid the positioning process.
Cut Margins
The jaw meshes acquired from the scanner often have residual unnecessary parts of information. This parts have to be removed before merging the data with the new trimmed base.
Fort his purpose, an interactive tool that can draw a line on the mesh surface is provided:
- The first left mouse click on the mesh surface creates a point and starts the margin definition
- Any additional left mouse click adds a point to the margin and connects it to the previous one
- A left mouse click on the first point closes the margin
- After the margin is closed, the user can:
- drag one point with the left mouse button to move it to a different position
- click between two points, to add a new point in the middle
- press ESC to delete the margin and start again
When the margin is defined, a click on the Cut button will remove all the parts of the mesh below the margin.
Adjust Bases
The user can change 4 different parameters of the bases. When a parameter is changed, the 3D view updates in approximately 2 seconds.
- Width : the maximum width of the base
- Length : the maximum length of the base
- Height : the base height
- Distance : distance between the two bases, which are symmetric to the occlusal plane
After the cut, the jaw meshes have to be completely fitted in the bases. If the bases are too small a warning message will appear below the parameters.
Finalize
This last page shows only the Finalize button. When clicked, the software takes all the data and computes the new, closed, mesh. This process can take up to 2 minutes.
If the result is not satisfactory for the user, it is possible to return to one of the previous steps, change parameters and positions and then return to the Finalize step and compute the meshes again.
Otherwise, if the finalized mesh is satisfactory, click Ok to confirm the base trimming and save the new meshes.


