Difference between revisions of "Man ModelTrimming/pt-br"
| Line 9: | Line 9: | ||
=Interface= | =Interface= | ||
| − | + | The interface of the Model Trimming tool is different from the rest of the software. On the top right, there are 4 tabs, one for every step of the process. The rest of the screen is either one or three 3D Views: | |
| − | * ''' | + | * '''One View''' : during the Cut Margins step, it shows only one jaw at a time |
| − | * ''' | + | * '''Three Views''' : during the other steps, all the information is shown together to allow the user to see everything from three different points of view at the same time |
=Etapas= | =Etapas= | ||
| − | + | The procedure develops in 4 steps: | |
| − | # ''' | + | # '''Move Jaws''' : adjusts the position of the jaws to respect some reference planes (occlusal plane and simmetric plane) |
| − | # ''' | + | # '''Cut Margins''' : draws a margin line on the mesh to cut away all the information that will be replaced by the trimmed base |
| − | # ''' | + | # '''Adjust Bases''' : changes the shape/position of the trimmed bases to adapt to the jaws |
| − | # ''' | + | # '''Finalize''' : creates the finalized meshes, merging the cut jaws with the trimmed bases |
==Mover Arcadas== | ==Mover Arcadas== | ||
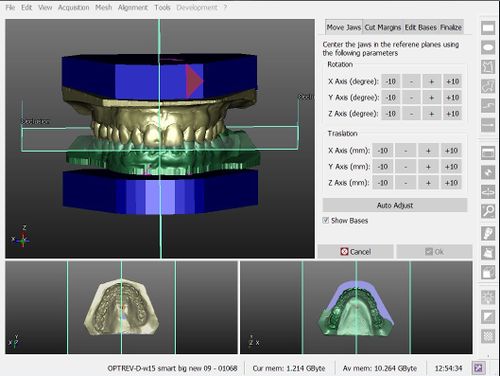
| − | + | The positions of the jaw meshes, acquired from the scanner, may vary. This tool allows the user to adjust the position of the meshes with the aid of some commands. | |
| − | + | For each movement there are 4 buttons (-10, -, +, +10), which apply a specific movement to the objects. | |
Todos os movimentos (rotações e translações) são definidos de acordo com um eixo. O eixo pode ser visto nas vistas 3D, no ângulo inferior esquerdo. | Todos os movimentos (rotações e translações) são definidos de acordo com um eixo. O eixo pode ser visto nas vistas 3D, no ângulo inferior esquerdo. | ||
| Line 37: | Line 37: | ||
==Cortar Margens== | ==Cortar Margens== | ||
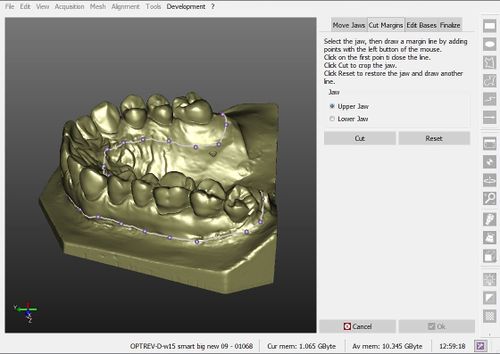
| − | + | The jaw meshes acquired from the scanner often have residual unnecessary parts of information. This parts have to be removed before merging the data with the new trimmed base. | |
| − | + | Fort his purpose, an interactive tool that can draw a line on the mesh surface is provided: | |
# O primeiro ''clique esquerdo do mouse'' sobre a superfície da mesh cria um ponto e começa a definição de margem | # O primeiro ''clique esquerdo do mouse'' sobre a superfície da mesh cria um ponto e começa a definição de margem | ||
| Line 49: | Line 49: | ||
#* ''pressione ESC'' para apagar a margem e começar de novo | #* ''pressione ESC'' para apagar a margem e começar de novo | ||
| − | + | When the margin is defined, a click on the '''Cut''' button will remove all the parts of the mesh below the margin. | |
{{Screenshot|Dental_2_5_ortoBaseCut.jpg}} | {{Screenshot|Dental_2_5_ortoBaseCut.jpg}} | ||
| Line 55: | Line 55: | ||
==Ajustar Bases== | ==Ajustar Bases== | ||
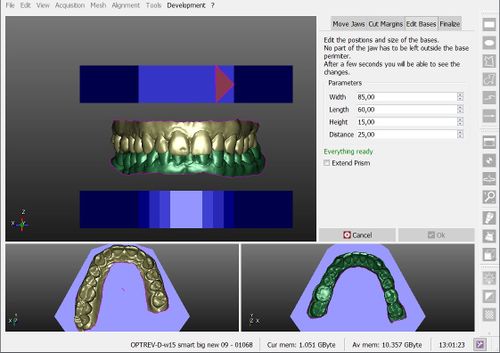
| − | + | The user can change 4 different parameters of the bases. When a parameter is changed, the 3D view updates in approximately 2 seconds. | |
| − | * ''' | + | * '''Width''' : the maximum width of the base |
| − | * ''' | + | * '''Length''' : the maximum length of the base |
| − | * ''' | + | * '''Height''' : the base height |
| − | * ''' | + | * '''Distance''' : distance between the two bases, which are symmetric to the occlusal plane |
| − | + | After the cut, the jaw meshes have to be completely fitted in the bases. If the bases are too small a warning message will appear below the parameters. | |
{{Screenshot|Dental_2_5_ortoBaseAdjust.jpg}} | {{Screenshot|Dental_2_5_ortoBaseAdjust.jpg}} | ||
| Line 68: | Line 68: | ||
==Finalizar== | ==Finalizar== | ||
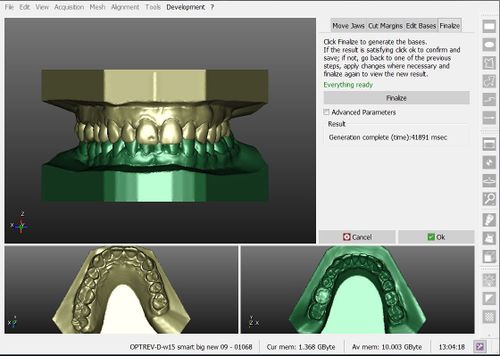
| − | + | This last page shows only the '''Finalize''' button. When clicked, the software takes all the data and computes the new, closed, mesh. This process can take up to 2 minutes. | |
| − | + | If the result is not satisfactory for the user, it is possible to return to one of the previous steps, change parameters and positions and then return to the Finalize step and compute the meshes again. | |
| − | + | Caso contrário, se a mesh finalizada for satisfatória, clique em '' 'Ok' '' para confirmar a base de corte e salvar as novas meshes. | |
{{Screenshot|Dental_2_5_ortoBaseFinalize.jpg}} | {{Screenshot|Dental_2_5_ortoBaseFinalize.jpg}} | ||
{{Navigation|Man_DataExport|Wiz_Introduction}} | {{Navigation|Man_DataExport|Wiz_Introduction}} | ||
Revision as of 13:21, 16 November 2015
Contents
Modelo Aparamento
A ferramenta de aparamento de modelo faz parte dos módulos adicionais Ortodontia e Moldagem. Ela pega uma ou duas arcadas alinhadas adquiridos do escaner e fecha a malhas da arcada com uma base aparada.
A ferramenta é lançada clicando no botão Template:Inline, nas Barra de Ferramentas Principal que aparece quando o projeto tem pelo menos uma mesh de arcada pronta.
Interface
The interface of the Model Trimming tool is different from the rest of the software. On the top right, there are 4 tabs, one for every step of the process. The rest of the screen is either one or three 3D Views:
- One View : during the Cut Margins step, it shows only one jaw at a time
- Three Views : during the other steps, all the information is shown together to allow the user to see everything from three different points of view at the same time
Etapas
The procedure develops in 4 steps:
- Move Jaws : adjusts the position of the jaws to respect some reference planes (occlusal plane and simmetric plane)
- Cut Margins : draws a margin line on the mesh to cut away all the information that will be replaced by the trimmed base
- Adjust Bases : changes the shape/position of the trimmed bases to adapt to the jaws
- Finalize : creates the finalized meshes, merging the cut jaws with the trimmed bases
Mover Arcadas
The positions of the jaw meshes, acquired from the scanner, may vary. This tool allows the user to adjust the position of the meshes with the aid of some commands.
For each movement there are 4 buttons (-10, -, +, +10), which apply a specific movement to the objects.
Todos os movimentos (rotações e translações) são definidos de acordo com um eixo. O eixo pode ser visto nas vistas 3D, no ângulo inferior esquerdo.
Há uma opção adicional, Mostrar Bases , que permite que o usuário veja uma prévia de como as bases aparadas serão, a fim de auxiliar o processo de posicionamento.
Cortar Margens
The jaw meshes acquired from the scanner often have residual unnecessary parts of information. This parts have to be removed before merging the data with the new trimmed base.
Fort his purpose, an interactive tool that can draw a line on the mesh surface is provided:
- O primeiro clique esquerdo do mouse sobre a superfície da mesh cria um ponto e começa a definição de margem
- Qualquer clique esquerda do mouse adicional acrescenta um ponto na margem e o conecta ao anterior
- Um clique esquerdo do mouse no primeiro ponto fecha a margem
- Depois de fechada a margem, o usuário pode:
- arraste um ponto com o botão esquerdo do mouse para movê-lo para uma posição diferente
- clique entre 2 pontos, para adicionar um novo ponto no meio
- pressione ESC para apagar a margem e começar de novo
When the margin is defined, a click on the Cut button will remove all the parts of the mesh below the margin.
Ajustar Bases
The user can change 4 different parameters of the bases. When a parameter is changed, the 3D view updates in approximately 2 seconds.
- Width : the maximum width of the base
- Length : the maximum length of the base
- Height : the base height
- Distance : distance between the two bases, which are symmetric to the occlusal plane
After the cut, the jaw meshes have to be completely fitted in the bases. If the bases are too small a warning message will appear below the parameters.
Finalizar
This last page shows only the Finalize button. When clicked, the software takes all the data and computes the new, closed, mesh. This process can take up to 2 minutes.
If the result is not satisfactory for the user, it is possible to return to one of the previous steps, change parameters and positions and then return to the Finalize step and compute the meshes again.
Caso contrário, se a mesh finalizada for satisfatória, clique em 'Ok' para confirmar a base de corte e salvar as novas meshes.


