Step-By-Step Wizard
Revision as of 11:35, 1 February 2016 by FrancescoMRomano (talk | contribs) (Created page with "* Die Hauptwerkzeugleiste wird nicht angezeigt * Statt dem Projektbaum, wird die Liste von den für die Projekterstellung zu folgenden Wizard...")
Wizard (geleiteter Prozess)
Bei Strukturprojekten bietet OpticalRevEng Dental einen Wizard an, der den Nutzer vom ersten Scanprozess bis zur Datenexportierung unterstützt.
Wizardinterface
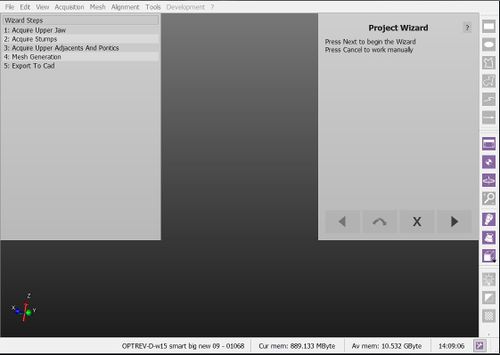
Wenn der Wizard gestartet wird, ändert sich das Softwareinterface folgendermaßen:
- Die Hauptwerkzeugleiste wird nicht angezeigt
- Statt dem Projektbaum, wird die Liste von den für die Projekterstellung zu folgenden Wizardschritten angezeigt.
- In der Ecke oben rechts wird der tatsächliche Wizard angezeigt, der den Nutzer unterstützt und mit nur 4 Tasten gesteuert werden kann.
During all the wizard steps, all the other tools will be locked. All the interactions will be handled in the Wizard Panel on the top right of the screen
Wizard Sequence
The sequence of wizard steps depends on each specific project. It follows this logic:
- Acquire all the required data from the scanner
- After every single acquisiton:
- Check that all the information is correctly aligned
- Generate the needed meshes
- Align the implants
- Export to the CAD


