Difference between revisions of "Man ProjectCreation/pt-br"
(Updating to match new version of source page) |
|||
| Line 71: | Line 71: | ||
; Sectioned Model : default workflow, in which every element is acquired separately and all the information gets merged at the end | ; Sectioned Model : default workflow, in which every element is acquired separately and all the information gets merged at the end | ||
; Impression Scan : if the ''Impression Scan Module'' is enabled in the license, check this option to scan an impression and not a stone model | ; Impression Scan : if the ''Impression Scan Module'' is enabled in the license, check this option to scan an impression and not a stone model | ||
| − | ; | + | ; Quadrant Model : if the ''Concept Quad Scan Module'' is enabled, it is possible to scan all the parts of a Quadrant Tray in just one step |
; Unsectioned Model : enable this option if the model to be scanned is not sectioned, the scanner will not require a separate scan for every die | ; Unsectioned Model : enable this option if the model to be scanned is not sectioned, the scanner will not require a separate scan for every die | ||
| Line 85: | Line 85: | ||
Para definir o caso, clique em cada posição multi-munhão e defina o nome de cada paciente no campo '' Paciente ''. | Para definir o caso, clique em cada posição multi-munhão e defina o nome de cada paciente no campo '' Paciente ''. | ||
| + | |||
| + | To scan a Waxup for the selected stump, select the Waxup box. | ||
== Ortodôntico / PPR / Projeto Moldagem == | == Ortodôntico / PPR / Projeto Moldagem == | ||
Revision as of 12:19, 8 June 2016
Contents
Projeto
Ao lançar o software diretamente, se o projeto não foi definido em outro banco de dados comoExocad DentalDB, o projeto de escaneamento deve ser definido.
O software tem um diálogo Gestor de Projeto para coletar todos os dados sobre os itens a serem escaneados e para preparar um específico Assistente Passo a passo .
O gerente de projeto permitirá selecionar um dos tipos de projeto disponíveis clicando no ícone respectivo na barra à esquerda da caixa de diálogo.
Em todos os projetos, o usuário tem de definir algumas Informação Geral:
- O ID do paciente (Obrigatório)
- O ID do médico (Opcional)
- Um nome de projeto específico para salvar o projeto no disco, se não for fornecido será gerado automaticamente com base no ID do paciente
- O nome do desenhador (Opcional)
- Notas (Opcional)
Quando o projeto for definido, confirme clicando no ícone verde na parte inferior da caixa de diálogo. O software irá criar uma específica Projeto Estruturado e iniciar o Assistente passo a passo.
Projeto de Prótese Fixa
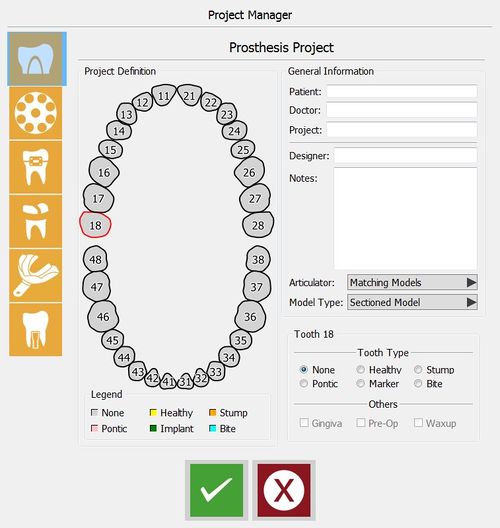
Definição do Projeto habilitado clicando no ícone de Prótese.
A seção de prótese é o mais complexo por causa da quantidade de elementos que podem ser ajustados e que requerem a definição de dente por dente.
À exceção da seção Informação Geral , este projeto mostra 2 seções adicionais
Definição do Projeto
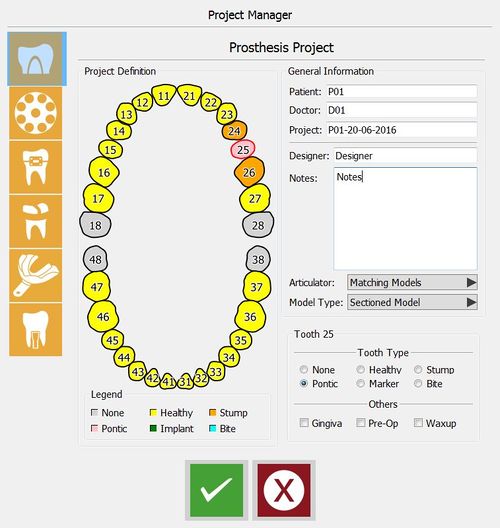
Na parte principal da janela, está disponível um odontograma que permite definir os elementos que têm de ser escaneados.
Mantendo ![]() ao clicar em um dente, o último item selecionado será copiado para o dente selecionado.
ao clicar em um dente, o último item selecionado será copiado para o dente selecionado.
Mantendo ![]() ao clicar em um dente, os últimos parâmetros selecionados serão copiados para todos os dentes entre o último dente e aquele selecionado.
ao clicar em um dente, os últimos parâmetros selecionados serão copiados para todos os dentes entre o último dente e aquele selecionado.
Informação do Dente
A seção no canto inferior direito permite selecionar o Tipo de Dente e algumas Outras Opções para cada elemento selecionado. Os Tipos de Dentes são:
- None
- this tooth is not part of the project, it will not be acquired or can be ignored
- Healthy
- this tooth is part of the main stone model, it can be acquired with the rest of the model
- Stump
- this tooth is a removable die that has to be acquired alone or on the Multi-Die support
- Pontic
- missing tooth in between two stumps, it will be the intermediate element of a bridge
- Implant
- there is an implant in this position, therefore a Scan Body will be acquired
- Bite
- this tooth is part of an occlusal bite
Cada tipo dente tem uma cor específica no esquema de definição do projeto
As outras opções são:
- Gingiva
- this element is mounted on an artificial gingiva that has to be acquired separately from the stone model
- Pre-Op
- the anatomy of this element is part of an additional model that will be acquired separately and then aligned to the reference stone model
- Waxup
- over this tooth position, it's possible to scan a Pre-Modelled Waxup that will be aligned to the rest of the stone model
Parâmetros Adicionais
Na seção de informação geral, existem alguns parâmetros adicionais:
Articulator Box
Select how the models are kept in articulation:
- Matching models
- to scan the occlusion if there is no need to use the automatic positioning in Exocad's Virtual Articulator
- Articulator A
- to scan the Artex Articulator and to use the same in Exocad's Virtual Articulator
- Articulator S
- to scan the Sam Articulator and to use the same in Exocad's Virtual Articulator
- Articulator P
- to scan the Kavo Articulator and to use the same in Exocad's Virtual Articulator
Model Type Box
Select which specific workflow to use:
- Sectioned Model
- default workflow, in which every element is acquired separately and all the information gets merged at the end
- Impression Scan
- if the Impression Scan Module is enabled in the license, check this option to scan an impression and not a stone model
- Quadrant Model
- if the Concept Quad Scan Module is enabled, it is possible to scan all the parts of a Quadrant Tray in just one step
- Unsectioned Model
- enable this option if the model to be scanned is not sectioned, the scanner will not require a separate scan for every die
Aqui a seguir um exemplo de um projeto de prótese definido para uma ponte de 3 elementos com um antagonista de gesso;
Projeto Multi Munhão
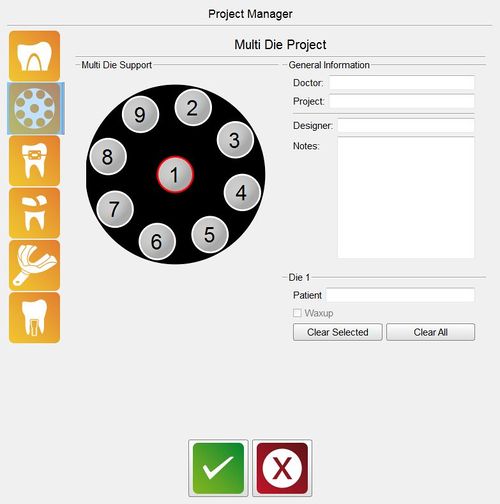
Use o Projeto Multi-Munhão para escanear diferentes munhões de diferentes pacientes em um único projeto:
Para definir o caso, clique em cada posição multi-munhão e defina o nome de cada paciente no campo Paciente .
To scan a Waxup for the selected stump, select the Waxup box.
Ortodôntico / PPR / Projeto Moldagem
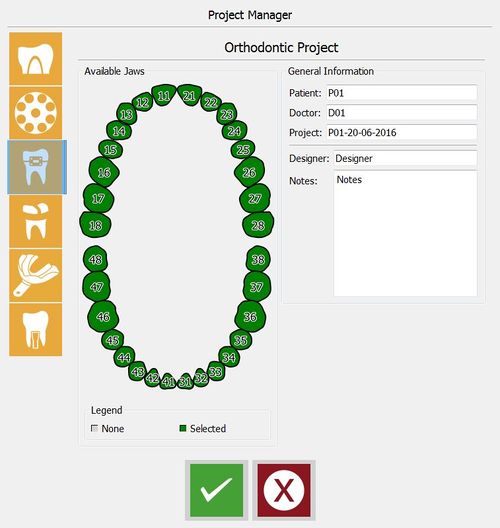
A Ortodontia, PPR e Projetos de Moldagem são simples e semelhantes entre si.
Esses projetos exigem que o usuário selecione as arcadas inteiras em vez de dentes individuais.
Quando a definição do projeto é confirmada, o software irá preparar o 'Arvore do Project' para adquirir os dados do scanner.
Editar Projeto
Se a definição do projeto precisa ser alterada enquanto já em uso, é possível selecionar a ferramenta 'Editar Projeto' no Menu Arquivo ou no Projeto Barra de Ferramentas (Veja Barra de ferramentas de suporte e de Menus).
Esta ferramenta irá abrir novamente o Gerente de Projeto com a definição do projeto atual. É possível alterar a definição do projeto e os parâmetros de cada dente.
Quando a edição for confirmada, o software irá adaptar o Projeto Arvore . Editar um projeto já escaneado, ou parcialmente escaneado, pode causar perda de dados.


