Difference between revisions of "Man ProjectCreation/ja"
(Created page with "すべての歯のタイプには、プロジェクト定義体系において特定の色が割り当てられています。") |
(Updating to match new version of source page) |
||
| (43 intermediate revisions by 2 users not shown) | |||
| Line 1: | Line 1: | ||
{{Language bar}} | {{Language bar}} | ||
{{DISPLAYTITLE:Project Creation|noerror}} | {{DISPLAYTITLE:Project Creation|noerror}} | ||
| − | = | + | =2、プロジェクト作成= |
ソフトウェアを直接起動する際、''Exocad DentalDB''など他のデータベースでプロジェクトが定義されていない場合、スキャンプロジェクトを定義する必要があります。 | ソフトウェアを直接起動する際、''Exocad DentalDB''など他のデータベースでプロジェクトが定義されていない場合、スキャンプロジェクトを定義する必要があります。 | ||
| Line 8: | Line 8: | ||
プロジェクトマネージャーでは、ダイアログ左側のバーにあるアイコンをクリックして、利用可能なプロジェクトタイプを選択できます。 | プロジェクトマネージャーでは、ダイアログ左側のバーにあるアイコンをクリックして、利用可能なプロジェクトタイプを選択できます。 | ||
| − | すべてのプロジェクトにおいて、'''General Information''' | + | すべてのプロジェクトにおいて、'''General Information''' (一般情報)を定義する必要があります。 |
* 患者ID (必須) | * 患者ID (必須) | ||
| Line 18: | Line 18: | ||
プロジェクトの定義が完了したら、ダイアログ下部の緑色のアイコンをクリックして確定します。ソフトウェアは'''構造プロジェクト'''を作成し、[[Wiz_Introduction|ステップバイステップウィザード]]を開始します。 | プロジェクトの定義が完了したら、ダイアログ下部の緑色のアイコンをクリックして確定します。ソフトウェアは'''構造プロジェクト'''を作成し、[[Wiz_Introduction|ステップバイステップウィザード]]を開始します。 | ||
| − | == | + | == 〇固定補綴プロジェクト == |
補綴アイコンをクリックして、プロジェクト定義を有効にします。 | 補綴アイコンをクリックして、プロジェクト定義を有効にします。 | ||
| Line 28: | Line 28: | ||
このプロジェクトには、'''General Information'''(一般情報)セクションの他に、2つの追加セクションがあります。 | このプロジェクトには、'''General Information'''(一般情報)セクションの他に、2つの追加セクションがあります。 | ||
| − | == | + | == 〇プロジェクト定義 == |
ウィンドウの中心部には歯型図があり、スキャンする個所を定義することができます。 | ウィンドウの中心部には歯型図があり、スキャンする個所を定義することができます。 | ||
| Line 36: | Line 36: | ||
{{Inline button|Key_shift.png}} を押しながら歯をクリックすると、最後の設定パラメータが、最後の歯と選択された歯の間のすべての歯にコピーされます。 | {{Inline button|Key_shift.png}} を押しながら歯をクリックすると、最後の設定パラメータが、最後の歯と選択された歯の間のすべての歯にコピーされます。 | ||
| − | == | + | == 〇歯の情報 == |
| − | 画面右下のセクションでは、選択した部品に対する''Tooth Type''(歯のタイプ)と''Others'' | + | 画面右下のセクションでは、選択した部品に対する''Tooth Type''(歯のタイプ)と''Others''(その他のオプション)を選択できます。 |
| − | + | 歯のタイプには、以下があります。 | |
| − | ; None(なし): | + | ; None(なし): この歯はプロジェクト対象外で、取得されず、無視することができます。 |
| − | ; Healthy(健全): | + | ; Healthy(健全): この歯は石膏模型の一部で、スキャン取得できます。 |
| − | ; Stump(スタンプ): | + | ; Stump(スタンプ): この歯は単独、またはマルチダイサポートで取得する必要がある可撤式歯型です。 |
| − | ; Pontic(ポンティック): | + | ; Pontic(ポンティック): 2つのスタンプの間の欠損歯で、ブリッジの中間部品となります。 |
| − | ; Implant(インプラント): | + | ; Implant(インプラント): この位置はインプラントとなり、スキャンボディが取得されます。 |
| − | ; Bite(バイト): | + | ; Bite(バイト): この歯は咬合バイトの部品です。 |
すべての歯のタイプには、プロジェクト定義体系において特定の色が割り当てられています。 | すべての歯のタイプには、プロジェクト定義体系において特定の色が割り当てられています。 | ||
| − | + | その他のオプションには、以下があります。 | |
| − | ; | + | ; Gingiva(歯肉): この部品は人工歯肉上にあり、石膏模型とは別に取得する必要があります。 |
| − | ; Pre-Op: | + | ; Pre-Op: この部品の構造は別途取得される追加模型の一部で、その後に参照石膏模型にアライメントされます。 |
| − | ; | + | ; Waxup(ワックスアップ): この歯の位置で、事前にモデリングされたワックスアップをスキャンすることができ、これは石膏模型の残りの部分とアライメントされます。 |
| − | === | + | === 〇追加パラメータ === |
| − | + | 一般情報セクションには、追加のパラメータがいくつかあります。 | |
| − | ==== | + | ==== ●Articulator(咬合器) ==== |
| − | + | 咬合器の中で模型をどのように保持するのか選択します。 | |
| − | ; Matching | + | ; Matching models(マッチング模型): ExocadのVirtual Articulatorの自動ポジショニングを使用する必要がない場合、咬合をスキャンします。 |
| − | ; Articulator A : | + | ; Articulator A : アーテックス咬合器をスキャンし、同じものをExocadのVirtual Articulatorで使用します。 |
| − | ; Articulator S : | + | ; Articulator S : SAM咬合器をスキャンし、同じものをExocadのVirtual Articulatorで使用します。 |
| − | ; Articulator P : | + | ; Articulator P : Kavo咬合器をスキャンし、同じものをExocadのVirtual Articulatorで使用します。 |
==== Model Type Box ==== | ==== Model Type Box ==== | ||
| Line 71: | Line 71: | ||
; Sectioned Model : default workflow, in which every element is acquired separately and all the information gets merged at the end | ; Sectioned Model : default workflow, in which every element is acquired separately and all the information gets merged at the end | ||
; Impression Scan : if the ''Impression Scan Module'' is enabled in the license, check this option to scan an impression and not a stone model | ; Impression Scan : if the ''Impression Scan Module'' is enabled in the license, check this option to scan an impression and not a stone model | ||
| − | ; | + | ; Quadrant Model : if the ''Concept Quad Scan Module'' is enabled, it is possible to scan all the parts of a Quadrant Tray in just one step |
; Unsectioned Model : enable this option if the model to be scanned is not sectioned, the scanner will not require a separate scan for every die | ; Unsectioned Model : enable this option if the model to be scanned is not sectioned, the scanner will not require a separate scan for every die | ||
| − | + | 以下は、定義済みの補綴プロジェクトの一例です。この例では、対咬歯を持つ3部品のブリッジのプロジェクトとなっています。 | |
{{Screenshot|Project definition.jpg}} | {{Screenshot|Project definition.jpg}} | ||
| − | == | + | == 〇マルチダイプロジェクト == |
| − | + | マルチダイプロジェクトを使い、異なる患者からの複数の歯型を、単一のプロジェクトでスキャンできます。 | |
| − | {{Screenshot| | + | {{Screenshot|Dental_3_5_projectCreation-multiDie.JPG}} |
| − | + | ケースを設定するには、マルチダイのそれぞれの場所をクリックして、''Patient''(患者)フィールドに各患者の名前を定義します。 | |
| − | + | To scan a Waxup for the selected stump, select the Waxup box. | |
| − | + | == 〇歯科矯正/Scheletric/印象プロジェクト == | |
| + | |||
| + | 歯科矯正、Scheletric、印象プロジェクトの場合は単純明快で、それぞれ同様の方法で行います。 | ||
{{Screenshot|Dental_2_5_projectCreation-orthodontic.jpg}} | {{Screenshot|Dental_2_5_projectCreation-orthodontic.jpg}} | ||
| − | + | これらのプロジェクトの場合、それぞれの歯ではなく、顎全体を選択する必要があります。 | |
| − | + | プロジェクト定義が確定されると、ソフトウェアは'''プロジェクトツリー'''を準備し、スキャナーからデータを取得します。 | |
| − | == | + | == 〇プロジェクト編集 == |
| − | + | 使用中にプロジェクト定義の変更が必要になった場合、'''プロジェクト編集''ツール(''ファイルメニュー''または''プロジェクトツールバー''からアクセス)で行うことができます。([[Support_Toolbars_And_Menus|サポートツールバーとメニュー]] のページを参照) | |
| − | + | このツールは、現在のプロジェクト定義を使って'''プロジェクトマネージャー'''を再度開きます。プロジェクトの定義およびすべての歯のパラメータを変更することができます。 | |
| − | + | 編集が完了したら、ソフトウェアは''プロジェクトツリー''に適用します。すでにスキャン済み、または一部がスキャンされているプロジェクトを編集すると、データを紛失することがあります。 | |
{{Navigation|Man_StartScreen|Man_Acquisition}} | {{Navigation|Man_StartScreen|Man_Acquisition}} | ||
Latest revision as of 13:42, 20 December 2016
Contents
2、プロジェクト作成
ソフトウェアを直接起動する際、Exocad DentalDBなど他のデータベースでプロジェクトが定義されていない場合、スキャンプロジェクトを定義する必要があります。
ソフトウェアにはProject Manager(プロジェクトマネージャー)ダイアログがあり、スキャンするアイテムに関するすべてのデータを収集し、 ステップバイステップウィザードの準備をします。
プロジェクトマネージャーでは、ダイアログ左側のバーにあるアイコンをクリックして、利用可能なプロジェクトタイプを選択できます。
すべてのプロジェクトにおいて、General Information (一般情報)を定義する必要があります。
- 患者ID (必須)
- ドクターID(任意)
- ディスクに保存するプロジェクト名。指定されない場合は、患者IDに基づいて自動的に生成されます
- デザイナーID(任意)
- メモ(任意)
プロジェクトの定義が完了したら、ダイアログ下部の緑色のアイコンをクリックして確定します。ソフトウェアは構造プロジェクトを作成し、ステップバイステップウィザードを開始します。
〇固定補綴プロジェクト
補綴アイコンをクリックして、プロジェクト定義を有効にします。
補綴セクションは最も複雑なセクションで、多くの部品の設定を行い、それぞれの歯を定義する必要があります。
このプロジェクトには、General Information(一般情報)セクションの他に、2つの追加セクションがあります。
〇プロジェクト定義
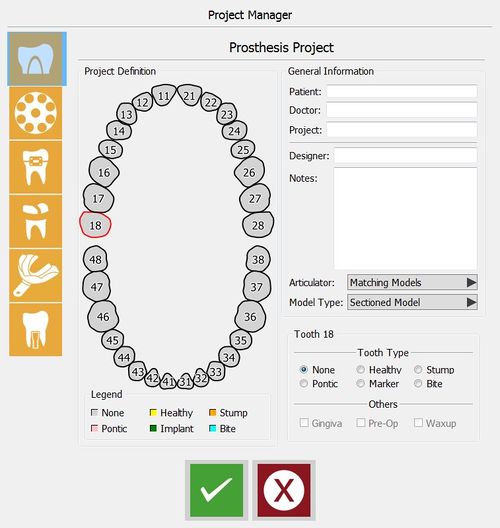
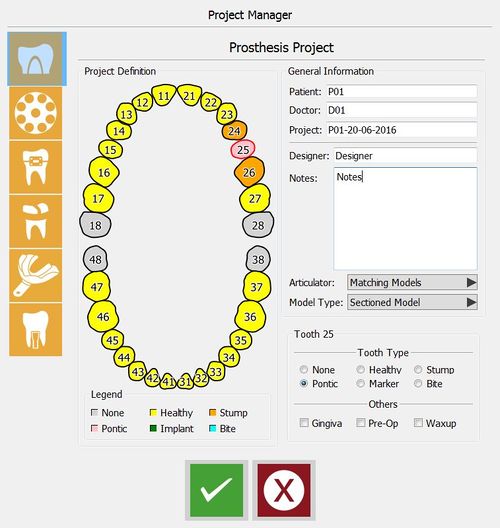
ウィンドウの中心部には歯型図があり、スキャンする個所を定義することができます。
![]() を押しながら歯をクリックすると、最後に選択されたアイテムが選択した歯へコピーされます。
を押しながら歯をクリックすると、最後に選択されたアイテムが選択した歯へコピーされます。
![]() を押しながら歯をクリックすると、最後の設定パラメータが、最後の歯と選択された歯の間のすべての歯にコピーされます。
を押しながら歯をクリックすると、最後の設定パラメータが、最後の歯と選択された歯の間のすべての歯にコピーされます。
〇歯の情報
画面右下のセクションでは、選択した部品に対するTooth Type(歯のタイプ)とOthers(その他のオプション)を選択できます。 歯のタイプには、以下があります。
- None(なし)
- この歯はプロジェクト対象外で、取得されず、無視することができます。
- Healthy(健全)
- この歯は石膏模型の一部で、スキャン取得できます。
- Stump(スタンプ)
- この歯は単独、またはマルチダイサポートで取得する必要がある可撤式歯型です。
- Pontic(ポンティック)
- 2つのスタンプの間の欠損歯で、ブリッジの中間部品となります。
- Implant(インプラント)
- この位置はインプラントとなり、スキャンボディが取得されます。
- Bite(バイト)
- この歯は咬合バイトの部品です。
すべての歯のタイプには、プロジェクト定義体系において特定の色が割り当てられています。
その他のオプションには、以下があります。
- Gingiva(歯肉)
- この部品は人工歯肉上にあり、石膏模型とは別に取得する必要があります。
- Pre-Op
- この部品の構造は別途取得される追加模型の一部で、その後に参照石膏模型にアライメントされます。
- Waxup(ワックスアップ)
- この歯の位置で、事前にモデリングされたワックスアップをスキャンすることができ、これは石膏模型の残りの部分とアライメントされます。
〇追加パラメータ
一般情報セクションには、追加のパラメータがいくつかあります。
●Articulator(咬合器)
咬合器の中で模型をどのように保持するのか選択します。
- Matching models(マッチング模型)
- ExocadのVirtual Articulatorの自動ポジショニングを使用する必要がない場合、咬合をスキャンします。
- Articulator A
- アーテックス咬合器をスキャンし、同じものをExocadのVirtual Articulatorで使用します。
- Articulator S
- SAM咬合器をスキャンし、同じものをExocadのVirtual Articulatorで使用します。
- Articulator P
- Kavo咬合器をスキャンし、同じものをExocadのVirtual Articulatorで使用します。
Model Type Box
Select which specific workflow to use:
- Sectioned Model
- default workflow, in which every element is acquired separately and all the information gets merged at the end
- Impression Scan
- if the Impression Scan Module is enabled in the license, check this option to scan an impression and not a stone model
- Quadrant Model
- if the Concept Quad Scan Module is enabled, it is possible to scan all the parts of a Quadrant Tray in just one step
- Unsectioned Model
- enable this option if the model to be scanned is not sectioned, the scanner will not require a separate scan for every die
以下は、定義済みの補綴プロジェクトの一例です。この例では、対咬歯を持つ3部品のブリッジのプロジェクトとなっています。
〇マルチダイプロジェクト
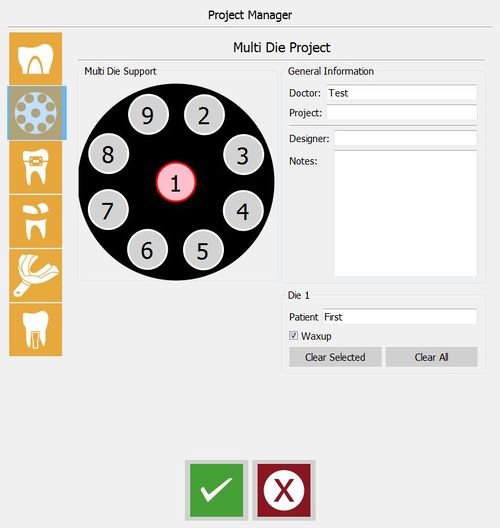
マルチダイプロジェクトを使い、異なる患者からの複数の歯型を、単一のプロジェクトでスキャンできます。
ケースを設定するには、マルチダイのそれぞれの場所をクリックして、Patient(患者)フィールドに各患者の名前を定義します。
To scan a Waxup for the selected stump, select the Waxup box.
〇歯科矯正/Scheletric/印象プロジェクト
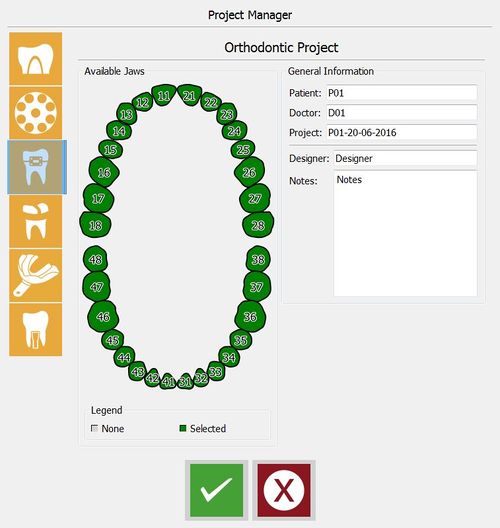
歯科矯正、Scheletric、印象プロジェクトの場合は単純明快で、それぞれ同様の方法で行います。
これらのプロジェクトの場合、それぞれの歯ではなく、顎全体を選択する必要があります。
プロジェクト定義が確定されると、ソフトウェアはプロジェクトツリーを準備し、スキャナーからデータを取得します。
〇プロジェクト編集
使用中にプロジェクト定義の変更が必要になった場合、'プロジェクト編集ツール(ファイルメニューまたはプロジェクトツールバーからアクセス)で行うことができます。(サポートツールバーとメニュー のページを参照)
このツールは、現在のプロジェクト定義を使ってプロジェクトマネージャーを再度開きます。プロジェクトの定義およびすべての歯のパラメータを変更することができます。
編集が完了したら、ソフトウェアはプロジェクトツリーに適用します。すでにスキャン済み、または一部がスキャンされているプロジェクトを編集すると、データを紛失することがあります。


