Difference between revisions of "Man ImplantAlign/ja"
(Created page with "この問題点を克服するために、インプラントコネクションは直接スキャンせず、代わりに'''インプラントマーカーまたはスキャン...") |
(Created page with "インプラントマーカー自体をスキャンするだけでは十分ではありません。結果として生成されるデータは、インプラントインター...") |
||
| Line 9: | Line 9: | ||
この問題点を克服するために、インプラントコネクションは直接スキャンせず、代わりに'''インプラントマーカーまたはスキャンボディ'''を使用します。スキャンボディは特殊なオブジェクトで、スキャンされるよう設計されており、インプラント上に完全にフィットします。 | この問題点を克服するために、インプラントコネクションは直接スキャンせず、代わりに'''インプラントマーカーまたはスキャンボディ'''を使用します。スキャンボディは特殊なオブジェクトで、スキャンされるよう設計されており、インプラント上に完全にフィットします。 | ||
| − | + | インプラントマーカー自体をスキャンするだけでは十分ではありません。結果として生成されるデータは、インプラントインターフェースの正確な位置を算出するために使用されます。この操作を実行するには、[[Implant_Library|インプラントライブラリー]]が必要となります。 | |
The alignment to the implant library can be performed in the CAD software. However, using an implant library for Exocad's Platform, the user can perform this operation directly in the scanning software OpticalRevEng Dental, in order to get better results. | The alignment to the implant library can be performed in the CAD software. However, using an implant library for Exocad's Platform, the user can perform this operation directly in the scanning software OpticalRevEng Dental, in order to get better results. | ||
Revision as of 09:23, 27 December 2015
マーカー取得
インプラントのプロジェクト用にデータを取得する際、インプラント自体を取得するのには問題があります。スタンプや石膏模型の一部を取得するのとは異なります。インプラントのコネクション/インターフェースは通常小さく、金属製です。
さらに、適合も機械的に完璧である必要があり、誤差は許されません。
この問題点を克服するために、インプラントコネクションは直接スキャンせず、代わりにインプラントマーカーまたはスキャンボディを使用します。スキャンボディは特殊なオブジェクトで、スキャンされるよう設計されており、インプラント上に完全にフィットします。
インプラントマーカー自体をスキャンするだけでは十分ではありません。結果として生成されるデータは、インプラントインターフェースの正確な位置を算出するために使用されます。この操作を実行するには、インプラントライブラリーが必要となります。
The alignment to the implant library can be performed in the CAD software. However, using an implant library for Exocad's Platform, the user can perform this operation directly in the scanning software OpticalRevEng Dental, in order to get better results.
Implant Selection
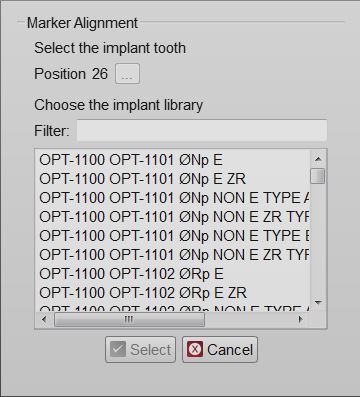
After the mesh generation, by selecting the mesh of an implant marker from the project tree, the Marker Alignment button will appear in the Main Toolbar. Click on this button to open the Implant Selection dialog.
In this Dialog there are:
- A tooth position selection (the button with three dots ...) that can be used only in Free Mode to select the tooth position of an implant
- An implant list with all the implants available in the current Implant Library
- A Filter box where it is possible to write part of the name of the needed implant. All the implants that match the name will be showed in the implant list
Select the implant to be used and click the Select Button.
Attention while choosing the right implant from the library. Many implant libraries have different versions of every implant connection. For example:
- Engaging Connections : the connection can not rotate on the implant, suggested for abutments or single restorations
- Not-Engaging Connections : the connection can rotate on the implant, suggested for bars and bridges
- For Zirconia : connections with specific shapes, suited for zirconia restorations
If the wrong implant is selected, it is possible to repeat the procedure to replace the old aligned connection with a new one.
If the CAD design is launched using a wrong connection it will be necessary to restart all the design from the beginning
Marker Alignment
When selecting the implant connection, the software will start the Manual Alignment mode.
The acquired marker mesh will need to be aligned to the library marker shape. From this data the connection position will be computed.
This procedure has to be performed for every marker of the project. The CAD Export will issue a warning if one or more marker alignments are missing.


