Difference between revisions of "Dental Service Tools/pt-br"
(Updating to match new version of source page) |
(Updating to match new version of source page) |
||
| Line 1: | Line 1: | ||
{{Language bar}} | {{Language bar}} | ||
| − | {{DISPLAYTITLE:Dental Service | + | {{DISPLAYTITLE:Dental Service Mode|noerror}} |
| − | + | __TOC__ | |
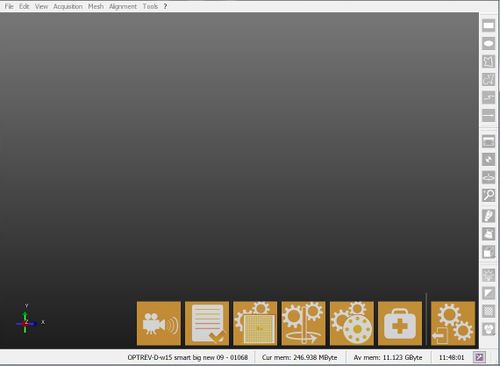
| − | OpticalRevEng Dental | + | OpticalRevEng Dental offers a Service Mode that can be started from the [[Support_Toolbars_And_Menus#Tools|Tools Menu]], to recalibrate and diagnose any issue that might occur. |
| + | |||
| + | {{Screenshot|Service-mode.jpg}} | ||
| + | |||
| + | == Live Mode == | ||
| + | |||
| + | With this tool you can check what the scanner cameras are seeing. | ||
| + | |||
| + | You can start this tool with this {{Inline button|ActionLiveCameraParams.svg}} button; | ||
| + | |||
| + | == Check Scanner == | ||
| + | |||
| + | The software will check the scanner connection every time it starts. | ||
| + | |||
| + | With this tool {{Inline button|actionCheckScannerHardware.svg}} you can do this check manually. | ||
==Cabeça de recalibração== | ==Cabeça de recalibração== | ||
| + | |||
| + | You can start this tool clicking this {{Inline button|actionRecalibrateHead.svg}} button; | ||
| + | |||
| + | There are 2 types of calibration: | ||
| + | ; Recalibration : Fast procedure useful to do periodically or if the scanner is moved | ||
| + | ; Full Calibration : More complex procedure useful if the scanner is returning from a mechanical repair | ||
Esta ferramenta utiliza o [[Acessórios|Kit de Calibração]] para realizar uma nova calibração da cabeça óptica do scanner. O procedimento é o seguinte: | Esta ferramenta utiliza o [[Acessórios|Kit de Calibração]] para realizar uma nova calibração da cabeça óptica do scanner. O procedimento é o seguinte: | ||
| − | # | + | #Put the calibration kit inside the scanner in the correct position |
| − | # | + | #Select the calibration type from the drop-down menu |
| − | # | + | #In the calibration dialog, select from the drop down menu the exact calibration kit name |
| − | # | + | #Click '''Start''' |
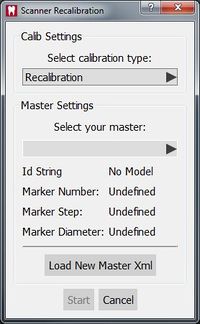
Se o nome do kit de calibração não está disponível no sub-menu , o botão '''Carregar Novo Master Xml'''pode ser usado para adicionar um novo kit de calibração a partir do arquivo de descrição XML apropriado. | Se o nome do kit de calibração não está disponível no sub-menu , o botão '''Carregar Novo Master Xml'''pode ser usado para adicionar um novo kit de calibração a partir do arquivo de descrição XML apropriado. | ||
| − | {{Small image| | + | {{Small image|Calib-dlg.jpg}} |
| − | + | The calibration procedure is automatic. Once finished, the software will show one of the following messages: | |
| − | *' | + | *'Scanner Already Calibrated' : the calibration is not necessary |
| − | *' | + | *'Scanner Recalibrated Successfully' : the calibration has been completed |
| − | *' | + | *'Scanner Recalibration Failed' : calibration has to be repeated |
Se a calibração foi bem-sucedida, a '''Calibração dos Eixos''' é iniciada automaticamente. | Se a calibração foi bem-sucedida, a '''Calibração dos Eixos''' é iniciada automaticamente. | ||
| Line 30: | Line 50: | ||
Esta ferramenta é usada para verificar o sistema de movimento do escaner. O escaner irá digitalizar um objeto, analisá-lo, e usar esses dados para calibrar o sistema de movimento. | Esta ferramenta é usada para verificar o sistema de movimento do escaner. O escaner irá digitalizar um objeto, analisá-lo, e usar esses dados para calibrar o sistema de movimento. | ||
| − | + | This tool will start automatically after a '''Head Recalibration''' or can be started manually with the {{Inline button|actionDirectAxesCalib.svg}} button. | |
| + | |||
| + | {{Important|When the '''Dynamic Articulation Module''' is enabled, calibrate the axis with the specific [[Accessories|Axis Calibration Object]]. From that moment on, any recalibration needs to be performed with the same object. Otherwise, axis recalibration will fail.}} | ||
| − | # | + | # Put the calibration object inside the scanner |
| − | # | + | # Click '''Recalibrate Axis''' |
| − | # | + | # Click '''Ok''' when prompted |
O procedimento de calibração é automática. Uma vez que é terminado, o software irá mostrar uma das seguintes mensagens: | O procedimento de calibração é automática. Uma vez que é terminado, o software irá mostrar uma das seguintes mensagens: | ||
| − | *' | + | *'Axis Recalibration Successfull' : the calibration has been completed |
| − | *' | + | *'Axis Recalibration Failed' : calibration has to be repeated |
==Parâmetros Auto Ajuste Multi-Munhão == | ==Parâmetros Auto Ajuste Multi-Munhão == | ||
| Line 45: | Line 67: | ||
Esta ferramenta é usada para calibrar o suporte Multi-Munhão. Se as aquisições realizadas com o Multi-Munhão não são reconhecidas corretamente, o procedimento de calibração é o seguinte: | Esta ferramenta é usada para calibrar o suporte Multi-Munhão. Se as aquisições realizadas com o Multi-Munhão não são reconhecidas corretamente, o procedimento de calibração é o seguinte: | ||
| − | # | + | # Clean the multi-die from excessive material or white powder, every single die position needs to be clearly separated from the others |
| − | # | + | # Put the empty multi-die support inside the scanner |
| − | # | + | # Start the tool with this {{Inline button|ActionAutoSetUpMultiDieParameters.svg }} button |
| − | # | + | # Click '''Ok''' when prompted |
==Aquisição de Diagnóstico== | ==Aquisição de Diagnóstico== | ||
| − | + | When doubting the proper functioning of the scanner, this tool carries out a specific acquisition of the object currently inside the scanner. | |
| + | |||
| + | The software then saves all the information in a "*.diag" file that can be sent to the OpticalRevEng Dental support to diagnose possible issues. | ||
| + | |||
| + | To start this tool click this {{Inline button|actionDiagnosticAcquisition.svg}} button. | ||
{{Navigation|Dental_Options_Interactor|Main Page}} | {{Navigation|Dental_Options_Interactor|Main Page}} | ||
Revision as of 11:36, 2 December 2015
Contents
OpticalRevEng Dental offers a Service Mode that can be started from the Tools Menu, to recalibrate and diagnose any issue that might occur.
Live Mode
With this tool you can check what the scanner cameras are seeing.
You can start this tool with this button;
Check Scanner
The software will check the scanner connection every time it starts.
With this tool you can do this check manually.
Cabeça de recalibração
You can start this tool clicking this button;
There are 2 types of calibration:
- Recalibration
- Fast procedure useful to do periodically or if the scanner is moved
- Full Calibration
- More complex procedure useful if the scanner is returning from a mechanical repair
Esta ferramenta utiliza o Kit de Calibração para realizar uma nova calibração da cabeça óptica do scanner. O procedimento é o seguinte:
- Put the calibration kit inside the scanner in the correct position
- Select the calibration type from the drop-down menu
- In the calibration dialog, select from the drop down menu the exact calibration kit name
- Click Start
Se o nome do kit de calibração não está disponível no sub-menu , o botão Carregar Novo Master Xmlpode ser usado para adicionar um novo kit de calibração a partir do arquivo de descrição XML apropriado.
The calibration procedure is automatic. Once finished, the software will show one of the following messages:
- 'Scanner Already Calibrated' : the calibration is not necessary
- 'Scanner Recalibrated Successfully' : the calibration has been completed
- 'Scanner Recalibration Failed' : calibration has to be repeated
Se a calibração foi bem-sucedida, a Calibração dos Eixos é iniciada automaticamente.
Recalibração dos Eixos
Esta ferramenta é usada para verificar o sistema de movimento do escaner. O escaner irá digitalizar um objeto, analisá-lo, e usar esses dados para calibrar o sistema de movimento.
This tool will start automatically after a Head Recalibration or can be started manually with the button.
- Put the calibration object inside the scanner
- Click Recalibrate Axis
- Click Ok when prompted
O procedimento de calibração é automática. Uma vez que é terminado, o software irá mostrar uma das seguintes mensagens:
- 'Axis Recalibration Successfull' : the calibration has been completed
- 'Axis Recalibration Failed' : calibration has to be repeated
Parâmetros Auto Ajuste Multi-Munhão
Esta ferramenta é usada para calibrar o suporte Multi-Munhão. Se as aquisições realizadas com o Multi-Munhão não são reconhecidas corretamente, o procedimento de calibração é o seguinte:
- Clean the multi-die from excessive material or white powder, every single die position needs to be clearly separated from the others
- Put the empty multi-die support inside the scanner
- Start the tool with this
button
- Click Ok when prompted
Aquisição de Diagnóstico
When doubting the proper functioning of the scanner, this tool carries out a specific acquisition of the object currently inside the scanner.
The software then saves all the information in a "*.diag" file that can be sent to the OpticalRevEng Dental support to diagnose possible issues.


