Step-By-Step Wizard

From Open Tech Dental Wiki 4.0
Revision as of 12:35, 29 December 2015 by Meinan (talk | contribs) (Created page with "ウィザードステップの順序は、各プロジェクトによって異なります。基本的な考え方は以下のとおりです:")
Jump to: navigation, search


ステップバイステップウィザード

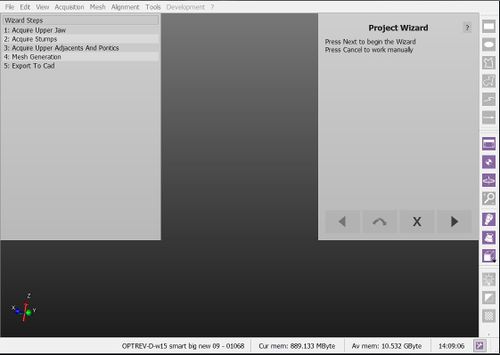
構造プロジェクトで作業する場合、このスキャニングソフトウェアでは、最初のスキャナー取得からデータのエクスポートまで、ユーザーをガイドするウィザードを利用できます。

ウィザードのインターフェース

ウィザードモードを起動すると、ソフトウェアのインターフェースが変わります:

  • メインツールバーが消えます
  • プロジェクトツリーの代わりに、ウィザードステップリストが表示され、完了済みのステップと次のステップを確認できます。
  • アプリケーションの右上には、ユーザーをガイドするウィザードがあり、4つのボタンのみで操作できます
    1. Dental 2 5 wiz prev.png : 前のウィザードステップに戻る
    2. Dental 2 5 wiz skip.png : 現在のステップをスキップする
    3. Dental 2 5 wiz quit.png : ステップバイステップウィザードを閉じ、手動で作業を続ける
    4. Dental 2 5 wiz next.png : 現在のステップを確定し、次のステップへ進む

ウィザードの全ステップにおいて、その他すべてのツールはロックされます。ソフトウェアとの対話は、すべて画面右上にあるウィザードパネルで行われます

Dental 2 5 wizStart.jpg

ウィザードの順序

ウィザードステップの順序は、各プロジェクトによって異なります。基本的な考え方は以下のとおりです:

  1. Acquire all the required data from the scanner
  2. After every single acquisiton:
    1. Clean the acquisition from the support holder and duplicated data
    2. Align the acquisition to the rest of the project and check the alignment if needed
  3. Check that all the information is correctly aligned
  4. Generate the needed meshes
  5. Align the implants
  6. Export to the CAD
Dental 2 5 wiz prev.png Homebutton.png Dental 2 5 wiz next.png