Marker Alignment
Achiziție Marker
La obținerea datelor pentru un proiect pe implanturi, achizitia implantului în sine este problematică. Nu este ca un bont sau un model. Legăturile / interfețele implantului sunt, în mod normal, mici și metalice.
Mai mult, montarea trebuie să fie perfect mecanică, fără nici o marjă de eroare.
Pentru a rezolva această problemă, conexiunea implantului nu este scanată direct, dar se folosește un marker de implant sau un corp de scanare . Un corp de scanare este un obiect specific, proiectat să fie scanat, care se potrivește exact asupra implantului.
The scan of the implant marker itself is not enough: its resulting data will be used to compute the exact position of the implant interface. In order to carry out this operation, an Implant Library is needed .
The alignment to the implant library can be performed in the CAD software. However, using an implant library for Exocad's Platform, the user can perform this operation directly in the scanning software OpticalRevEng Dental, in order to get better results.
Implant Selection
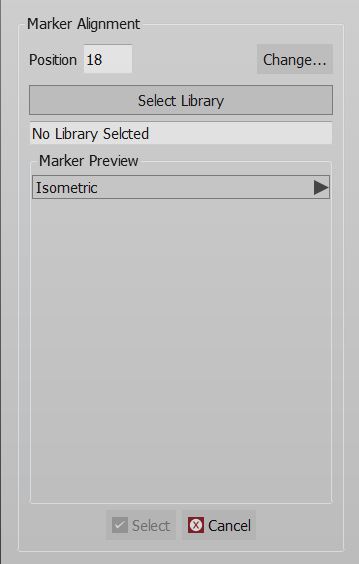
After the mesh generation, by selecting the mesh of an implant marker from the project tree, the Marker Alignment button will appear in the Main Toolbar. Click on this button to open the Implant Selection dialog.
In this Dialog there are:
- A tooth position selection (Change ...) that can be used only in Free Mode to select the tooth position of an implant
- A Select Library button, that opens the Library Selection Panel
- A Marker Preview menu that, once the appropriate connection has been selected for the current element, will show the STL of the marker present in the library. It is possible to choose different views to check the Merker's shape
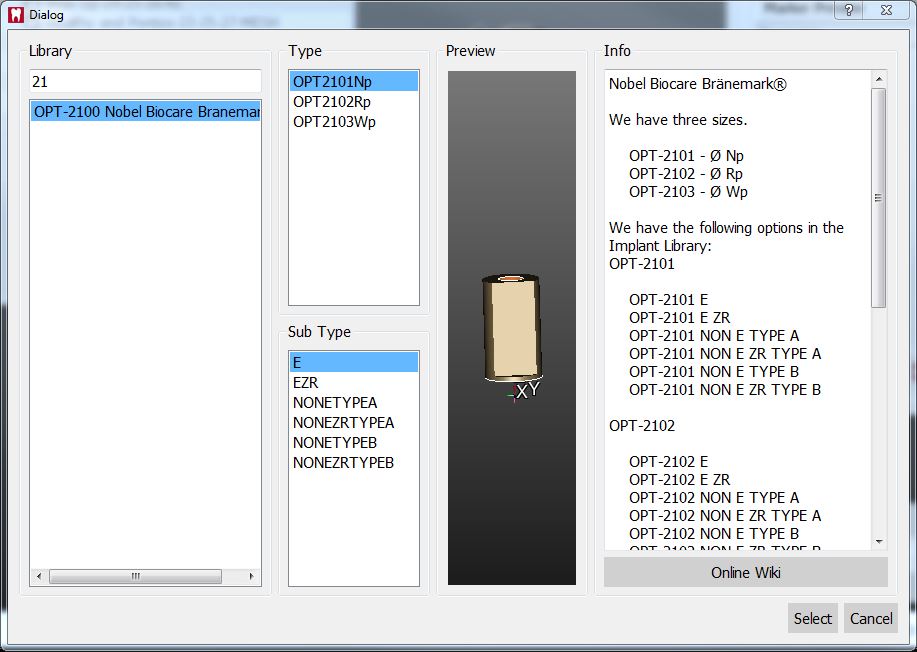
To continue with the Marker selection click on the Select Library Button. The Implant Selection Panel will open. The Panel is divided in 4 Sections
Library
For choosing the general connection and implant family, contains:
- A Filter box where it is possible to write part of the name of the needed implant. All the implants that match the name will be showed in the implant list
- An implant list with all the implants available in the current Implant Library
Type and Sub Type
For Choosing the diameter and type of connection. There can be many of these types, in our libraries for instance there are:
- Engaging Connections : the connection can not rotate on the implant, suggested for abutments or single restorations
- Not-Engaging Connections : the connection can rotate on the implant, suggested for bars and bridges
- For Zirconia : connections with specific shapes, suited for zirconia restorations
Preview
Shows the preview of the STL marker present in the library
Info
If the library is correctly configured to work with our software, in this section it is possible to have a small overview of the libraries with additional information on the availabe diameters and implant types. All our libraries are provided with this feature and, being connected to this wiki, the Open in browser button opens the wiki on the implant list page.
To accept the implant selection click on Select, otherwise Cancel.
If the wrong implant is selected, it is possible to repeat the procedure to replace the old aligned connection with a new one.
If the CAD design is launched using a wrong connection it will be necessary to restart all the design from the beginning
Marker Alignment
When selecting the implant connection, the software will start the Manual Alignment mode.
The acquired marker mesh will need to be aligned to the library marker shape. From this data the connection position will be computed.
This procedure has to be performed for every marker of the project. The CAD Export will issue a warning if one or more marker alignments are missing.


