Project Creation
Contents
Projet
Lorsqu’on démarre le logiciel il faut définir le projet de Numérisation, si le projet n’a pas été défini avec une base de donnés externe comme DentalDB d'Exocad
Le logiciel a une fenêtre de Définition du Projet ou on peut insérer toutes les informations nécessaires à la numérisation. Le type d’information définit ensuite l' Assistant.
Pendant la définition on peut sélectionner l’un des types de projet disponibles en cliquant sur les icones dans la barre à gauche de la fenêtre.
Tous types de projet ont besoin des Informations Générales
- Le nom du patient (obligatoire)
- Le nom du médecin (optionnel)
- Un nom du projet pour le sauvegarder. S’il n’est pas choisi, le nom est créé automatiquement selon le nom du patient
- Le nome du technicien (Optionnel)
- Des notes (Optionnelles)
Cliquer sur l’icône verte dans la partie en bas de la fenêtre pour confirmer la définition du projet. Le logiciel crée un Projet Structurée et on démarre l’Assistant.
Projet Prothèse
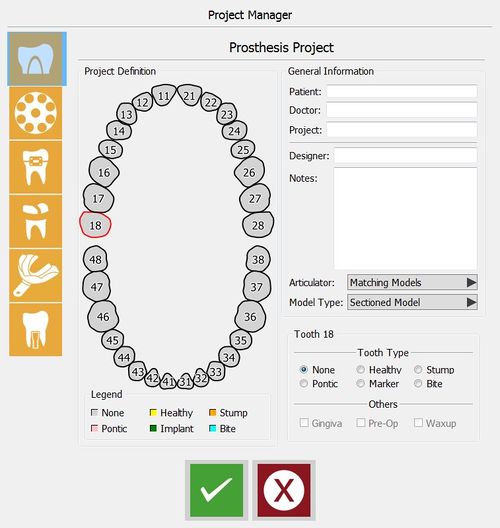
Cliquer sur l’icône pour habiliter la définition d’un Projet Prothèse
La section de Prothèse est la plus complexe parce que on peut insérer un nombre d’informations plus élevé que pour les autres types de projet. Pour cette raison il est nécessaire de définir une dent à la fois.
Le projet a aussi deux autres sectionnes:
Définition du Projet
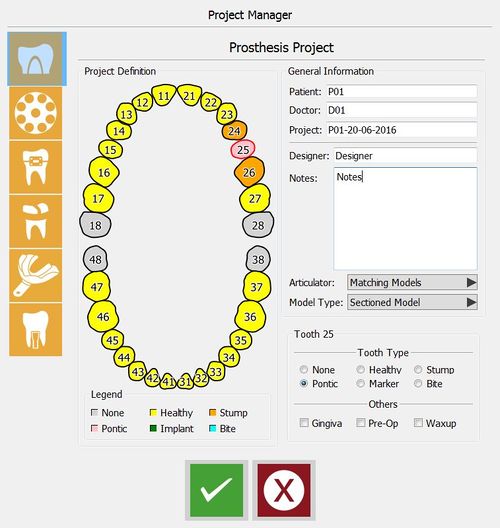
La partie plus grande de la fenêtre a un odontogramme qui permet de définir les éléments à numériser
Pour copier le type d’élément et ses paramètres à une dent différente il faut cliquer sur le nombre correspondant en appuyant ![]()
Pour copier le type d’élément et ses paramètres à une séquence de dents il faut cliquer sur le nombre correspondant en appuyant ![]()
Informations d’Elément
On peut sélectionner le Type de Dent et des Autres Informations pour chaque élément dans la partie en bas à droite. Les types disponibles sont les suivants :
- Aucunː la dent n’est pas partie du projet et elle n’est pas à numériser
- Sainː la dent fait partie du projet et elle sera numérisée avec des autres parties du modèle
- Moignonːla dent est un moignon déplaçable et elle sera numérisée individuellement ou sur le support Multi Die
- Intermédiaireː une dent manquante entre les deux moignons qui va devenir l’élément intermédiaire d’un pont
- Scan Bodyː il y a un implant et on va avoir un scan body pour lire l’information
- Morduː une dent qui fait partie du mordu occlusal
Dans le schème de définition du projet chaque dent a une couleur différente
Des autres options disponibles sont les suivantes :
- Gencives
- l’élément se trouve sur une gencive artificielle qui va être numérisée séparément
- Provisoire
- l’anatomie de l’élément est part d’un modèle diffèrent qui va être numérisé séparément et puis aligné au model en plâtre de référence
- Cirage
- il est possible de numériser un cirage pre-modelé qui va être aligné au modèle en plâtre de référence
Paramètres Adjonctifs
In the general information section, there are some additional parameters:
Articulator Box
Select how the models are kept in articulation:
- Matching models
- to scan the occlusion if there is no need to use the automatic positioning in Exocad's Virtual Articulator
- Articulator A
- to scan the Artex Articulator and to use the same in Exocad's Virtual Articulator
- Articulator S
- to scan the Sam Articulator and to use the same in Exocad's Virtual Articulator
- Articulator P
- to scan the Kavo Articulator and to use the same in Exocad's Virtual Articulator
Model Type Box
Select which specific workflow to use:
- Sectioned Model
- default workflow, in which every element is acquired separately and all the information gets merged at the end
- Impression Scan
- if the Impression Scan Module is enabled in the license, check this option to scan an impression and not a stone model
- All In One
- if the All In One Scan Module is enabled, it is possible to scan all the parts of a Quadrant Trye in just one step
- Unsectioned Model
- enable this option if the model to be scanned is not sectioned, the scanner will not require a separate scan for every die
Here below an example of a defined prosthesis project for a 3-elements bridge with a stone antagonist:
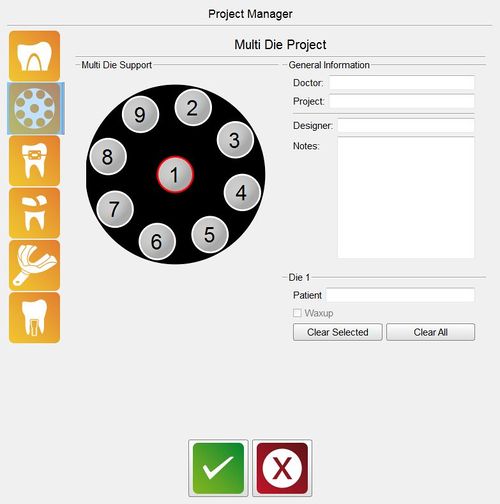
Multi-Die Project
Use the Multi-Die Project to scan different dies from different patients in one single project:
To set the case, click on each multi-die position and define the name of each patient in the Patient field.
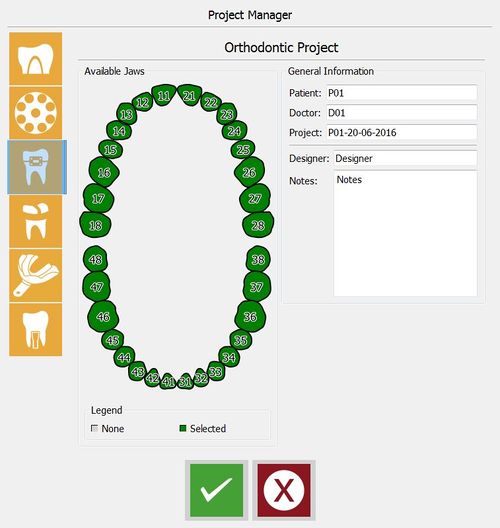
Orthodontic/Scheletric/Impression Project
The Orthodontic, Scheletric and Impression Projects are straightforward and similar to one another.
These projects require the user to select the whole jaws instead of individual teeth.
When the project definition is confirmed, the software will prepare the Project Tree to acquire the data from the scanner.
Project Editing
If the project definition needs to be changed while already in use, it is possible to select the Edit Project tool in the File Menu or in the Project Toolbar (See Support Toolbars And Menus).
This tool will open again the Project Manager with the current project definition. It is possible to change the project definition and the parameters of every tooth.
When the editing is confirmed, the software will adapt the Project Tree. Editing an already scanned, or partially scanned, project can cause data loss.


