Marker Alignment
標記對齊
當為一個種植體專案採集數據,採集種植體本身是有問題的.它不象基牙或部份代型模式.種植體連接/接口通常很小並且是金屬
此外,該接頭具有機械地完善,沒有誤差的邊緣。
為了解決這個問題,種植體連接不直接掃描而是用 種植體標記或掃描桿代替它使用.一個掃描桿是一個特定物件,設計成被掃描,恰好適合種植體.
種植體標記本身的掃描是不夠的:其產生的數據將被用來計算種植體界面的精確位置.為了進行這項操作植體資料庫 是必須的
植體庫中的對準可以在CAD軟體中被執行.然而,為了得到更好的結果,用戶可以直接執行此操作在使用Exocad平台植體庫的掃描軟件OpticalRevEng Dental上,
植體選擇
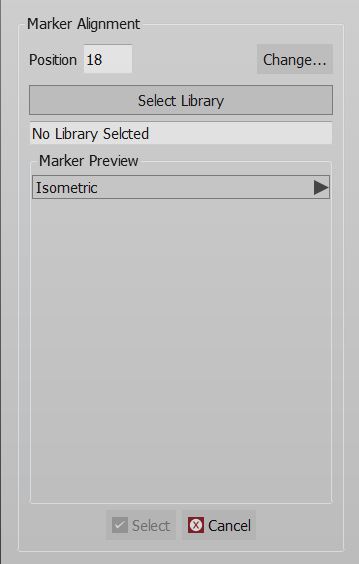
網格步驟後,從專案樹狀圖中選擇植體標記的網格."標記對齊"按鈕會出現在 主工具列. 點擊此按鈕打開"選擇種植體"對話框.
在這個對話框有:
- A tooth position selection (Change ...) that can be used only in Free Mode to select the tooth position of an implant
- A Select Library button, that opens the Library Selection Panel
- A Marker Preview menu that, once the appropriate connection has been selected for the current element, will show the STL of the marker present in the library. It is possible to choose different views to check the Merker's shape
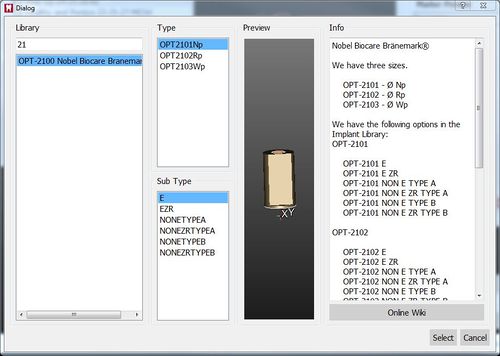
To continue with the Marker selection click on the Select Library Button. The Implant Selection Panel will open. The Panel is divided in 4 Sections
Library
For choosing the general connection and implant family, contains:
- A Filter box where it is possible to write part of the name of the needed implant. All the implants that match the name will be showed in the implant list
- An implant list with all the implants available in the current Implant Library
Type and Sub Type
For Choosing the diameter and type of connection. There can be many of these types, in our libraries for instance there are:
- Engaging Connections : the connection can not rotate on the implant, suggested for abutments or single restorations
- Not-Engaging Connections : the connection can rotate on the implant, suggested for bars and bridges
- For Zirconia : connections with specific shapes, suited for zirconia restorations
Preview
Shows the preview of the STL marker present in the library
Info
If the library is correctly configured to work with our software, in this section it is possible to have a small overview of the libraries with additional information on the availabe diameters and implant types. All our libraries are provided with this feature and, being connected to this wiki, the Open in browser button opens the wiki on the implant list page.
To accept the implant selection click on Select, otherwise Cancel.
If the wrong implant is selected, it is possible to repeat the procedure to replace the old aligned connection with a new one.
If the CAD design is launched using a wrong connection it will be necessary to restart all the design from the beginning
Marker Alignment
When selecting the implant connection, the software will start the Manual Alignment mode.
The acquired marker mesh will need to be aligned to the library marker shape. From this data the connection position will be computed.
This procedure has to be performed for every marker of the project. The CAD Export will issue a warning if one or more marker alignments are missing.


