Difference between revisions of "Dental Service Tools"
(Aggiornamento a 3.0 (Nuova organizzazione service mode)) |
(Marked this version for translation) |
||
| Line 5: | Line 5: | ||
__TOC__ | __TOC__ | ||
| + | <!--T:22--> | ||
OpticalRevEng Dental offers a Service Mode that can be started from the [[Support_Toolbars_And_Menus#Tools|Tools Menu]], to recalibrate and diagnose any issue that might occur. | OpticalRevEng Dental offers a Service Mode that can be started from the [[Support_Toolbars_And_Menus#Tools|Tools Menu]], to recalibrate and diagnose any issue that might occur. | ||
| + | <!--T:23--> | ||
{{Screenshot|Service-mode.jpg}} | {{Screenshot|Service-mode.jpg}} | ||
| − | == Live Mode == | + | == Live Mode == <!--T:24--> |
| + | <!--T:25--> | ||
With this tool you can check what the scanner cameras are seeing. | With this tool you can check what the scanner cameras are seeing. | ||
| + | <!--T:26--> | ||
You can start this tool with this {{Inline button|ActionLiveCameraParams.svg}} button; | You can start this tool with this {{Inline button|ActionLiveCameraParams.svg}} button; | ||
| − | == Check Scanner == | + | == Check Scanner == <!--T:27--> |
| + | <!--T:28--> | ||
The software will check the scanner connection every time it starts. | The software will check the scanner connection every time it starts. | ||
| + | <!--T:29--> | ||
With this tool {{Inline button|actionCheckScannerHardware.svg}} you can do this check manually. | With this tool {{Inline button|actionCheckScannerHardware.svg}} you can do this check manually. | ||
== Recalibrate Head== <!--T:3--> | == Recalibrate Head== <!--T:3--> | ||
| + | <!--T:30--> | ||
You can start this tool clicking this {{Inline button|actionRecalibrateHead.svg}} button; | You can start this tool clicking this {{Inline button|actionRecalibrateHead.svg}} button; | ||
| + | <!--T:31--> | ||
There are 2 types of calibration: | There are 2 types of calibration: | ||
; Recalibration : Fast procedure useful to do periodically or if the scanner is moved | ; Recalibration : Fast procedure useful to do periodically or if the scanner is moved | ||
| Line 60: | Line 68: | ||
This tool is used to check the movement system of the scanner. The scanner will scan an object, analyze it, and use this data to calibrate the movement system. | This tool is used to check the movement system of the scanner. The scanner will scan an object, analyze it, and use this data to calibrate the movement system. | ||
| + | <!--T:32--> | ||
This tool will start automatically after a '''Head Recalibration''' or can be started manually with the {{Inline button|actionDirectAxesCalib.svg}} button. | This tool will start automatically after a '''Head Recalibration''' or can be started manually with the {{Inline button|actionDirectAxesCalib.svg}} button. | ||
| Line 93: | Line 102: | ||
When doubting the proper functioning of the scanner, this tool carries out a specific acquisition of the object currently inside the scanner. | When doubting the proper functioning of the scanner, this tool carries out a specific acquisition of the object currently inside the scanner. | ||
| + | <!--T:33--> | ||
The software then saves all the information in a "*.diag" file that can be sent to the OpticalRevEng Dental support to diagnose possible issues. | The software then saves all the information in a "*.diag" file that can be sent to the OpticalRevEng Dental support to diagnose possible issues. | ||
| + | <!--T:34--> | ||
To start this tool click this {{Inline button|actionDiagnosticAcquisition.svg}} button. | To start this tool click this {{Inline button|actionDiagnosticAcquisition.svg}} button. | ||
</translate> | </translate> | ||
{{Navigation|Dental_Options_Interactor|Main Page}} | {{Navigation|Dental_Options_Interactor|Main Page}} | ||
Revision as of 21:52, 1 December 2015
Contents
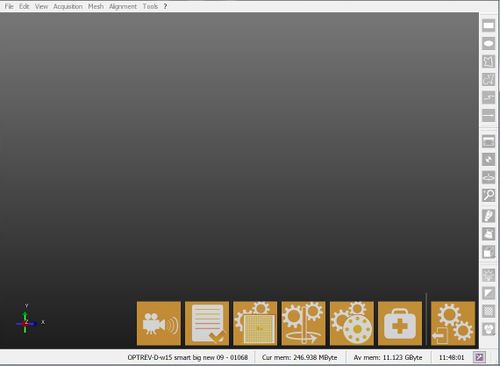
OpticalRevEng Dental offers a Service Mode that can be started from the Tools Menu, to recalibrate and diagnose any issue that might occur.
Live Mode
With this tool you can check what the scanner cameras are seeing.
You can start this tool with this button;
Check Scanner
The software will check the scanner connection every time it starts.
With this tool you can do this check manually.
Recalibrate Head
You can start this tool clicking this button;
There are 2 types of calibration:
- Recalibration
- Fast procedure useful to do periodically or if the scanner is moved
- Full Calibration
- More complex procedure useful if the scanner is returning from a mechanical repair
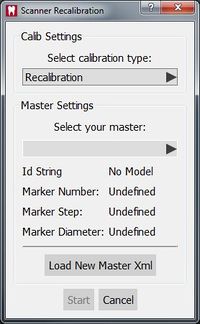
This tool uses the Calibration Kit to carry out a new calibration of the Optical Head of the scanner. The procedure is the following:
- Put the calibration kit inside the scanner in the correct position
- Select the calibration type from the drop-down menu
- In the calibration dialog, select from the drop down menu the exact calibration kit name
- Click Start
If the calibration kit name is not available in the drop down menu, the Load New Master Xml button can be used to add a new calibration kit from the appropriate Xml description file.
The calibration procedure is automatic. Once finished, the software will show one of the following messages:
- 'Scanner Already Calibrated' : the calibration is not necessary
- 'Scanner Recalibrated Successfully' : the calibration has been completed
- 'Scanner Recalibration Failed' : calibration has to be repeated
If the calibration was successful, the Axes Calibration starts automatically.
Recalibrate Axis
This tool is used to check the movement system of the scanner. The scanner will scan an object, analyze it, and use this data to calibrate the movement system.
This tool will start automatically after a Head Recalibration or can be started manually with the button.
- Put the calibration object inside the scanner
- Click Recalibrate Axis
- Click Ok when prompted
The calibration procedure is automatic. Once it is finished, the software will show one of the following messages:
- 'Axis Recalibration Successfull' : the calibration has been completed
- 'Axis Recalibration Failed' : calibration has to be repeated
Auto Set-Up Multi-Die Parameters
This tool is used to calibrate the Multi-Die support. If the acquisitions carried out with the Multi-Die are not correctly recognized, the calibration procedure is the following:
- Clean the multi-die from excessive material or white powder, every single die position needs to be clearly separated from the others
- Put the empty multi-die support inside the scanner
- Start the tool with this
button
- Click Ok when prompted
Diagnostic Acquisition
When doubting the proper functioning of the scanner, this tool carries out a specific acquisition of the object currently inside the scanner.
The software then saves all the information in a "*.diag" file that can be sent to the OpticalRevEng Dental support to diagnose possible issues.


