Difference between revisions of "Man ImplantAlign/es"
| Line 22: | Line 22: | ||
En este Diálogo se encuentran: | En este Diálogo se encuentran: | ||
| − | # | + | # Una opción para seleccionar la posición del implante(Change...) que puede ser utilizada sólo en [[Mode|Modo Libre]] |
| − | # | + | # Un botón '''Selecciona Biblioteca''' que abre el Panel de Selección de Bibliotécas |
| − | # | + | # Un menù vista previa del Marker que muestra el STL del marker según la biblioteca seleccionada. Es posible elegir entre varias vistas para controlar el marker |
To continue with the Marker selection click on the '''Select Library''' Button. The '''Implant Selection Panel''' will open. The Panel is divided in 4 Sections | To continue with the Marker selection click on the '''Select Library''' Button. The '''Implant Selection Panel''' will open. The Panel is divided in 4 Sections | ||
Revision as of 09:57, 21 June 2016
Captura de Scan Body
La captura de un implante se complica cuando se quieren capturar datos en un proyecto de implantes. Generalmente, las conexiones/interfaces del implante son pequeñas y metálicas y no son visibles como un muñón o una parte de un modelo de yeso.
Además, la alineación debe ser perfecta, sin ningún margen de error desde el punto de vista mecánico.
Para solucionar este problema, es necesario escanear un "Marker de Implante o Scan Body". Uno Scan Body es un objeto específico, formulado para ser escaneado, que se conecta perfectamente al implante.
El escaneo del Scan Body no es suficiente: los datos resultantes del escaneo serán utilizados para calcular la posición exacta de la interfaz implantar. Para efectuar este cálculo es necesaria una Biblioteca de Implantes.
La alineación con la biblioteca de implantes puede ser efectuada en el software CAD. Sin embargo, para obtener mejores resultados, el usuario puede efectuar esta operación en el software OpticalRevEng Dental, utilizando una biblioteca de implantes para la plataforma Exocad.
Seleccionar Implante
Después de haber generado las mallas, seleccionando las mallas de uno scan body en el árbol de proyecto, se visualizará el botón "Alineación de Scan Body" en la Barra de Herramientas. Hacer clic en este icono para abrir el cuadro de dialogo "Seleccionar Implante"
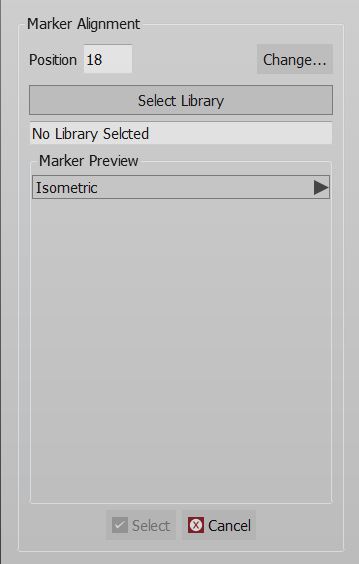
En este Diálogo se encuentran:
- Una opción para seleccionar la posición del implante(Change...) que puede ser utilizada sólo en Modo Libre
- Un botón Selecciona Biblioteca que abre el Panel de Selección de Bibliotécas
- Un menù vista previa del Marker que muestra el STL del marker según la biblioteca seleccionada. Es posible elegir entre varias vistas para controlar el marker
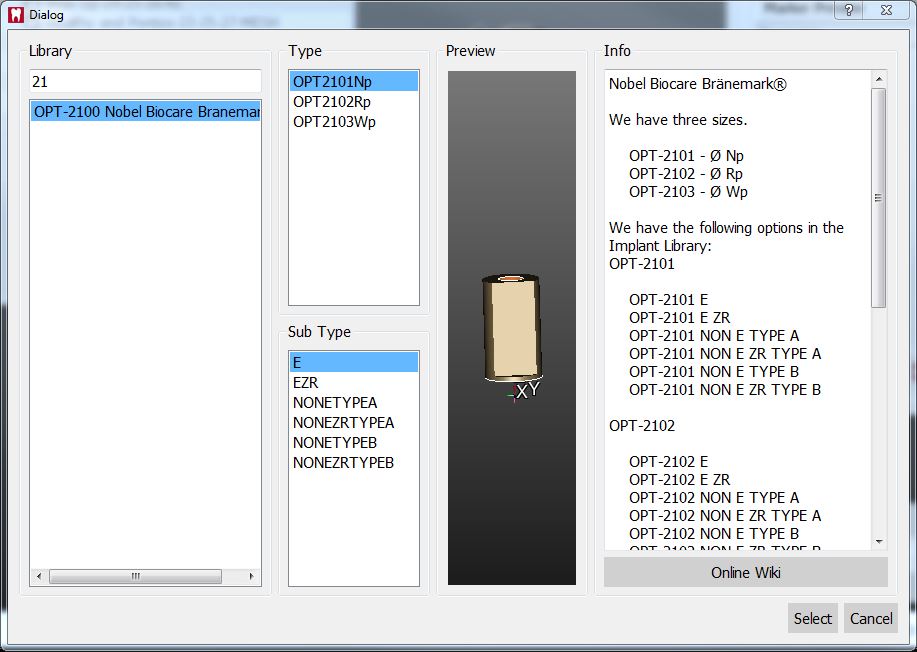
To continue with the Marker selection click on the Select Library Button. The Implant Selection Panel will open. The Panel is divided in 4 Sections
Library
For choosing the general connection and implant family, contains:
- A Filter box where it is possible to write part of the name of the needed implant. All the implants that match the name will be showed in the implant list
- An implant list with all the implants available in the current Implant Library
Type and Sub Type
For Choosing the diameter and type of connection. There can be many of these types, in our libraries for instance there are:
- Engaging Connections : the connection can not rotate on the implant, suggested for abutments or single restorations
- Not-Engaging Connections : the connection can rotate on the implant, suggested for bars and bridges
- For Zirconia : connections with specific shapes, suited for zirconia restorations
Preview
Shows the preview of the STL marker present in the library
Info
If the library is correctly configured to work with our software, in this section it is possible to have a small overview of the libraries with additional information on the availabe diameters and implant types. All our libraries are provided with this feature and, being connected to this wiki, the Open in browser button opens the wiki on the implant list page.
To accept the implant selection click on Select, otherwise Cancel.
En el caso de que se seleccione el implante equivocado, es posible repetir el procedimiento.
En el caso de que se utilize una conexión equivocada para exportar el proyecto a CAD, será necesario reiniciar la modelación desde el principio
Alineación de Scan Body
Al seleccionar la conexión del implante, el software iniciará el modo de Alineación Manual
Será necesario alinear las mallas de lo Scan Body con la forma de la biblioteca. La posición de la conexión será calculada a partir de los datos capturados.
Este procedimiento deberá ser repetido para cada implante del proyecto. La herramienta Exportar a CAD visualizará un mensaje de alerta en caso de falta de datos.


