Difference between revisions of "Project Tree/zh-hant"
Democenter (talk | contribs) (Created page with "背景選單上顯示:") |
Democenter (talk | contribs) (Created page with "* '''次選單''':包含一些給選擇元件使用工具(網格,採集) * '''恢復採集''':將3D網格恢復成採集 * '''更改顏色''':改變元件的預設顏色,用...") |
||
| Line 40: | Line 40: | ||
背景選單上顯示: | 背景選單上顯示: | ||
| − | * | + | * '''次選單''':包含一些給選擇元件使用工具(網格,採集) |
| − | * | + | * '''恢復採集''':將3D網格恢復成採集 |
| − | * | + | * '''更改顏色''':改變元件的預設顏色,用在3D視圖 |
| − | * | + | * '''更改策略''':改變元件的掃描及網格化策略 |
| − | * | + | * '''導入...''':從磁碟導入支援格式的網格或採集檔案 |
| − | * | + | * '''導出...''':導出支援格式的網格或採集檔案到磁碟 |
| − | * | + | * '''導出所見''':將目前所選的所有網格整合導出成一個檔案 |
== Drag And Drop == | == Drag And Drop == | ||
Revision as of 01:59, 30 January 2016
專案樹狀圖
軟體介面的左上角是該專案的管理面板,它包含所有獲取和修改的數據。
結構化與自由模式的專案樹狀圖是不同的.
結構化專案
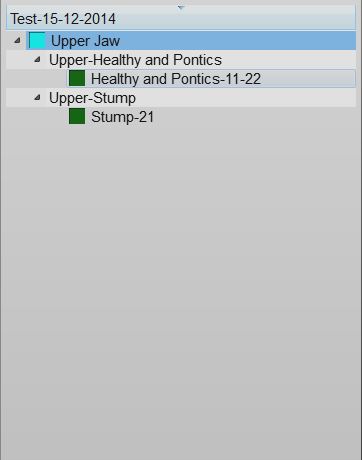
這張圖片顯示一個結構化樹狀圖的例子:
數據狀態與選擇
專案的每個物件都有3種不同的狀態,每種狀態都有不同的顏色框標記:
- 沒有數據 (灰框): 這個元件是專案要完成的但沒有可用的數據. 這個元件需要導入或掃描.
- 已獲得 (籃框): 這是一個 已獲得 的元件. 可以將此數據與該專案的其他部分對齊,編輯或轉換成網格格式.
- 網格化 (綠框): 這是一個 已轉換成網格 的元件. 可以編輯此數據並導出.
您可以在專案樹狀圖上操作這些:
- 在元件上左擊點選
- 按下 CTRL 並左擊以增加點選元件
- 在點選元件上右擊以打開 元件背景選單
- 在表外左擊以清除目前選項
所有選擇的元件將顯示在3D視圖上,軟體會激活主工具列 與支援工具列選單上瑜目前元件上所有可操作的選項.
訊息被布置成樹狀,每一個元件都能有"子"元件.這種設計能表現出專案資訊的從屬.例如一個單一的基牙是顎的一部分,所以他就是顎的子元件.當軟體要求"對齊"基牙於其他的項目時,它將在他的"母"元件上對齊.
背景選單
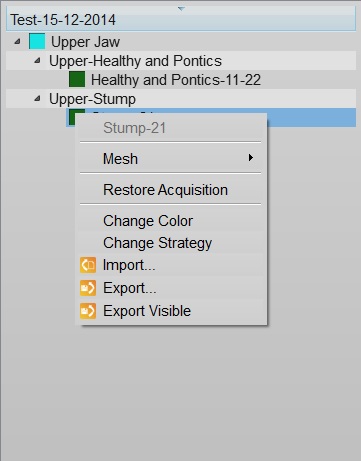
在專案樹狀圖的元件上右擊,將顯示背景選單:
背景選單上顯示:
- 次選單:包含一些給選擇元件使用工具(網格,採集)
- 恢復採集:將3D網格恢復成採集
- 更改顏色:改變元件的預設顏色,用在3D視圖
- 更改策略:改變元件的掃描及網格化策略
- 導入...:從磁碟導入支援格式的網格或採集檔案
- 導出...:導出支援格式的網格或採集檔案到磁碟
- 導出所見:將目前所選的所有網格整合導出成一個檔案
Drag And Drop
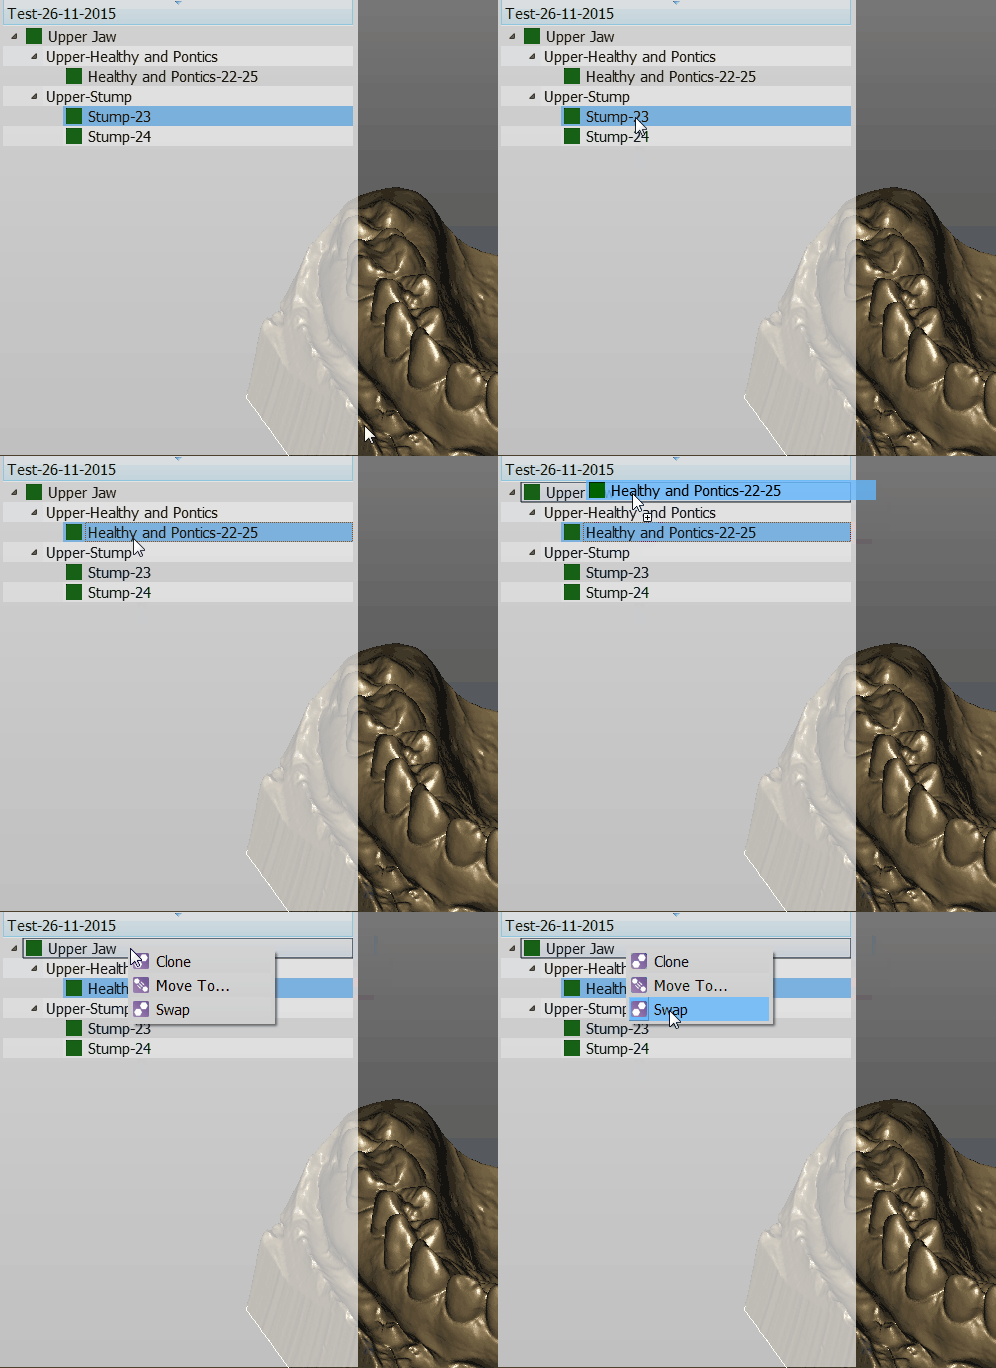
You can drag one element and drop it over a different one
The available actions will be:
- Clone to create a copy of this element
- Move To ... to clone the element and remove the original one
- Swap to swap the mesh or acquisition information of two elements
Free Project
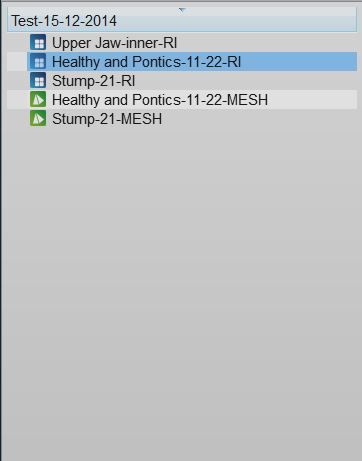
This is a screenshot of a Free Project Tree
In the Free Project mode, the software has no way of knowing the dependencies between the data. So there's no tree, no children. Only a list of objects.
The objects can be of 2 types. Acqusitions (blue icon) or Meshes (green icon).
This project type usually works as the Structured Project.
The differences are:
- To create a copy of a data, it is necessary to open the context menu and select the Clone function.
- By dragging one element above another, it is possible to choose between:
- The Direct Alignment: action to automatically align the two elements.
- The Manual Alignment: action to manually align the two elements.


