Difference between revisions of "Dental Service Tools"
| Line 5: | Line 5: | ||
<!--T:2--> | <!--T:2--> | ||
| − | OpticalRevEng Dental offers a set of Service | + | OpticalRevEng Dental offers a set of Service Tools, inside the [[Support_Toolbars_And_Menus#Tools|Tools Menu]], to recalibrate and diagnose problems of the scanner. |
==Recalibrate Head== <!--T:3--> | ==Recalibrate Head== <!--T:3--> | ||
Revision as of 07:40, 2 September 2015
Contents
Service Tools
OpticalRevEng Dental offers a set of Service Tools, inside the Tools Menu, to recalibrate and diagnose problems of the scanner.
Recalibrate Head
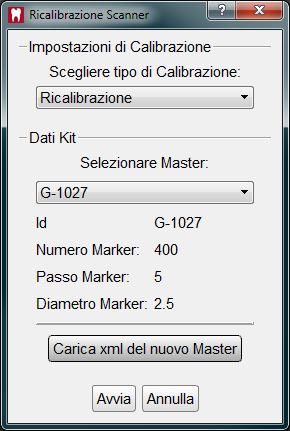
This tool uses the Calibration Kit to do a new calibration of the Optical Head of the scanner. The procedure is:
- Put the calibration kit inside the scanner in the correct position
- Click on the Recalibrate Head tool in the Tools Menu.
- In the calibration dialog select from the drop down menu the exact calibration kit name.
- Click Start
If the calibration kit name is not available in the drop down menu the Load New Master Xml button can be used to add a new calibration kit from the appropiate xml description file.
The calibration procedure is automatic. At its end the software will show one of the following messages:
- 'Scanner Already Calibrated' : The calibration was not needed
- 'Scanner Recalibrated Successfully' : The calibration was completed without error
- 'Scanner Recalibration Failed' : Some error happened
If the calibration was successful the Axis Calibration starts automatically.
Recalibrate Axis
This tool is used to check the movement system of the scanner. The scanner will scan an object, analyze it, and use this data to calibrate the movement system.
If the system has the Absolute Articulation System enabled the object needs to be the specific Axis Calibration Object.
- Put the calibration object inside the scanner
- Click Recalibrate Axis
- Click Ok when prompted.
The calibration procedure is automatic. At its end the software will show one of the following messages:
- 'Axis Recalibration Successfully' : The calibration completed without error
- 'Axis Recalibration Failed' : Some error happened
Auto Set-Up Multi-Die Parameters
This tool is used to calibrate the Multi-Die support. If the acquisitions done with the Multi-Die are not recognized correctly the calibration procedure is:
- Clean the multi-die from excessive material or white powder, every single die position needs to be clearly divided from the others
- Put the empty multi-die support inside the scanner
- Select the 'Auto Set-Up Multi-Die Parameters tool
- Click Ok when prompted
Diagnostic Acquisition
If the scanner is not working correctly this tool performs a specific acquisition of the object currently inside the scanner, saves all the information in a "*.diag" file that can be sent to the OpticalRevEng Dental support to better diagnose the acquisition problem.
