Difference between revisions of "Man ImplantAlign/it"
(Created page with "Questo Dialog presenta:") |
|||
| Line 20: | Line 20: | ||
{{Screenshot|Dental_2_5_implantSelection.jpg}} | {{Screenshot|Dental_2_5_implantSelection.jpg}} | ||
| − | Questo Dialog | + | Questo Dialog permette di scegliere: |
# A tooth position selection (the button with three dots ...) that can be used only in [[Free_Mode|Free Mode]] to select the tooth position of an implant | # A tooth position selection (the button with three dots ...) that can be used only in [[Free_Mode|Free Mode]] to select the tooth position of an implant | ||
Revision as of 14:52, 4 November 2015
Acquisizione di Impianti
Nei progetti su impianti non è possibile acquisire direttamente l'informazione della connessione implantare. Queste infatti sono piccole e metalliche e non sono visibili come un moncone o un modello in gesso.
Inoltre, l'allineamento deve essere perfetto dal punto di vista meccanico.
Per ottenere le informazioni necessarie sarà dunque necessario scansionare un Marker Implantare o uno Scan Body. Questo è un oggetto specifico, progettato per essere scansionato, che si connette perfettamente all'impianto.
La scansione dello Scan Body di per sè non è però sufficiente: i dati risultanti dalla scasione verranno utilizzati per calcolare la posizione esatta dell'interfaccia implantare. Per svolgere tale calcolo è necessario avere una Libreria Implantare.
L'allineamento della libreria implantare può essere svolto nel software CAD. Tuttavia, per ottenere risultati migliori, tale allineamento può essere svolto nel software di scansione OpticalRevEng Dental.
Scegliere l'impianto
Dopo aver generato le mesh, selezionando un elemento impianto nell'albero progetto verrà resa disponibile l'icona per Allineare gli Impianti nella Barra degli Strumenti Principale. Cliccare su tale icona per aprire il dialog di Selezione dell'Impianto.
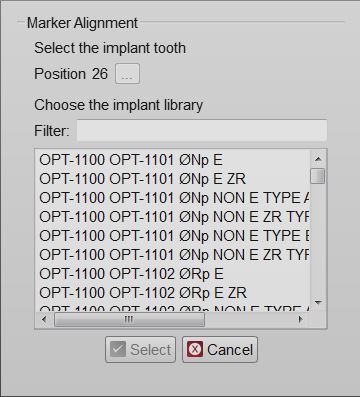
Questo Dialog permette di scegliere:
- A tooth position selection (the button with three dots ...) that can be used only in Free Mode to select the tooth position of an implant
- An implant list with all the implants available in the current Implant Library
- A Filter box where it is possible to write part of the name of the needed implant. All the implants that match the name will be showed in the implant list
Select the implant to be used and click the Select Button.
Attention while choosing the right implant from the library. Many implant libraries have different versions of every implant connection. For example:
- Engaging Connections : the connection can not rotate on the implant, suggested for abutments or single restorations
- Not-Engaging Connections : the connection can rotate on the implant, suggested for bars and bridges
- For Zirconia : connections with specific shapes, suited for zirconia restorations
If the wrong implant is selected, it is possible to repeat the procedure to replace the old aligned connection with a new one.
If the CAD design is launched using a wrong connection it will be necessary to restart all the design from the beginning
Implant Alignment
When selecting the implant connection, the software will start the Manual Alignment mode.
The acquired marker mesh will need to be aligned to the library marker shape. From this data the connection position will be computed.
This procedure has to be performed for every implant of the project. The CAD Export will issue a warning if one or more implant alignments are missing.


