Difference between revisions of "Wiz Introduction/zh-hant"
Democenter (talk | contribs) |
Democenter (talk | contribs) (Created page with "在所有的嚮導步驟,所有的其它工具將被鎖定.所有交互將在屏幕右上方的"嚮導面板"中處理") |
||
| Line 17: | Line 17: | ||
*# {{List button|dental_2_5_wiz_quit.png}} : 關閉引導精靈並繼續手動工作*# {{List button|dental_2_5_wiz_next.png}} : 確認當前步驟並繼續到下一步 | *# {{List button|dental_2_5_wiz_quit.png}} : 關閉引導精靈並繼續手動工作*# {{List button|dental_2_5_wiz_next.png}} : 確認當前步驟並繼續到下一步 | ||
| − | + | 在所有的嚮導步驟,所有的其它工具將被鎖定.所有交互將在屏幕右上方的"嚮導面板"中處理 | |
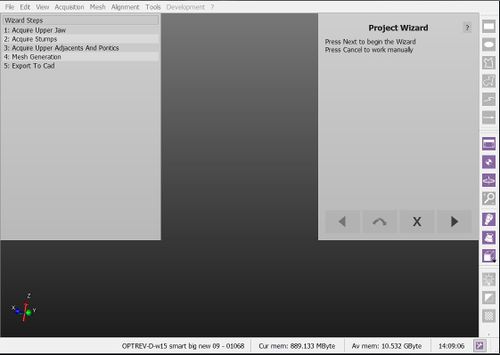
{{Screenshot|Dental_2_5_wizStart.jpg}} | {{Screenshot|Dental_2_5_wizStart.jpg}} | ||
Revision as of 08:43, 11 June 2016
引導精靈
當操作一個結構化專案, OpticalRevEng Dental 提供一個嚮導,引導用戶從第一步掃描儀採集到數據導出。
嚮導界面
當啟動嚮導模式,軟體界面的變化:
在所有的嚮導步驟,所有的其它工具將被鎖定.所有交互將在屏幕右上方的"嚮導面板"中處理
Wizard Sequence
The sequence of wizard steps depends on each specific project. It follows this logic:
- Acquire all the required data from the scanner
- After every single acquisiton:
- Check that all the information is correctly aligned
- Generate the needed meshes
- Align the implants
- Export to the CAD


