Difference between revisions of "Man ImplantAlign/ru"
Trubnikova (talk | contribs) |
Trubnikova (talk | contribs) (Created page with "В диалоговом окне находятся:") |
||
| Line 19: | Line 19: | ||
{{Screenshot|Dental_2_5_implantSelection.jpg}} | {{Screenshot|Dental_2_5_implantSelection.jpg}} | ||
| − | + | В диалоговом окне находятся: | |
# A tooth position selection (the button with three dots ...) that can be used only in [[Free_Mode|Free Mode]] to select the tooth position of an implant | # A tooth position selection (the button with three dots ...) that can be used only in [[Free_Mode|Free Mode]] to select the tooth position of an implant | ||
Revision as of 10:15, 2 March 2016
Сканирование маркера
Сканирование самого имплантата может быть проблематичным при получении данных по проекту имплантата.
Более того, его налаживание должно быть идеальным и четким с механической точки зрения.
Решением этой проблемы стало сканирование имплантата не напрямую, а посредством Маркера имплантата or scan body. Это особый объект, который полностью покрывает имплантат и используется при сканировании.
Сканирование маркера имплантата не достаточно: полученные данные необходимы для определения точного положения контактной поверхности имплантата. Для проведения этой операции необходимо иметь Библиотеку имплантата
Соотнесение сканирование к библиотеке имплантата может проводиться программой CAD. Однако при использовании библиотеки имплантата на платформе Exocad пользователь может осуществлять эту операцию напрямую в программе сканирования OpticalRevEng Dental, что позволяет достичь лучших результатов.
Выделение имплантата
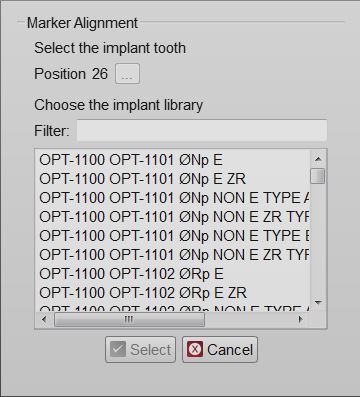
При выборе уже созданного меша маркера имплантата в дереве проекта появится кнопка Соотнесение маркера в Панели управления. После нажатия на кнопку появится диалоговое окно Выделение имплантата
В диалоговом окне находятся:
- A tooth position selection (the button with three dots ...) that can be used only in Free Mode to select the tooth position of an implant
- An implant list with all the implants available in the current Implant Library
- A Filter box where it is possible to write part of the name of the needed implant. All the implants that match the name will be showed in the implant list
Select the implant to be used and click the Select Button.
Attention while choosing the right implant from the library. Many implant libraries have different versions of every implant connection. For example:
- Engaging Connections : the connection can not rotate on the implant, suggested for abutments or single restorations
- Not-Engaging Connections : the connection can rotate on the implant, suggested for bars and bridges
- For Zirconia : connections with specific shapes, suited for zirconia restorations
If the wrong implant is selected, it is possible to repeat the procedure to replace the old aligned connection with a new one.
If the CAD design is launched using a wrong connection it will be necessary to restart all the design from the beginning
Marker Alignment
When selecting the implant connection, the software will start the Manual Alignment mode.
The acquired marker mesh will need to be aligned to the library marker shape. From this data the connection position will be computed.
This procedure has to be performed for every marker of the project. The CAD Export will issue a warning if one or more marker alignments are missing.


