Difference between revisions of "Man ImplantAlign/fr"
L.leonardi (talk | contribs) (Created page with "La fenêtre a:") |
L.leonardi (talk | contribs) (Created page with "# Une option pour choisir la position de l’implant (une icône avec trois points…) disponible seulement en Modalité Libre # La liste des connexions implanta...") |
||
| Line 21: | Line 21: | ||
La fenêtre a: | La fenêtre a: | ||
| − | # | + | # Une option pour choisir la position de l’implant (une icône avec trois points…) disponible seulement en [[Free_Mode|Modalité Libre]] |
| − | # | + | # La liste des connexions implantaires dans la Bibliothèque |
| − | # | + | # Une boîte filtre où on peut écrire le nom de l’implant auquel on veut aligner la numérisation. Tous les implants dont le nom correspond à ce qui est recherché apparaissent dans la liste. |
Select the implant to be used and click the '''Select''' Button. | Select the implant to be used and click the '''Select''' Button. | ||
Revision as of 12:50, 2 February 2016
Acquisition des Marqueurs
Dans les projets sur implants n’est pas possible d’acquérir directement l’information de la connexion implantaire parce qu'elle est trop petite et en métal et elle n’est pas donc visible comme un moignon ou comme un modèle en plâtre.
En outre, il faut que l’alignement soit parfait du point de vue mécanique.
Pour avoir les informations nécessaires il faut numériser un Marqueur Implantaire ou un Scan Body. Ce sont des objets spécifiques, pensés pour être numérisés, qui se connectent parfaitement à l’implant.
Toutefois, la seule numérisation du Marqueur n’est pas suffisante : les données de la numérisation sont utilisées pour calculer la position exacte de l’interface implantaire. À fin de la calculer il faut avoir une Bibliothèque Implantaire
L’alignement à la bibliothèque implantaire peut être démarré dans le logiciel CAO mais le logiciel OpticalRevEng Dental offre des résultats meilleurs.
Choisir l’Implant
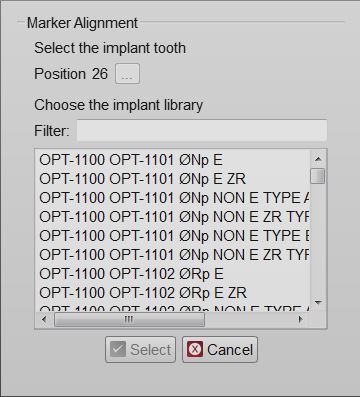
Apres avoir généré une maille, en sélectionnant un élément implant dans l’arbre du projet il y aura une icône pour Aligner les Marqueurs dans la Barre d’Outils Principale. Cliquer sur l’icône pour ouvrir la fenêtre de dialogue de Sélection de l’Implant.
La fenêtre a:
- Une option pour choisir la position de l’implant (une icône avec trois points…) disponible seulement en Modalité Libre
- La liste des connexions implantaires dans la Bibliothèque
- Une boîte filtre où on peut écrire le nom de l’implant auquel on veut aligner la numérisation. Tous les implants dont le nom correspond à ce qui est recherché apparaissent dans la liste.
Select the implant to be used and click the Select Button.
Attention while choosing the right implant from the library. Many implant libraries have different versions of every implant connection. For example:
- Engaging Connections : the connection can not rotate on the implant, suggested for abutments or single restorations
- Not-Engaging Connections : the connection can rotate on the implant, suggested for bars and bridges
- For Zirconia : connections with specific shapes, suited for zirconia restorations
If the wrong implant is selected, it is possible to repeat the procedure to replace the old aligned connection with a new one.
If the CAD design is launched using a wrong connection it will be necessary to restart all the design from the beginning
Marker Alignment
When selecting the implant connection, the software will start the Manual Alignment mode.
The acquired marker mesh will need to be aligned to the library marker shape. From this data the connection position will be computed.
This procedure has to be performed for every marker of the project. The CAD Export will issue a warning if one or more marker alignments are missing.


