Difference between revisions of "Man ImplantAlign/ja"
(Created page with "= マーカー取得 =") |
(Updating to match new version of source page) |
||
| (30 intermediate revisions by 2 users not shown) | |||
| Line 1: | Line 1: | ||
{{Language bar}} | {{Language bar}} | ||
{{DISPLAYTITLE:Marker Alignment|noerror}} | {{DISPLAYTITLE:Marker Alignment|noerror}} | ||
| − | = | + | = 8、マーカー = |
| − | + | == 〇マーカー取得 == | |
| + | インプラントのプロジェクト用にデータを取得する際、インプラント自体を取得するのには問題があります。スタンプや石膏模型の一部を取得するのとは異なります。インプラントのコネクション/インターフェースは通常小さく、金属製です。 | ||
| − | + | さらに、適合も機械的に完璧である必要があり、誤差は許されません。 | |
| − | + | この問題点を克服するために、インプラントコネクションは直接スキャンせず、代わりに'''インプラントマーカーまたはスキャンボディ'''を使用します。スキャンボディは特殊なオブジェクトで、スキャンされるよう設計されており、インプラント上に完全にフィットします。 | |
| − | + | インプラントマーカー自体をスキャンするだけでは十分ではありません。結果として生成されるデータは、インプラントインターフェースの正確な位置を算出するために使用されます。この操作を実行するには、[[Implant_Library|インプラントライブラリー]]が必要となります。 | |
| − | + | インプラントライブラリーに対するアライメントはCADソフトウェアで実行できます。しかし、Exocadプラットフォーム用のインプラントライブラリーを使って、スキャニングソフトウェアで直接この操作を実行することができます。これにより、よりよい結果を得ることが可能となります。 | |
| − | = | + | == 〇インプラント選択 == |
| − | + | メッシュ生成後、プロジェクトツリーからインプラントマーカーのメッシュを選択することで、''Marker Alignment''(マーカーアライメント)ボタンが[[Main_Toolbar|メインツールバー]]に表示されます。 | |
| − | + | このボタンをクリックして、''インプラント選択''ダイアログ画面を開きます。 | |
| − | + | [[File:Dental_3_5_implantSelection.JPG]] | |
| − | + | このダイアログ画面には、以下があります。 | |
| − | # A tooth position selection ( | + | # A tooth position selection (Change ...) that can be used only in [[Free_Mode|Free Mode]] to select the tooth position of an implant |
| + | # A '''Select Library''' button, that opens the Library Selection Panel | ||
| + | # A Marker Preview menu that, once the appropriate connection has been selected for the current element, will show the STL of the marker present in the library. It is possible to choose different views to check the Merker's shape | ||
| + | |||
| + | To continue with the Marker selection click on the '''Select Library''' Button. The '''Implant Selection Panel''' will open. The Panel is divided in 4 Sections | ||
| + | |||
| + | [[File:Dental_3_5_implantSelectionPanel.JPG]] | ||
| + | |||
| + | '''Library''' | ||
| + | |||
| + | For choosing the general connection and implant family, contains: | ||
| + | |||
| + | # A Filter box where it is possible to write part of the name of the needed implant. All the implants that match the name will be showed in the implant list | ||
# An implant list with all the implants available in the current Implant Library | # An implant list with all the implants available in the current Implant Library | ||
| − | |||
| − | + | '''Type and Sub Type''' | |
| − | + | For Choosing the diameter and type of connection. There can be many of these types, in our libraries for instance there are: | |
* Engaging Connections : the connection can not rotate on the implant, suggested for abutments or single restorations | * Engaging Connections : the connection can not rotate on the implant, suggested for abutments or single restorations | ||
| Line 34: | Line 46: | ||
* For Zirconia : connections with specific shapes, suited for zirconia restorations | * For Zirconia : connections with specific shapes, suited for zirconia restorations | ||
| − | If the | + | '''Preview''' |
| + | |||
| + | Shows the preview of the STL marker present in the library | ||
| + | |||
| + | '''Info''' | ||
| + | |||
| + | If the library is correctly configured to work with our software, in this section it is possible to have a small overview of the libraries with additional information on the availabe diameters and implant types. | ||
| + | All our libraries are provided with this feature and, being connected to this wiki, the ''Open in browser'' button opens the wiki on the implant list page. | ||
| + | |||
| + | To accept the implant selection click on ''Select'', otherwise ''Cancel''. | ||
| + | |||
| + | 誤ったインプラントを選択した場合は、手順を繰り返して、古いコネクションを新しいものと交換できます。 | ||
| − | ''' | + | '''※誤ったコネクションでCADデザインを開始した場合、すべてのデザインを最初からやり直す必要があります。''' |
| − | = | + | == 〇マーカーのアライメント = |
| − | + | インプラントコネクションを選択する時、ソフトウェアは[[Man_Align#Manual Alignment|手動アライメント]]モードを開始します。 | |
| − | + | 取得されたマーカーメッシュはライブラリーのマーカー形状にアライメントされる必要があります。このデータから、コネクションの位置が計算されます。 | |
| − | + | この手順は、プロジェクトのすべてのマーカーで実施される必要があります。1つ以上のマーカーアライメントが見つからない場合、[[Man_DataExport|CAD Export]]は警告を出します。 | |
{{Navigation|Man_MeshEditing|Man_DataExport}} | {{Navigation|Man_MeshEditing|Man_DataExport}} | ||
Latest revision as of 10:10, 21 June 2016
Contents
8、マーカー
〇マーカー取得
インプラントのプロジェクト用にデータを取得する際、インプラント自体を取得するのには問題があります。スタンプや石膏模型の一部を取得するのとは異なります。インプラントのコネクション/インターフェースは通常小さく、金属製です。
さらに、適合も機械的に完璧である必要があり、誤差は許されません。
この問題点を克服するために、インプラントコネクションは直接スキャンせず、代わりにインプラントマーカーまたはスキャンボディを使用します。スキャンボディは特殊なオブジェクトで、スキャンされるよう設計されており、インプラント上に完全にフィットします。
インプラントマーカー自体をスキャンするだけでは十分ではありません。結果として生成されるデータは、インプラントインターフェースの正確な位置を算出するために使用されます。この操作を実行するには、インプラントライブラリーが必要となります。
インプラントライブラリーに対するアライメントはCADソフトウェアで実行できます。しかし、Exocadプラットフォーム用のインプラントライブラリーを使って、スキャニングソフトウェアで直接この操作を実行することができます。これにより、よりよい結果を得ることが可能となります。
〇インプラント選択
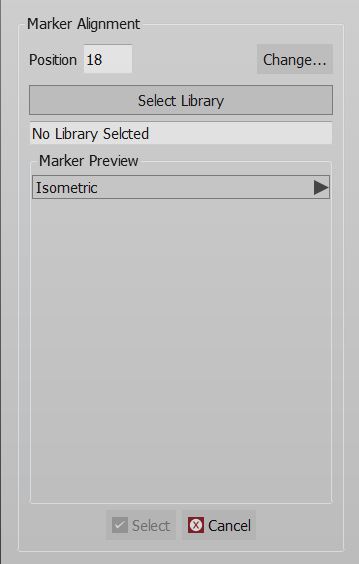
メッシュ生成後、プロジェクトツリーからインプラントマーカーのメッシュを選択することで、Marker Alignment(マーカーアライメント)ボタンがメインツールバーに表示されます。 このボタンをクリックして、インプラント選択ダイアログ画面を開きます。
このダイアログ画面には、以下があります。
- A tooth position selection (Change ...) that can be used only in Free Mode to select the tooth position of an implant
- A Select Library button, that opens the Library Selection Panel
- A Marker Preview menu that, once the appropriate connection has been selected for the current element, will show the STL of the marker present in the library. It is possible to choose different views to check the Merker's shape
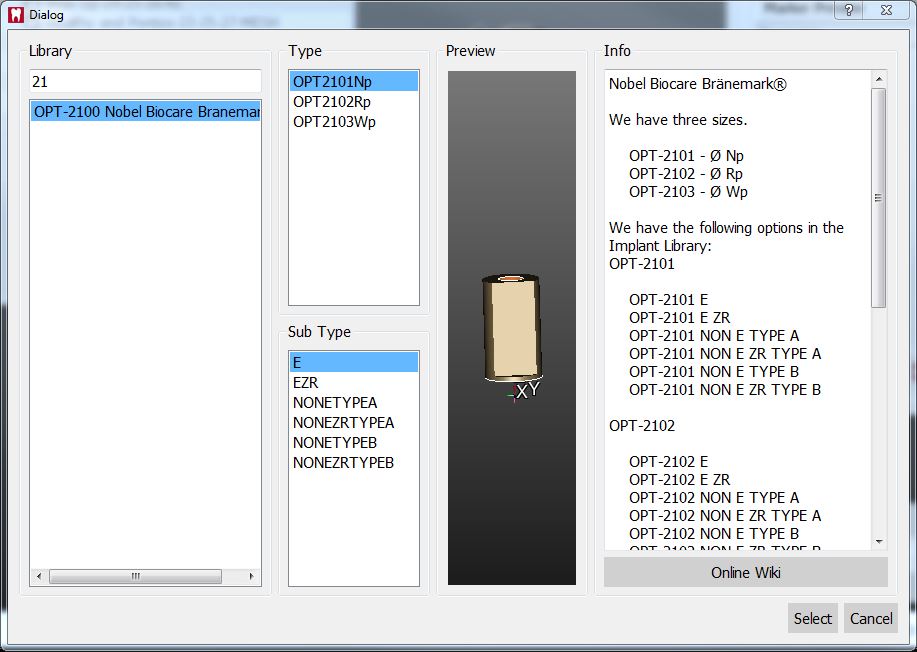
To continue with the Marker selection click on the Select Library Button. The Implant Selection Panel will open. The Panel is divided in 4 Sections
Library
For choosing the general connection and implant family, contains:
- A Filter box where it is possible to write part of the name of the needed implant. All the implants that match the name will be showed in the implant list
- An implant list with all the implants available in the current Implant Library
Type and Sub Type
For Choosing the diameter and type of connection. There can be many of these types, in our libraries for instance there are:
- Engaging Connections : the connection can not rotate on the implant, suggested for abutments or single restorations
- Not-Engaging Connections : the connection can rotate on the implant, suggested for bars and bridges
- For Zirconia : connections with specific shapes, suited for zirconia restorations
Preview
Shows the preview of the STL marker present in the library
Info
If the library is correctly configured to work with our software, in this section it is possible to have a small overview of the libraries with additional information on the availabe diameters and implant types. All our libraries are provided with this feature and, being connected to this wiki, the Open in browser button opens the wiki on the implant list page.
To accept the implant selection click on Select, otherwise Cancel.
誤ったインプラントを選択した場合は、手順を繰り返して、古いコネクションを新しいものと交換できます。
※誤ったコネクションでCADデザインを開始した場合、すべてのデザインを最初からやり直す必要があります。
= 〇マーカーのアライメント
インプラントコネクションを選択する時、ソフトウェアは手動アライメントモードを開始します。
取得されたマーカーメッシュはライブラリーのマーカー形状にアライメントされる必要があります。このデータから、コネクションの位置が計算されます。
この手順は、プロジェクトのすべてのマーカーで実施される必要があります。1つ以上のマーカーアライメントが見つからない場合、CAD Exportは警告を出します。


