Difference between revisions of "Wiz Introduction/ro"
(Created page with "Wiz Introducere") |
(Created page with "#Acquire toate datele necesare din scaner #După fiecare achiziție: ## Wiz_BaseCutAndAutoCleaning|Clean the acquisition from the support holder and dupl...") |
||
| (6 intermediate revisions by the same user not shown) | |||
| Line 4: | Line 4: | ||
= Step-By-Step Wizard = | = Step-By-Step Wizard = | ||
| − | + | Când lucrați într-un '''Structured Project''', Optical RevEnge Dental oferă un expert,wizard care va ghida utilizatorul de la prima achiziție a scanerului la exportul datelor. | |
| − | == Wizard | + | == Interfața Wizard == |
| − | + | La lansarea "Wizard Mode", interfața software modifică: | |
| − | * | + | * Dispare [[Main_Toolbar|Main Toolbar]] |
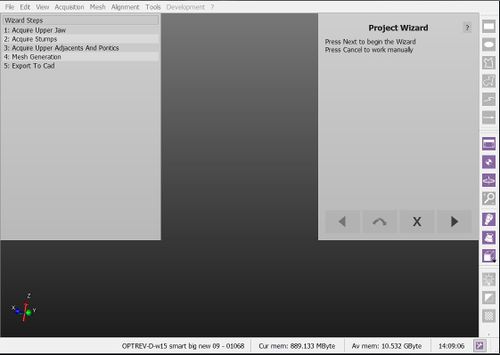
| − | * | + | * În loc de [[Project_Tree|Project Tree]], există o listă Wizard Steps care va reaminti utilizatorului pașii de completat și următorii pași. |
| − | * | + | * În colțul din dreapta sus al aplicației există Expertul însuși, care va ghida utilizatorul și care poate fi manipulat numai cu 4 butoane |
| − | *# {{List button|dental_2_5_wiz_prev.png}} : | + | *# {{List button|dental_2_5_wiz_prev.png}} : pentru a reveni la pasul anterior |
| − | *# {{List button|dental_2_5_wiz_skip.png}} : | + | *# {{List button|dental_2_5_wiz_skip.png}} : : pentru a sări peste pasul curent |
| − | *# {{List button|dental_2_5_wiz_quit.png}} : | + | *# {{List button|dental_2_5_wiz_quit.png}} :pentru a închide Expertul pas cu pas și continuați să lucrați manual |
| − | *# {{List button|dental_2_5_wiz_next.png}} : | + | *# {{List button|dental_2_5_wiz_next.png}} : pentru a confirma pasul curent și a trece la următorul |
| − | + | În timpul tuturor pașilor experților, toate celelalte instrumente vor fi blocate. Toate interacțiunile vor fi gestionate în panoul Wizard din partea dreapta sus a ecranului | |
{{Screenshot|Dental_2_5_wizStart.jpg}} | {{Screenshot|Dental_2_5_wizStart.jpg}} | ||
| Line 24: | Line 24: | ||
== Wizard Sequence == | == Wizard Sequence == | ||
| − | + | Secvența pașilor wizard depinde de fiecare proiect specific. Urmează această logică: | |
| − | # [[Wiz_Acquisition|Acquire]] | + | #[[Wiz_Acquisition|Acquire]] toate datele necesare din scaner |
| − | # | + | #După fiecare achiziție: |
## [[Wiz_BaseCutAndAutoCleaning|Clean the acquisition from the support holder and duplicated data]] | ## [[Wiz_BaseCutAndAutoCleaning|Clean the acquisition from the support holder and duplicated data]] | ||
| − | ## [[Wiz_Align|Align the acquisition to the rest of the project and check the alignment if needed]] | + | ##[[Wiz_Align|Align the acquisition to the rest of the project and check the alignment if needed]] |
| − | # [[Wiz_ProjectCheck|Check that all the information is correctly aligned]] | + | #[[Wiz_ProjectCheck|Check that all the information is correctly aligned]] |
| − | # | + | #Generați meshurile necesare |
# [[Wiz_ImplantAlign|Align the implants]] | # [[Wiz_ImplantAlign|Align the implants]] | ||
# [[Wiz_Export|Export to the CAD]] | # [[Wiz_Export|Export to the CAD]] | ||
{{Navigation|Man_ModelTrimming|Wiz_Acquisition}} | {{Navigation|Man_ModelTrimming|Wiz_Acquisition}} | ||
Latest revision as of 05:11, 25 September 2017
Step-By-Step Wizard
Când lucrați într-un Structured Project, Optical RevEnge Dental oferă un expert,wizard care va ghida utilizatorul de la prima achiziție a scanerului la exportul datelor.
Interfața Wizard
La lansarea "Wizard Mode", interfața software modifică:
- Dispare Main Toolbar
- În loc de Project Tree, există o listă Wizard Steps care va reaminti utilizatorului pașii de completat și următorii pași.
- În colțul din dreapta sus al aplicației există Expertul însuși, care va ghida utilizatorul și care poate fi manipulat numai cu 4 butoane
În timpul tuturor pașilor experților, toate celelalte instrumente vor fi blocate. Toate interacțiunile vor fi gestionate în panoul Wizard din partea dreapta sus a ecranului
Wizard Sequence
Secvența pașilor wizard depinde de fiecare proiect specific. Urmează această logică:
- Acquire toate datele necesare din scaner
- După fiecare achiziție:
- Check that all the information is correctly aligned
- Generați meshurile necesare
- Align the implants
- Export to the CAD


