|
|
| (25 intermediate revisions by one other user not shown) |
| Line 3: |
Line 3: |
| | __TOC__ | | __TOC__ |
| | | | |
| − | OpticalRevEng Dental 提供服務模式, 可從[[Support_Toolbars_And_Menus#Tools|主工具列]]打開, 以校準和診斷可能出現的問題 | + | OpticalRevEng Dental提供一种服务模式,可从[[Support_Toolbars_And_Menus#Tools|主工具栏]]打开,以校准和诊断可能出现的问题。 |
| | | | |
| | {{Screenshot|Service-mode.jpg}} | | {{Screenshot|Service-mode.jpg}} |
| Line 9: |
Line 9: |
| | ==直播模式== | | ==直播模式== |
| | | | |
| − | 此工具可以用來檢查的掃描儀攝像機的實時視圖。
| + | 此工具可以用来检查扫描器摄像机的实时视图。 |
| | | | |
| − | 要開始對這個工具點擊{{Inline button|ActionLiveCameraParams.svg}} 鈕;
| + | 要启动这个工具,点击{{Inline button|ActionLiveCameraParams.svg}}按钮; |
| | | | |
| − | ==檢查掃描儀== | + | ==检查扫描器== |
| | | | |
| − | The software checks if the scanner connection is in order every time it is activated.
| + | 该软件启用时,会检查扫描器的连接是否正常。 |
| | | | |
| − | With this tool {{Inline button|actionCheckScannerHardware.svg}}it is possible to run this check manually.
| + | 利用这个工具{{Inline button|actionCheckScannerHardware.svg}}也可以手动运行此检查。 |
| | | | |
| − | == Recalibrate Head== | + | ==校准头== |
| | | | |
| − | To launch this tool, click on the {{Inline button|actionRecalibrateHead.svg}} button;
| + | 要启动该工具,请点击{{Inline button|actionRecalibrateHead.svg}}按钮; |
| | | | |
| − | There are 2 types of calibration:
| + | 有2种类型的校准: |
| − | ; Recalibration : Fast procedure to update scanner's calibration periodically or to be performed if the scanner is moved to any other location | + | ; 重新校准:快速定期更新扫描器校准,或当扫描器移动到任何其他位置时执行 |
| − | ; Full Calibration : More complex procedure to be performed after a mechanical repair | + | ; 全面校准:硬件修理之后执行更复杂的程序 |
| | | | |
| − | This tool uses the [[Accessories|Calibration Kit]] to carry out a new calibration of the Optical Head of the scanner. The procedure is the following:
| + | 此工具使用[[Accessories|校准套件]] 对扫描器的光学头进行新的校准。流程如下: |
| | | | |
| − | #Put the calibration kit inside the scanner in the correct position | + | #把校准套件置入扫描器内正确的位置 |
| − | #Select the calibration type from the drop-down menu | + | #从下拉菜单中选择校准类型 |
| − | #In the calibration dialog, select from the drop down menu the exact calibration kit name | + | #在校准对话框中,从下拉菜单中选择准确的校准套件名称 |
| − | #Click '''Start''' | + | #点击'''启动''' |
| | | | |
| − | If the calibration kit name is not available in the drop down menu, the '''Load New Master Xml''' button can be used to add a new calibration kit from the appropriate Xml description file.
| + | 如果校准套件名称不在下拉选单中,使用'''装载新的主XML'''按钮可从相应的XML描述文件中添加一个新的校准套件。 |
| | | | |
| | {{Small image|Calib-dlg.jpg}} | | {{Small image|Calib-dlg.jpg}} |
| | | | |
| − | The calibration procedure is automatic. Once finished, the software will show one of the following messages:
| + | 校准过程是自动的。一旦完成后,软件会显示以下信息之一: |
| | | | |
| − | *'Scanner Already Calibrated' : the calibration is not necessary | + | *'扫描器已经校准':校准是没有必要 |
| − | *'Scanner Recalibrated Successfully' : the calibration has been completed | + | *'扫描器重新校准成功':校准已经完成 |
| − | *'Scanner Recalibration Failed' : calibration has to be repeated | + | *'扫描器校准失败':校准必须重复 |
| | | | |
| − | If the calibration was successful, the '''Axes Calibration''' starts automatically.
| + | 如果校准成功,'''轴校准'''将自动启动 |
| | | | |
| − | ==Recalibrate Axis== | + | ==校准轴== |
| | | | |
| − | This tool is used to check the movement system of the scanner. The scanner will scan an object, analyze it, and use this data to calibrate the movement system.
| + | 这个工具用于检查扫描仪的运动系统。扫描器将扫描一个对象,分析它,并使用该数据来校准运动系统。 |
| | | | |
| − | This tool will start automatically after a '''Head Recalibration''' or can be started manually with the {{Inline button|actionDirectAxesCalib.svg}} button.
| + | 该工具会在'''校准头'''之后自动启动,或按{{Inline button|actionDirectAxesCalib.svg}}按钮手动启动。 |
| | | | |
| − | {{Important|When the '''Dynamic Articulation Module''' is enabled, calibrate the axis with the specific [[Accessories|Axis Calibration Object]]. From that moment on, any recalibration needs to be performed with the same object. Otherwise, axis recalibration will fail.}} | + | {{Important|启用'''虚拟咬合模块'''时,使用特定[[Accessories|轴校准对象]]校准轴。从这一刻起,需要使用相同的对象执行所有校准。否则,轴校准将失败。}} |
| | | | |
| − | # Put the calibration object inside the scanner | + | # 将校准物对象置入扫描器内 |
| − | # Click '''Recalibrate Axis''' | + | # 点击'''校准轴''' |
| − | # Click '''Ok''' when prompted | + | # 出现提示时单击'''确定''' |
| | | | |
| − | The calibration procedure is automatic. Once it is finished, the software will show one of the following messages:
| + | 校准程序是自动的。一旦完成,软件将显示以下消息之一: |
| | | | |
| − | *'Axis Recalibration Successfull' : the calibration has been completed | + | *'轴重新校准成功':校准已完成 |
| − | *'Axis Recalibration Failed' : calibration has to be repeated | + | *'轴重新校准失败':必须重复校准 |
| | | | |
| − | ==Auto Set-Up Multi-Die Parameters== | + | ==自动设置多代型参数== |
| | | | |
| − | This tool is used to calibrate the Multi-Die support. If the acquisitions carried out with the Multi-Die are not correctly recognized, the calibration procedure is the following:
| + | 该工具用于校准多代型支持。如果使用多代型进行的采集则不能正确识别,则校准过程如下: |
| | | | |
| − | # Clean the multi-die from excessive material or white powder, every single die position needs to be clearly separated from the others | + | # 清洁多代型过多的材料或白色粉末,每一个代型位置需要与其他代型位置清楚分开 |
| − | # Put the empty multi-die support inside the scanner | + | # 把空的多代型支撑置入扫描器内 |
| − | # Start the tool with this button {{Inline button|ActionAutoSetUpMultiDieParameters.svg }} | + | # 使用按钮{{Inline button|ActionAutoSetUpMultiDieParameters.svg }}启动该工具 |
| − | # Click '''Ok''' when prompted | + | # 提示时点击'''确定''' |
| | | | |
| − | ==Diagnostic Acquisition== | + | ==诊断采集== |
| | | | |
| − | When doubting the proper functioning of the scanner, this tool carries out a specific acquisition of the object currently inside the scanner.
| + | 如果怀疑扫描器的正常运作,这个工具对目前扫描器内的对象进行特定的采集。 |
| | | | |
| − | The software then saves all the information in a "*.diag" file that can be sent to the OpticalRevEng Dental support to diagnose possible issues.
| + | 然后,该软件将所有的信息保存在“*.diag”文件中,并可以发送到OpticalRevEng Dental支持部门以诊断可能的问题。 |
| | | | |
| − | To start this tool click the {{Inline button|actionDiagnosticAcquisition.svg}} button.
| + | 要启动该工具,请点击{{Inline button|actionDiagnosticAcquisition.svg}}按钮。 |
| | | | |
| | {{Navigation|Dental_Options_Interactor|Main Page}} | | {{Navigation|Dental_Options_Interactor|Main Page}} |
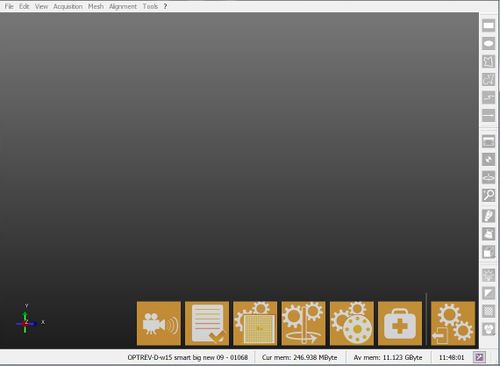
OpticalRevEng Dental提供一种服务模式,可从主工具栏打开,以校准和诊断可能出现的问题。

直播模式
此工具可以用来检查扫描器摄像机的实时视图。
要启动这个工具,点击 按钮;
按钮;
检查扫描器
该软件启用时,会检查扫描器的连接是否正常。
利用这个工具 也可以手动运行此检查。
校准头
要启动该工具,请点击 按钮;
按钮;
有2种类型的校准:
- 重新校准:快速定期更新扫描器校准,或当扫描器移动到任何其他位置时执行
- 全面校准:硬件修理之后执行更复杂的程序
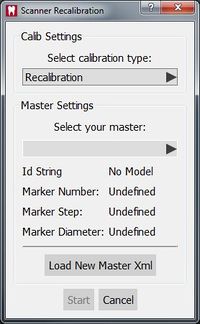
此工具使用校准套件 对扫描器的光学头进行新的校准。流程如下:
- 把校准套件置入扫描器内正确的位置
- 从下拉菜单中选择校准类型
- 在校准对话框中,从下拉菜单中选择准确的校准套件名称
- 点击启动
如果校准套件名称不在下拉选单中,使用装载新的主XML按钮可从相应的XML描述文件中添加一个新的校准套件。

校准过程是自动的。一旦完成后,软件会显示以下信息之一:
- '扫描器已经校准':校准是没有必要
- '扫描器重新校准成功':校准已经完成
- '扫描器校准失败':校准必须重复
如果校准成功,轴校准将自动启动
校准轴
这个工具用于检查扫描仪的运动系统。扫描器将扫描一个对象,分析它,并使用该数据来校准运动系统。
该工具会在校准头之后自动启动,或按 按钮手动启动。
启用
虚拟咬合模块时,使用特定
轴校准对象校准轴。从这一刻起,需要使用相同的对象执行所有校准。否则,轴校准将失败。
- 将校准物对象置入扫描器内
- 点击校准轴
- 出现提示时单击确定
校准程序是自动的。一旦完成,软件将显示以下消息之一:
- '轴重新校准成功':校准已完成
- '轴重新校准失败':必须重复校准
自动设置多代型参数
该工具用于校准多代型支持。如果使用多代型进行的采集则不能正确识别,则校准过程如下:
- 清洁多代型过多的材料或白色粉末,每一个代型位置需要与其他代型位置清楚分开
- 把空的多代型支撑置入扫描器内
- 使用按钮
 启动该工具
启动该工具
- 提示时点击确定
诊断采集
如果怀疑扫描器的正常运作,这个工具对目前扫描器内的对象进行特定的采集。
然后,该软件将所有的信息保存在“*.diag”文件中,并可以发送到OpticalRevEng Dental支持部门以诊断可能的问题。
要启动该工具,请点击 按钮。
按钮。


