Difference between revisions of "Wiz Introduction/zh-hant"
Democenter (talk | contribs) (Created page with "引導精靈") |
(Importing a new version from external source) |
||
| (9 intermediate revisions by one other user not shown) | |||
| Line 2: | Line 2: | ||
{{DISPLAYTITLE:Step-By-Step Wizard|noerror}} | {{DISPLAYTITLE:Step-By-Step Wizard|noerror}} | ||
| − | = | + | =分步向导= |
| − | + | 当操作一个'''结构化项目'''时, OpticalRevEng Dental提供一个向导,从第一步扫描器采集到数据导出引导用户。 | |
| − | == | + | ==向导界面== |
| − | + | 当启动''向导模式''时,软件界面发生的变化: | |
| − | * | + | * [[Main_Toolbar|主工具栏]]消失 |
| − | * | + | * 取代[[Project_Tree|项目树形图]]的是一个提醒用户关于完成步骤与下一步骤的向导步骤列表。 |
| − | * | + | * 在应用程序的右上角,向导本身将引导用户,并且只需要4个按钮即可操作 |
| − | *# {{List button|dental_2_5_wiz_prev.png}} : | + | *# {{List button|dental_2_5_wiz_prev.png}} : 返回到向导上一步 |
| − | *# {{List button|dental_2_5_wiz_skip.png}} : | + | *# {{List button|dental_2_5_wiz_skip.png}} : 跳过当前步骤 |
| − | *# {{List button|dental_2_5_wiz_quit.png}} : | + | *# {{List button|dental_2_5_wiz_quit.png}} : 关闭分步向导并继续手动工作 |
| − | *# {{List button|dental_2_5_wiz_next.png}} : | + | *# {{List button|dental_2_5_wiz_next.png}} : 确认当前步骤并继续下一步 |
| − | + | 在所有的向导步骤中,所有的其它工具将被锁定。所有交互将在屏幕右上方的''向导面板''中处理 | |
{{Screenshot|Dental_2_5_wizStart.jpg}} | {{Screenshot|Dental_2_5_wizStart.jpg}} | ||
| − | == | + | ==向导序列== |
| − | + | 向导步骤的顺序取决于每个具体项目。它遵循这样的逻辑: | |
| − | # [[Wiz_Acquisition| | + | # [[Wiz_Acquisition|采集]]从扫描器取得所需的所有数据 |
| − | # | + | # 每一次单一采集之后: |
| − | ## [[Wiz_BaseCutAndAutoCleaning| | + | ## [[Wiz_BaseCutAndAutoCleaning|清理从支承座的采集和复写数据]] |
| − | ## [[Wiz_Align| | + | ## [[Wiz_Align|对齐该项目的其余部分采集,如有需要检查是否对齐]] |
| − | # [[Wiz_ProjectCheck| | + | # [[Wiz_ProjectCheck|检查所有的信息都正确对齐]] |
| − | # | + | # 生成所需的网格 |
| − | # [[Wiz_ImplantAlign| | + | # [[Wiz_ImplantAlign|对齐种植体]] |
| − | # [[Wiz_Export| | + | # [[Wiz_Export|导出到CAD]] |
{{Navigation|Man_ModelTrimming|Wiz_Acquisition}} | {{Navigation|Man_ModelTrimming|Wiz_Acquisition}} | ||
Latest revision as of 12:17, 1 August 2017
分步向导
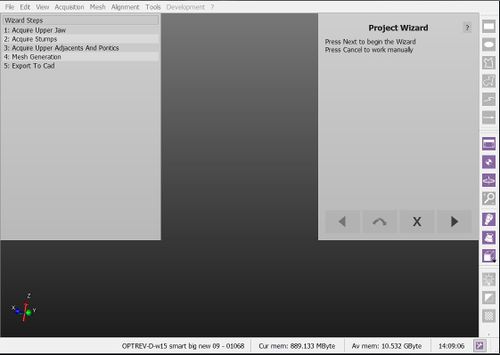
当操作一个结构化项目时, OpticalRevEng Dental提供一个向导,从第一步扫描器采集到数据导出引导用户。
向导界面
当启动向导模式时,软件界面发生的变化:
在所有的向导步骤中,所有的其它工具将被锁定。所有交互将在屏幕右上方的向导面板中处理
向导序列
向导步骤的顺序取决于每个具体项目。它遵循这样的逻辑:
- 采集从扫描器取得所需的所有数据
- 每一次单一采集之后:
- 检查所有的信息都正确对齐
- 生成所需的网格
- 对齐种植体
- 导出到CAD


