|
|
| (27 intermediate revisions by 2 users not shown) |
| Line 1: |
Line 1: |
| | {{Language bar}} | | {{Language bar}} |
| | {{DISPLAYTITLE:Marker Alignment|noerror}} | | {{DISPLAYTITLE:Marker Alignment|noerror}} |
| − | =標記對齊= | + | =标记对齐= |
| | | | |
| − | 當為一個種植體專案採集數據,採集種植體本身是有問題的.它不象基牙或部份代型模式.種植體連接/接口通常很小並且是金屬
| + | 当为一个种植体项目采集数据时,采集种植体本身是有问题的。它不像支台齿或一个石膏模型。种植体连接/接口通常很小,并且是金属的。 |
| | | | |
| − | Moreover, the fitting has to be mechanically perfect, with no margin of error.
| + | 此外,该接头在机械上是完美的,没有错误的边缘。 |
| | | | |
| − | To solve this problem, the implant connection is not directly scanned but an '''Implant Marker or Scan Body''' is used in its stead. A Scan Body is a specific object, designed to be scanned, which fits exactly over the implant.
| + | 为了解决这个问题,种植体连接不直接扫描,而是使用'''种植体标记或扫描杆'''代替。一个扫描杆是一个特定对象,设计用于扫描,恰好适合种植体。 |
| | | | |
| − | The scan of the implant marker itself is not enough: its resulting data will be used to compute the exact position of the implant interface. In order to carry out this operation, an [[Implant_Library|Implant Library]] is needed .
| + | 种植体标记本身的扫描是不够的:其产生的数据将用来计算种植体界面的精确位置。为了进行这项操作,需要[[Implant_Library|植体数据库]]。 |
| | | | |
| − | The alignment to the implant library can be performed in the CAD software. However, using an implant library for Exocad's Platform, the user can perform this operation directly in the scanning software OpticalRevEng Dental, in order to get better results.
| + | 种植体中的对准可以在CAD软件中执行。然而,为了获得更好的结果,用户可以使用Exocad平台的植体库,在扫描软件OpticalRevEng Dental中直接执行此操作。 |
| | | | |
| − | = Implant Selection = | + | =植体选择= |
| | | | |
| − | After the mesh generation, by selecting the mesh of an implant marker from the project tree, the ''Marker Alignment'' button will appear in the [[Main_Toolbar|Main Toolbar]].
| + | 网格生成后,从项目树形图中选择植体标记的网格。''标记对齐''按钮会出现在[[Main_Toolbar|主工具栏]]中。 |
| − | Click on this button to open the ''Implant Selection'' dialog.
| + | 点击此按钮打开''选择种植体''对话框。 |
| | | | |
| − | {{Screenshot|Dental_3_5_implantSelection.JPG}}
| + | [[File:Dental_3_5_implantSelection.JPG]] |
| | | | |
| − | In this Dialog there are:
| + | 在这个对话框中有: |
| | | | |
| − | # A tooth position selection (Change ...) that can be used only in [[Free_Mode|Free Mode]] to select the tooth position of an implant | + | # 牙齿位置选择(更改 ...)只能用于[[Free_Mode|自由模式]]去选择种植体的牙齿位置 |
| − | # A '''Select Library''' button, that opens the Library Selection Panel | + | # '''选择库'''按钮打开库选择面板 |
| − | # A Marker Preview menu that, once the appropriate connection has been selected for the current element, will show the STL of the marker present in the library. It is possible to choose different views to check the Merker's shape | + | # 标记预览菜单,一旦为当前组件选择了适当的连接,将显示在当前库的标记STL文件。可以选择不同的视角来检查标记的形状 |
| | | | |
| − | To continue with the Marker selection click on the '''Select Library''' Button. The '''Implant Selection Panel''' will open. The Panel is divided in 4 Sections
| + | 要继续标记选择,点击'''选择库'''按钮。'''种植体选择面板'''将打开。面板将划分成4个部份 |
| | | | |
| − | {{Screenshot|Dental_3_5_implantSelectionPanel.JPG}}
| + | [[File:Dental_3_5_implantSelectionPanel.JPG]] |
| | | | |
| − | '''Library''' | + | '''库''' |
| | | | |
| − | For choosing the general connection and implant family, contains:
| + | 对于选择常规接口和种植体系列,包括: |
| | | | |
| − | # A Filter box where it is possible to write part of the name of the needed implant. All the implants that match the name will be showed in the implant list | + | # 一个筛选框,可以编写所需种植体名称的部分。所有匹配名称的种植体将在种植体列表中显示 |
| − | # An implant list with all the implants available in the current Implant Library | + | # 提供目前种植体库中所有种植体的种植体列表 |
| | | | |
| − | '''Type and Sub Type''' | + | '''类型和子类型''' |
| | | | |
| − | For Choosing the diameter and type of connection. There can be many of these types, in our libraries for instance there are:
| + | 用于选择接口的直径和类型。可能有许多这些类型,在我们的范例库中有: |
| | | | |
| − | * Engaging Connections : the connection can not rotate on the implant, suggested for abutments or single restorations | + | * 抗旋转接口 : 种植体上的接口不能旋转,建议用于基牙或单一修复 |
| − | * Not-Engaging Connections : the connection can rotate on the implant, suggested for bars and bridges | + | * 非抗璇接口 : 种植体上的接口可以旋转,建议用于杆卡或牙桥 |
| − | * For Zirconia : connections with specific shapes, suited for zirconia restorations | + | * 用于氧化锆: 特定形状的接口,适合氧化锆修复 |
| | | | |
| − | '''Preview''' | + | '''预览''' |
| | | | |
| − | Shows the preview of the STL marker present in the library
| + | 显示出在库中标记STL文件的预览 |
| | | | |
| − | '''Info''' | + | '''信息''' |
| | | | |
| − | If the library is correctly configured to work with our software, in this section it is possible to have a small overview of the libraries with additional information on the availabe diameters and implant types.
| + | 如果库根据我们使用的软件正确配置,在这个部份,可能会有关于库的简要概述,并且提供关于可用直径和种植体类型的附加信息。 |
| − | All our libraries are provided with this feature and, being connected to this wiki, the ''Open in browser'' button opens the wiki on the implant list page.
| + | 我们所有的库都提供此项功能,并连接到维基,使用''打开浏览器''按钮可以打开维基页面上的种植体列表。 |
| | | | |
| − | To accept the implant selection click on ''Select'', otherwise ''Cancel''.
| + | 如果接受种植体选择,则点击''选择'',否则点击''取消''。 |
| | | | |
| − | If the wrong implant is selected, it is possible to repeat the procedure to replace the old aligned connection with a new one.
| + | 如果选择错误的种植体,可以重复该过程,使用新的接口替换老的对齐接口。 |
| | | | |
| − | '''If the CAD design is launched using a wrong connection it will be necessary to restart all the design from the beginning''' | + | '''如果CAD设计使用错误的接口启动,有必要重新启动所有的设计''' |
| | | | |
| − | = Marker Alignment = | + | =标记对齐= |
| | | | |
| − | When selecting the implant connection, the software will start the [[Man_Align#Manual Alignment|Manual Alignment]] mode.
| + | 当选择种植体接口时,软件将启动[[Man_Align#Manual Alignment|手动对齐]]模式。 |
| | | | |
| − | The acquired marker mesh will need to be aligned to the library marker shape. From this data the connection position will be computed.
| + | 所采集的标记网格将需要与库的标记形状对齐。可以根据这个数据计算接口的位置。 |
| | | | |
| − | This procedure has to be performed for every marker of the project. The [[Man_DataExport|CAD Export]] will issue a warning if one or more marker alignments are missing.
| + | 需要对项目的每个标记执行这个过程。如果一个或多个标记对齐丢失,[[Man_DataExport|导出到CAD]]将发出警告。 |
| | | | |
| | {{Navigation|Man_MeshEditing|Man_DataExport}} | | {{Navigation|Man_MeshEditing|Man_DataExport}} |
标记对齐
当为一个种植体项目采集数据时,采集种植体本身是有问题的。它不像支台齿或一个石膏模型。种植体连接/接口通常很小,并且是金属的。
此外,该接头在机械上是完美的,没有错误的边缘。
为了解决这个问题,种植体连接不直接扫描,而是使用种植体标记或扫描杆代替。一个扫描杆是一个特定对象,设计用于扫描,恰好适合种植体。
种植体标记本身的扫描是不够的:其产生的数据将用来计算种植体界面的精确位置。为了进行这项操作,需要植体数据库。
种植体中的对准可以在CAD软件中执行。然而,为了获得更好的结果,用户可以使用Exocad平台的植体库,在扫描软件OpticalRevEng Dental中直接执行此操作。
植体选择
网格生成后,从项目树形图中选择植体标记的网格。标记对齐按钮会出现在主工具栏中。
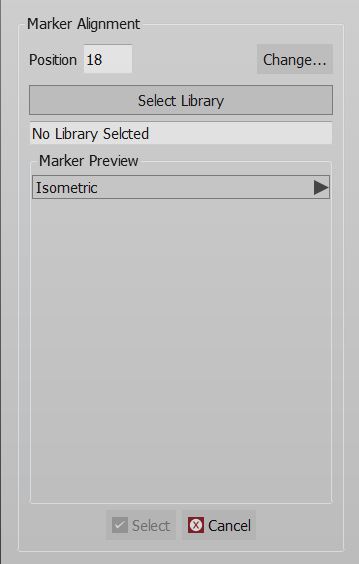
点击此按钮打开选择种植体对话框。

在这个对话框中有:
- 牙齿位置选择(更改 ...)只能用于自由模式去选择种植体的牙齿位置
- 选择库按钮打开库选择面板
- 标记预览菜单,一旦为当前组件选择了适当的连接,将显示在当前库的标记STL文件。可以选择不同的视角来检查标记的形状
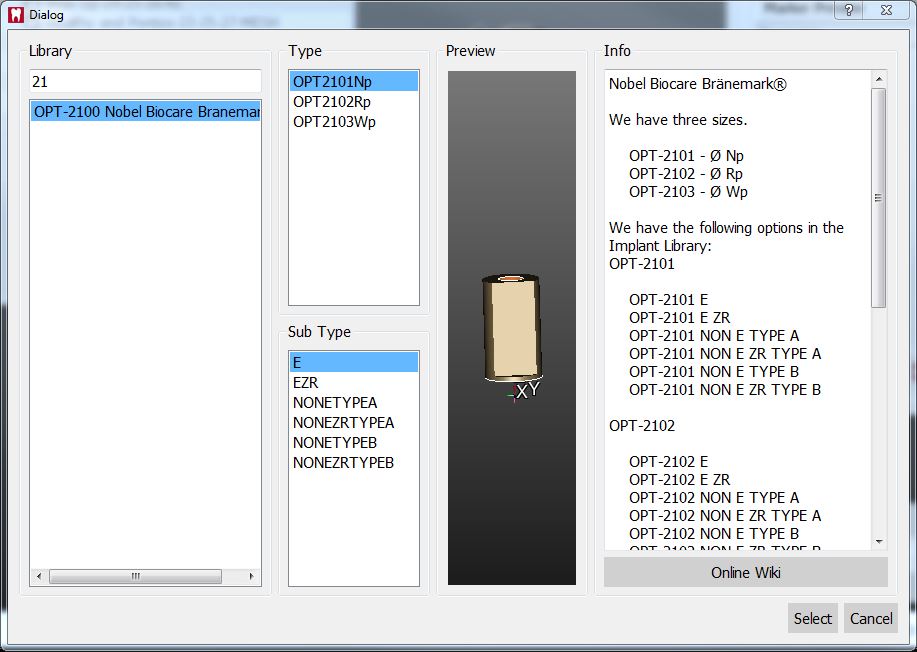
要继续标记选择,点击选择库按钮。种植体选择面板将打开。面板将划分成4个部份

库
对于选择常规接口和种植体系列,包括:
- 一个筛选框,可以编写所需种植体名称的部分。所有匹配名称的种植体将在种植体列表中显示
- 提供目前种植体库中所有种植体的种植体列表
类型和子类型
用于选择接口的直径和类型。可能有许多这些类型,在我们的范例库中有:
- 抗旋转接口 : 种植体上的接口不能旋转,建议用于基牙或单一修复
- 非抗璇接口 : 种植体上的接口可以旋转,建议用于杆卡或牙桥
- 用于氧化锆: 特定形状的接口,适合氧化锆修复
预览
显示出在库中标记STL文件的预览
信息
如果库根据我们使用的软件正确配置,在这个部份,可能会有关于库的简要概述,并且提供关于可用直径和种植体类型的附加信息。
我们所有的库都提供此项功能,并连接到维基,使用打开浏览器按钮可以打开维基页面上的种植体列表。
如果接受种植体选择,则点击选择,否则点击取消。
如果选择错误的种植体,可以重复该过程,使用新的接口替换老的对齐接口。
如果CAD设计使用错误的接口启动,有必要重新启动所有的设计
标记对齐
当选择种植体接口时,软件将启动手动对齐模式。
所采集的标记网格将需要与库的标记形状对齐。可以根据这个数据计算接口的位置。
需要对项目的每个标记执行这个过程。如果一个或多个标记对齐丢失,导出到CAD将发出警告。


