Difference between revisions of "Project Tree/zh-hant"
Democenter (talk | contribs) (Created page with "=== 數據狀態與選擇 ===") |
(Importing a new version from external source) |
||
| (28 intermediate revisions by 2 users not shown) | |||
| Line 1: | Line 1: | ||
{{Language bar}} | {{Language bar}} | ||
{{DISPLAYTITLE:Project Tree|noerror}} | {{DISPLAYTITLE:Project Tree|noerror}} | ||
| − | = | + | = 项目树形图 = |
| − | + | 软件界面的左上角是该项目的管理面板,它包含所有采集和修改的数据。 | |
| − | + | 结构化与自由模式的项目树形图是不同的。 | |
| − | == | + | == 结构化项目 == |
| − | + | 这张图像显示了一个结构化树形图的例子: | |
| − | {{Screenshot| | + | {{Screenshot|Dental_3.5_projectTree.JPG}} |
| − | === | + | === 数据状态与选择 === |
| − | + | 项目的每个对象都有3种不同的状态,每种状态都用不同的颜色框标记: | |
| − | * '' | + | * ''没有数据(灰框)'':这是项目要完成但没有可用数据的元素。需要导入或扫描这个元素。 |
| − | * '' | + | * ''已采集(篮框)'':这是一个'''已采集'''的元素。可以将此数据与该项目的其他部分对齐,对其进行编辑或转换成网格格式。 |
| − | * '' | + | * ''网格化(绿框)'':这是一个'''已转换成网格'''的元素。可以编辑此数据并导出。 |
| − | + | 可以与项目树形图进行交互: | |
| − | # | + | # 左击元素点选 |
| − | # | + | # 按住CTRL并左击元素以将其添加至目前选择 |
| − | # | + | # 右击元素以打开''元素上下文菜单'' |
| − | # | + | # 在表外左击以清除目前选择 |
| − | + | 所有选择的元素将显示在3D视图上,软件会根据目前选择激活[[Main_Toolbar|主工具栏]]与[[Support_Toolbars|支持工具栏]]菜单上所有可操作的按钮。 | |
| − | + | 信息布置为树状,每一个元素都能有“子”元素。这种设计能表现出项目信息的从属。例如一个单一的支台齿是颚的一部分,所以它就是颚的子元素。当软件要求“对齐”支台齿与其他项目时,会将它与其“父”元素对齐。 | |
| − | == | + | == 上下文菜单 == |
| − | + | 右击项目树形图元素,将显示上下文菜单: | |
| − | {{Screenshot| | + | {{Screenshot|Dental_3_5_projectTreeMenu.JPG}} |
| − | + | 上下文菜单显示: | |
| − | * | + | * '''子菜单''':包含一些选定元素的工具(网格、采集) |
| − | * | + | * '''恢复采集'''按钮:将''删除''网格并恢复至之前的采集 |
| − | * | + | * '''更改颜色'''按钮:改变元素的''分配颜色'',用于3D视图 |
| − | * | + | * '''更改策略'''按钮:改变此元素的''扫描及网格化策略'' |
| − | * | + | * '''导入...'''按钮:从磁盘导入支持格式的网格或采集文件 |
| − | * | + | * '''导出...'''按钮:导出支持格式的网格或采集到磁盘文件 |
| − | * | + | * '''导出所见'''按钮:将目前所选的所有网格整合导出成一个文件 |
| − | == | + | == 拖放 == |
| − | + | 您可以拖动一个元素然后放在另一个元素上 | |
| − | {{Screenshot| | + | {{Screenshot|Dental_3_5_projectTreeClone.gif}} |
| − | + | 可用的操作将是: | |
| − | * ''' | + | * '''克隆'''创建一个元素的副本 |
| − | * ''' | + | * '''移至 ...'''克隆该元素并删除原始元素 |
| − | * ''' | + | * '''交换'''交换2个元素的网格或采集信息 |
| + | * '''删除其共同点'''从一系列图像自动删除共同点 | ||
| − | == | + | == 自由项目 == |
| − | + | 这是自由项目树形图的截图 | |
| − | {{Screenshot| | + | {{Screenshot|Dental_3_5_projectTreeFree.gif}} |
| − | + | 在自由项目模式下,软件无法得知数据之间的从属关系。因此没有树形图,没有子目录,只有一个对象列表。 | |
| − | + | 有2种类型的对象。采集(篮框)或网格(绿框) | |
| − | + | 这种项目类型的操作方法与''结构化项目''大部分相同。 | |
| − | + | 不同处是: | |
| − | * | + | * 要创建一个数据副本,您需要打开上下文菜单并选择''复制''功能。 |
| − | * | + | * 通过拖动一个元素到另一个元素上,您可以选择2个动作: |
| − | ** | + | **''直接对齐'':自动对齐2个元素。 |
| − | ** | + | **''手动对齐'':手动对齐2个元素。 |
| + | **''删除共同点'':该操作自动从范围图像删除共同的部分 | ||
{{Navigation|Interaction|Main Toolbar}} | {{Navigation|Interaction|Main Toolbar}} | ||
Latest revision as of 12:14, 1 August 2017
项目树形图
软件界面的左上角是该项目的管理面板,它包含所有采集和修改的数据。
结构化与自由模式的项目树形图是不同的。
结构化项目
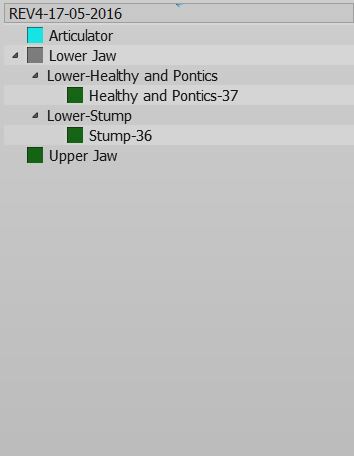
这张图像显示了一个结构化树形图的例子:
数据状态与选择
项目的每个对象都有3种不同的状态,每种状态都用不同的颜色框标记:
- 没有数据(灰框):这是项目要完成但没有可用数据的元素。需要导入或扫描这个元素。
- 已采集(篮框):这是一个已采集的元素。可以将此数据与该项目的其他部分对齐,对其进行编辑或转换成网格格式。
- 网格化(绿框):这是一个已转换成网格的元素。可以编辑此数据并导出。
可以与项目树形图进行交互:
- 左击元素点选
- 按住CTRL并左击元素以将其添加至目前选择
- 右击元素以打开元素上下文菜单
- 在表外左击以清除目前选择
所有选择的元素将显示在3D视图上,软件会根据目前选择激活主工具栏与支持工具栏菜单上所有可操作的按钮。
信息布置为树状,每一个元素都能有“子”元素。这种设计能表现出项目信息的从属。例如一个单一的支台齿是颚的一部分,所以它就是颚的子元素。当软件要求“对齐”支台齿与其他项目时,会将它与其“父”元素对齐。
上下文菜单
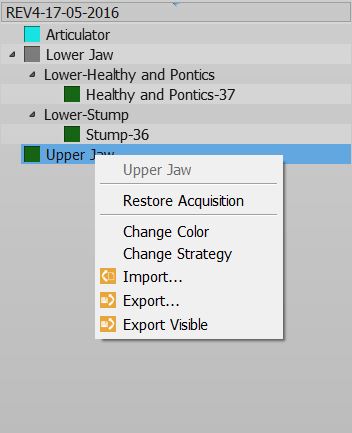
右击项目树形图元素,将显示上下文菜单:
上下文菜单显示:
- 子菜单:包含一些选定元素的工具(网格、采集)
- 恢复采集按钮:将删除网格并恢复至之前的采集
- 更改颜色按钮:改变元素的分配颜色,用于3D视图
- 更改策略按钮:改变此元素的扫描及网格化策略
- 导入...按钮:从磁盘导入支持格式的网格或采集文件
- 导出...按钮:导出支持格式的网格或采集到磁盘文件
- 导出所见按钮:将目前所选的所有网格整合导出成一个文件
拖放
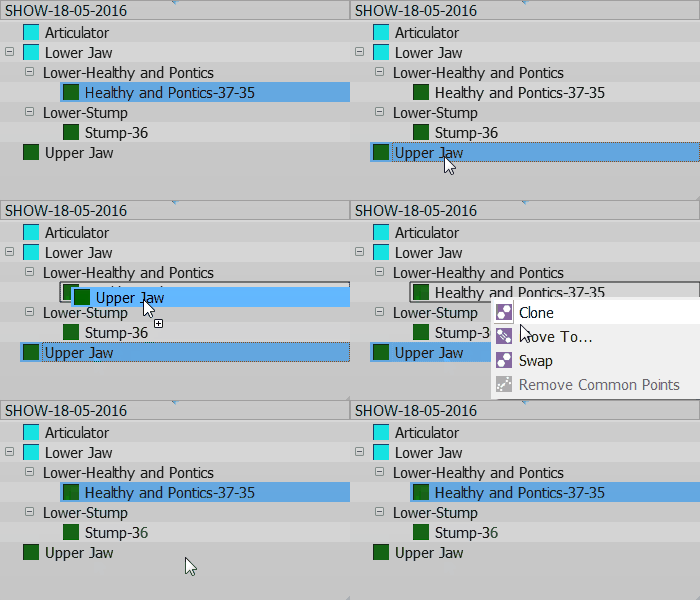
您可以拖动一个元素然后放在另一个元素上
可用的操作将是:
- 克隆创建一个元素的副本
- 移至 ...克隆该元素并删除原始元素
- 交换交换2个元素的网格或采集信息
- 删除其共同点从一系列图像自动删除共同点
自由项目
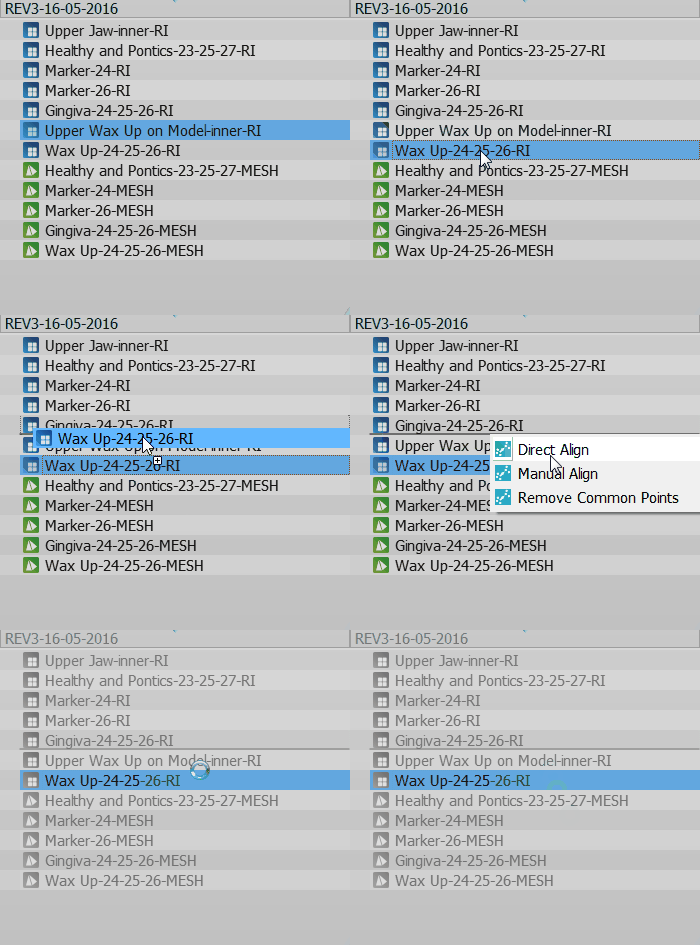
这是自由项目树形图的截图
在自由项目模式下,软件无法得知数据之间的从属关系。因此没有树形图,没有子目录,只有一个对象列表。
有2种类型的对象。采集(篮框)或网格(绿框)
这种项目类型的操作方法与结构化项目大部分相同。
不同处是:
- 要创建一个数据副本,您需要打开上下文菜单并选择复制功能。
- 通过拖动一个元素到另一个元素上,您可以选择2个动作:
- 直接对齐:自动对齐2个元素。
- 手动对齐:手动对齐2个元素。
- 删除共同点:该操作自动从范围图像删除共同的部分


