Difference between revisions of "Wiz Introduction/ja"
(Created page with "''ウィザードモード''を起動すると、ソフトウェアのインターフェースが変わります:") |
(Created page with "# スキャナーから必要なすべてのデータを取得する # それぞれの取得後: ## Wiz_BaseCutAndAutoCleaning|サポートホルダー...") |
||
| (4 intermediate revisions by the same user not shown) | |||
| Line 10: | Line 10: | ||
''ウィザードモード''を起動すると、ソフトウェアのインターフェースが変わります: | ''ウィザードモード''を起動すると、ソフトウェアのインターフェースが変わります: | ||
| − | * | + | * [[Main_Toolbar|メインツールバー]]が消えます |
| − | * | + | * [[Project_Tree|プロジェクトツリー]]の代わりに、ウィザードステップリストが表示され、完了済みのステップと次のステップを確認できます。 |
| − | * | + | * アプリケーションの右上には、ユーザーをガイドするウィザードがあり、4つのボタンのみで操作できます |
| − | *# {{List button|dental_2_5_wiz_prev.png}} : | + | *# {{List button|dental_2_5_wiz_prev.png}} : 前のウィザードステップに戻る |
| − | *# {{List button|dental_2_5_wiz_skip.png}} : | + | *# {{List button|dental_2_5_wiz_skip.png}} : 現在のステップをスキップする |
| − | *# {{List button|dental_2_5_wiz_quit.png}} : | + | *# {{List button|dental_2_5_wiz_quit.png}} : ステップバイステップウィザードを閉じ、手動で作業を続ける |
| − | *# {{List button|dental_2_5_wiz_next.png}} : | + | *# {{List button|dental_2_5_wiz_next.png}} : 現在のステップを確定し、次のステップへ進む |
| − | + | ウィザードの全ステップにおいて、その他すべてのツールはロックされます。ソフトウェアとの対話は、すべて画面右上にある''ウィザードパネル''で行われます | |
{{Screenshot|Dental_2_5_wizStart.jpg}} | {{Screenshot|Dental_2_5_wizStart.jpg}} | ||
| − | == | + | == ウィザードの順序 == |
| − | + | ウィザードステップの順序は、各プロジェクトによって異なります。基本的な考え方は以下のとおりです: | |
| − | # [[Wiz_Acquisition| | + | # スキャナーから必要なすべてのデータを[[Wiz_Acquisition|取得]]する |
| − | # | + | # それぞれの取得後: |
| − | ## [[Wiz_BaseCutAndAutoCleaning| | + | ## [[Wiz_BaseCutAndAutoCleaning|サポートホルダーからの取得と複製されたデータを綺麗にする]] |
| − | ## [[Wiz_Align| | + | ## [[Wiz_Align|取得データをプロジェクトの残りの部分にアライメントし、必要に応じてアライメント状態をチェックする]] |
| − | # [[Wiz_ProjectCheck| | + | # [[Wiz_ProjectCheck|すべての情報が正しくアライメントされているかチェックする]] |
| − | # | + | # 必要なメッシュを生成する |
| − | # [[Wiz_ImplantAlign| | + | # [[Wiz_ImplantAlign|インプラントをアライメントする]] |
| − | # [[Wiz_Export| | + | # [[Wiz_Export|CADへエクスポートする]] |
{{Navigation|Man_ModelTrimming|Wiz_Acquisition}} | {{Navigation|Man_ModelTrimming|Wiz_Acquisition}} | ||
Latest revision as of 12:38, 29 December 2015
ステップバイステップウィザード
構造プロジェクトで作業する場合、このスキャニングソフトウェアでは、最初のスキャナー取得からデータのエクスポートまで、ユーザーをガイドするウィザードを利用できます。
ウィザードのインターフェース
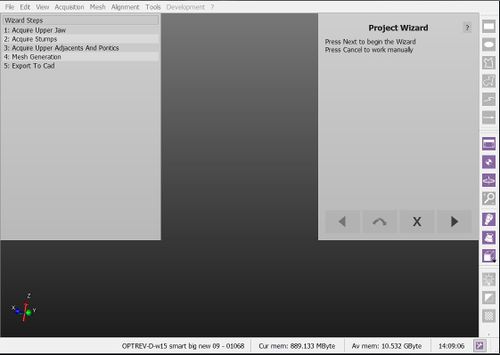
ウィザードモードを起動すると、ソフトウェアのインターフェースが変わります:
- メインツールバーが消えます
- プロジェクトツリーの代わりに、ウィザードステップリストが表示され、完了済みのステップと次のステップを確認できます。
- アプリケーションの右上には、ユーザーをガイドするウィザードがあり、4つのボタンのみで操作できます
ウィザードの全ステップにおいて、その他すべてのツールはロックされます。ソフトウェアとの対話は、すべて画面右上にあるウィザードパネルで行われます
ウィザードの順序
ウィザードステップの順序は、各プロジェクトによって異なります。基本的な考え方は以下のとおりです:
- スキャナーから必要なすべてのデータを取得する
- それぞれの取得後:
- すべての情報が正しくアライメントされているかチェックする
- 必要なメッシュを生成する
- インプラントをアライメントする
- CADへエクスポートする


