Difference between revisions of "Man Acquisition/pt-br"
(Created page with "# Coloque o objeto dentro do scanner, da melhor maneira possível # Uso o Acquisição Individual ferramenta") |
(Updating to match new version of source page) |
||
| (50 intermediate revisions by 4 users not shown) | |||
| Line 15: | Line 15: | ||
# Coloque o objeto dentro do scanner no suporte do modelo adequado | # Coloque o objeto dentro do scanner no suporte do modelo adequado | ||
# Na''Arvore Projeto'', selecione o objeto a ser escaneado | # Na''Arvore Projeto'', selecione o objeto a ser escaneado | ||
| − | # Clique no ícone de Aquisição sobre o [[ | + | # Clique no ícone de Aquisição sobre o [[Main_Toolbar|Principal Barra de Ferramentas]] |
| − | + | The scanner will then acquire the object using the strategy of the selected element and the status of the ''Project Tree'' will be updated. | |
| − | [[ | + | [[File:Denta_2_5_simpleAcquisition.gif]] |
| − | + | If the models are prepared to be mounted in an articulator, they could be too tall to be mounted on the tall model holder and be properly focused by the scanner. For this reason, the model holder base can be detached from the plate itself to allow the user to scan taller models on the low support. | |
| − | + | [[File:piattello-da-staccare.jpg]] | |
| + | [[File:piattello-staccato.jpg]] | ||
| + | |||
| + | === Advanced Parameters === | ||
| + | |||
| + | To use an acquisition strategy different from the default, hold the {{Inline button|Key shift.png}} button when clicking on the Acquisition icon. | ||
| + | |||
| + | [[File:Adv-acqui.JPG]] | ||
| + | |||
| + | An addittional dialog will allow to choose a different strategy and a color for the object that needs to be acquired | ||
| + | |||
| + | === Dynamic Articulation === | ||
| + | |||
| + | If the '''Dynamic Articulation Module''' is enabled and in use, the software will remind the user to scan the jaw on top of the adequate base. | ||
| + | |||
| + | [[File:Msg art.PNG]] | ||
| + | |||
| + | The base to be used depends on the '''type of articulator''' chosen in the project definition. | ||
| + | |||
| + | {{Important|If the base type doesn't match the type of articulator, the positioning in Exocad Virtual Articulator won't be correct.}} | ||
| + | |||
| + | == Multi-Munhão == | ||
| + | |||
| + | To acquire multiple dies in a single scan, even from both jaws at the same time, using the multi-die support: | ||
# Selecione a partir do ''Projeto Arvore'' todas matrizes a serem digitalizados | # Selecione a partir do ''Projeto Arvore'' todas matrizes a serem digitalizados | ||
| − | # Clique no botão Aquisição Multi-Die que aparece na[[ | + | # Clique no botão Aquisição Multi-Die que aparece na [[Main_Toolbar|Principal Barra de Ferramentas]]. Pelo menos 2 matrizes têm que ser seleccionados na ''Projeto Arvore'' |
# Coloque as matrizes em cada espaço do suporte, como mostrado pelo software na janela superior direita e colocaque o suporte Multi-Die dentro do escaner | # Coloque as matrizes em cada espaço do suporte, como mostrado pelo software na janela superior direita e colocaque o suporte Multi-Die dentro do escaner | ||
# Clique o botão ''Iniciar Aquisição'' | # Clique o botão ''Iniciar Aquisição'' | ||
| Line 32: | Line 55: | ||
O escaner irá adquirir os dados, identificando cada dado e atualizando o status do ''Projeto Arvore'' | O escaner irá adquirir os dados, identificando cada dado e atualizando o status do ''Projeto Arvore'' | ||
| − | [[ | + | [[File:Dental_2_5_multiDieAcquisition.gif]] |
== Individual == | == Individual == | ||
| Line 39: | Line 62: | ||
# Coloque o objeto dentro do scanner, da melhor maneira possível | # Coloque o objeto dentro do scanner, da melhor maneira possível | ||
| − | # Uso o [[ | + | # Uso o [[Support_Toolbars_And_Menus#Tools|Acquisição Individual]] ferramenta |
| − | + | O software irá realizar uma única aquisição sem mover o sistema de motores | |
| − | = | + | = Integração = |
| − | + | Depois que um objeto tenha sido adquirido no scanner, pode haver a necessidade de adicionar mais informações para o escaneamento inicial. Por exemplo, parte do objeto pode estar faltando devido a sombras ou porque a estratégia de aquisição não cobriu um ponto de vista específico. | |
| − | In order to integrate additional information, use the '''Integrate Acquisition''' button on the [[Main_Toolbar|Main Toolbar]]. This will launch the ''Integration Mode'', providing 3 different integration tools. It is possible to switch from one tool to another. Confirm the modification with the '''Apply''' {{Inline button| | + | In order to integrate additional information, use the '''Integrate Acquisition''' button on the [[Main_Toolbar|Main Toolbar]]. This will launch the ''Integration Mode'', providing 3 different integration tools. It is possible to switch from one tool to another. Confirm the modification with the '''Apply''' {{Inline button|AcceptButton.jpg}} button or discard it with the '''Cancel''' {{Inline button|Dental_2_5_cancelButton.png}} button. |
It is possible to add an unlimited number of acquisitions but '''adding to much data could slow down the project and increase the project disk size'''. | It is possible to add an unlimited number of acquisitions but '''adding to much data could slow down the project and increase the project disk size'''. | ||
| − | == | + | == Individual == |
| − | + | O modo de integração individual permite adicionar informações a partir de um ponto de vista específico. Para adicionar informações: | |
| − | # | + | # Girar a visualização 3D de modo que a tela irá mostrar exatamente a parte do objeto a ser integrada |
| − | # | + | # Clique em Iniciar Integração {{Inline button|Dental_2_5_startIntegrationButton.png}} icon |
| − | If the | + | If you wish for the plate to replicate the virtual movements you apply to the image, check the '''Follow 3d View''' Box |
| + | |||
| + | Se a última aquisição adicionada não for boa, inútil ou problemática, é possível removê-lo com o botão '''Desfazer''' {{Inline button|Dental_2_5_undoLastIntegrationBtn.png}}. | ||
If the object is not in the original scanning position, the software can not correctly integrate the information. It is possible to try to fix this problem using the ''Calc Integration Position'' button. | If the object is not in the original scanning position, the software can not correctly integrate the information. It is possible to try to fix this problem using the ''Calc Integration Position'' button. | ||
| − | {{Screenshot| | + | {{Screenshot|dental_3_5_integrateSingle.jpg}} |
| − | |||
| − | |||
| − | |||
| − | |||
| − | + | == Smart == | |
| − | + | The Smart mode, instead of scanning one position at a time, allows to identify the holes on the virtual model and, if possible, close them with a scanning sequence. <br /> | |
| − | |||
| − | + | Para adicionar uma posição: | |
| − | # | + | # Rotate the 3D view to identify the holes, and left click on the ones that need to be closed |
| − | # Click the | + | # Click the {{Inline button|Dental_2_5_startIntegrationButton.png}} button to start the integration sequence |
| − | + | The images will be added to the scan and then aligned all together at the end of the acquisition | |
| − | {{Screenshot| | + | {{Screenshot|dental_3_5_integrateMulti.JPG}} |
| − | == | + | ==Completo== |
| − | + | A integração completa é o modo mais fácil: permite selecionar quantas posições forem necessárias, e em que grau a placa deve inclinar para completar a imagem. <br /> | |
| − | + | Em seguida, clicando o botão Inicie a Integração [[File: Dental_2_5_startIntegrationButton.png|x35px]], o escaner irá inclinar o modelo e realizar uma aquisição de 360 ° usando o número selecionado de posições. | |
| − | {{Screenshot| | + | {{Screenshot|dental_3_5_integrateFull.JPG}} |
| − | = | + | = Mudar Estratégia = |
| − | + | Quando o '' Projeto Arvore '' é criado, o software irá selecionar uma estratégia específica para cada elemento, tentando maximizar a qualidade da digitalização e economia de espaço. Para alterar a estratégia de um elemento do projeto | |
| − | # | + | # Botão direito do mouse sobre o elemento na árvore do projeto |
| − | # | + | # Selecione ''Alterar Estratégia'' |
| − | # | + | # Selecione a nova estratégia no menu suspenso |
Another scan of the object will be carried out using the new strategy instead of the old one. | Another scan of the object will be carried out using the new strategy instead of the old one. | ||
{{Navigation|Man_ProjctCreation|Man_DataEditing}} | {{Navigation|Man_ProjctCreation|Man_DataEditing}} | ||
Latest revision as of 11:30, 7 September 2016
Contents
Aquisições
Adquirir dados do escaner e criar uma representação virtual 3D de um objeto é a principal função do software OpticalRevEng Dental.
Para obter informações adicionais sobre o Assistente Passo-a-Passo, verifique aWizard Acquisition página.
No Projeto Estruturado fora do assistente, existem 3 procedimentos para a aquisição de dados a partir do escaner.
Simples
Esta é a maneira mais fácil de adquirir dados, e os mais utilizados:
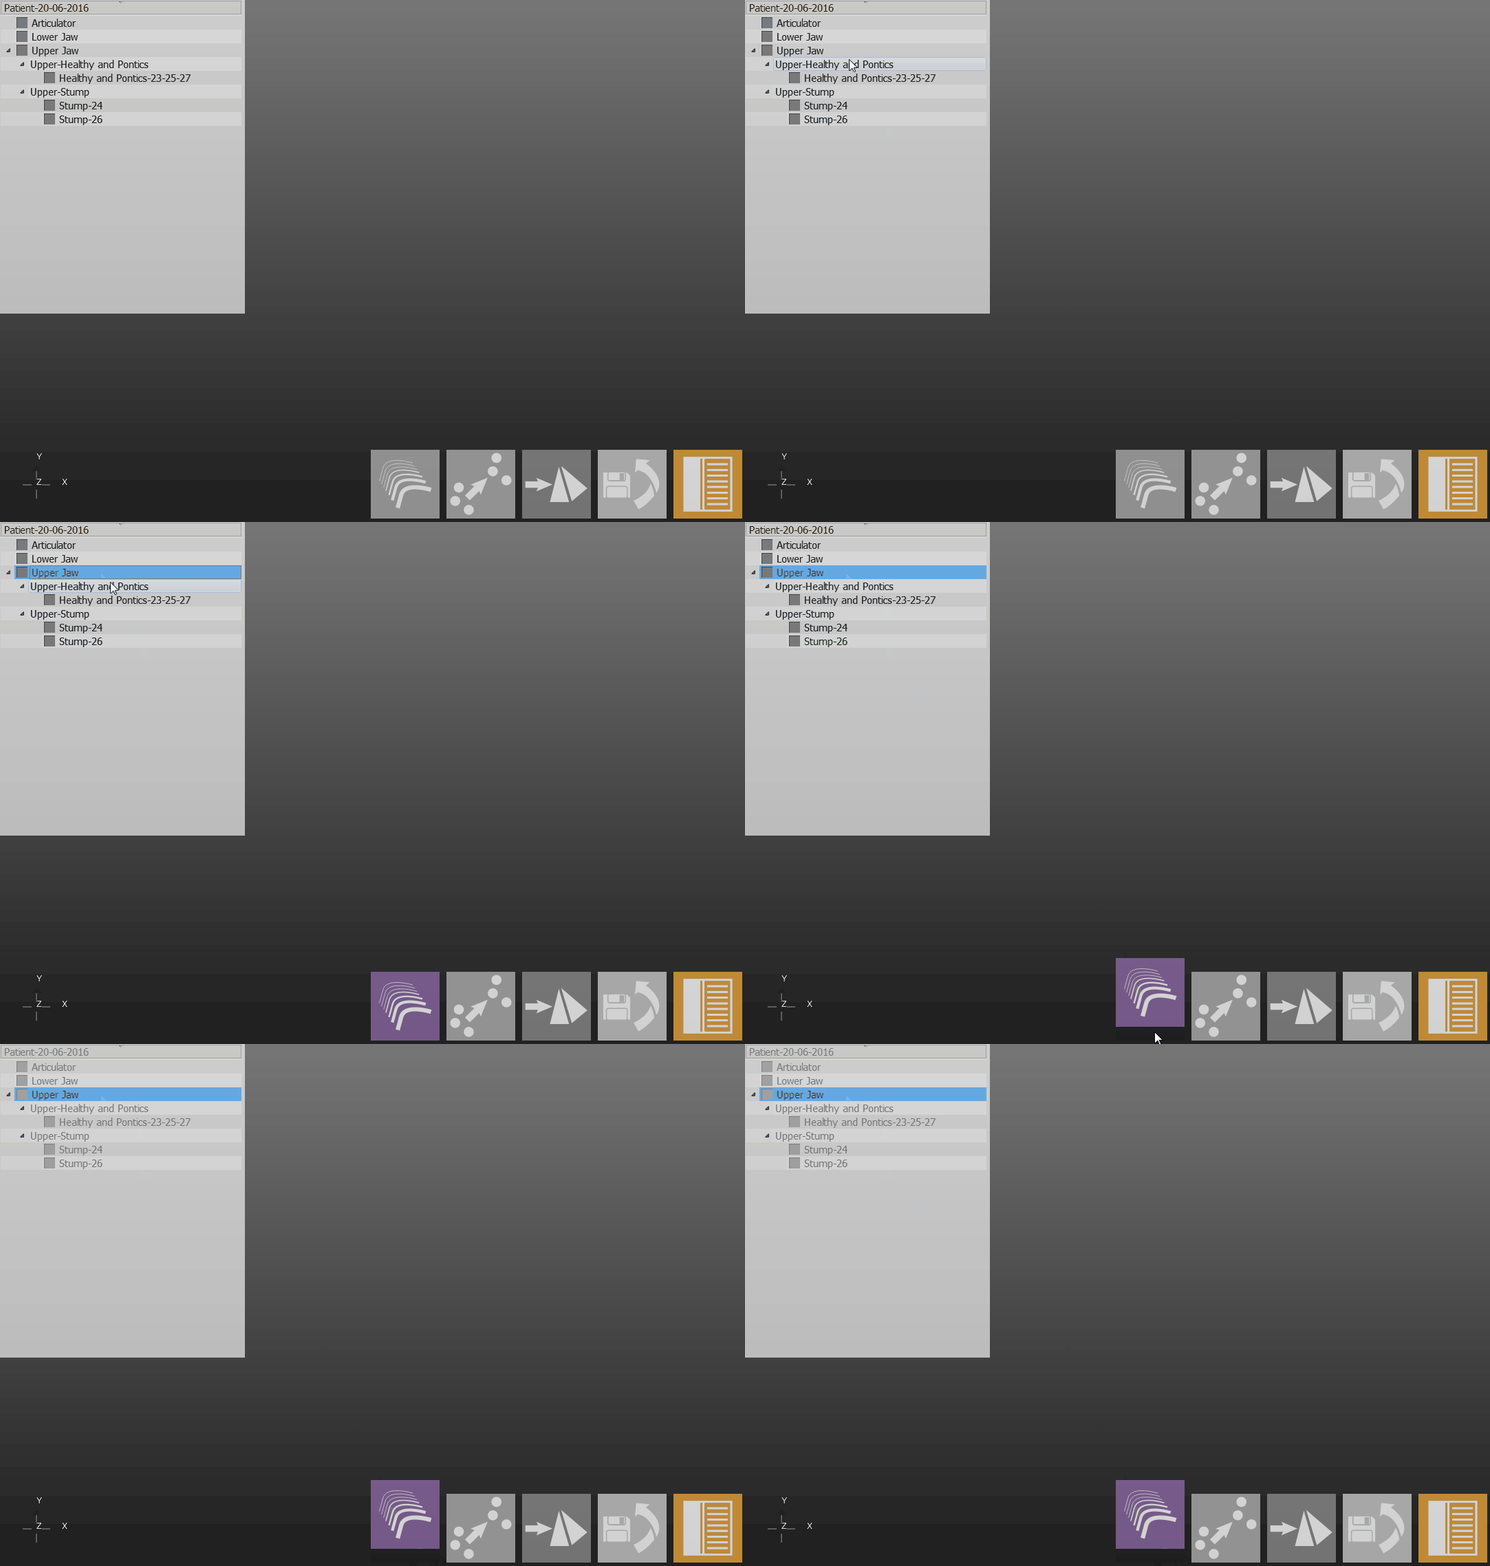
- Coloque o objeto dentro do scanner no suporte do modelo adequado
- NaArvore Projeto, selecione o objeto a ser escaneado
- Clique no ícone de Aquisição sobre o Principal Barra de Ferramentas
The scanner will then acquire the object using the strategy of the selected element and the status of the Project Tree will be updated.
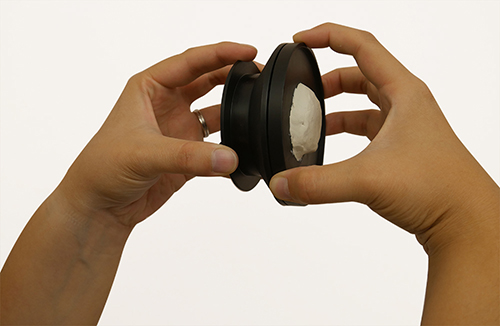
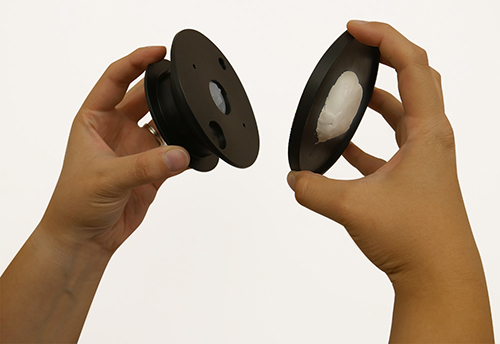
If the models are prepared to be mounted in an articulator, they could be too tall to be mounted on the tall model holder and be properly focused by the scanner. For this reason, the model holder base can be detached from the plate itself to allow the user to scan taller models on the low support.
Advanced Parameters
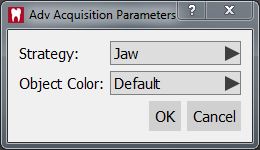
To use an acquisition strategy different from the default, hold the ![]() button when clicking on the Acquisition icon.
button when clicking on the Acquisition icon.
An addittional dialog will allow to choose a different strategy and a color for the object that needs to be acquired
Dynamic Articulation
If the Dynamic Articulation Module is enabled and in use, the software will remind the user to scan the jaw on top of the adequate base.
The base to be used depends on the type of articulator chosen in the project definition.
Multi-Munhão
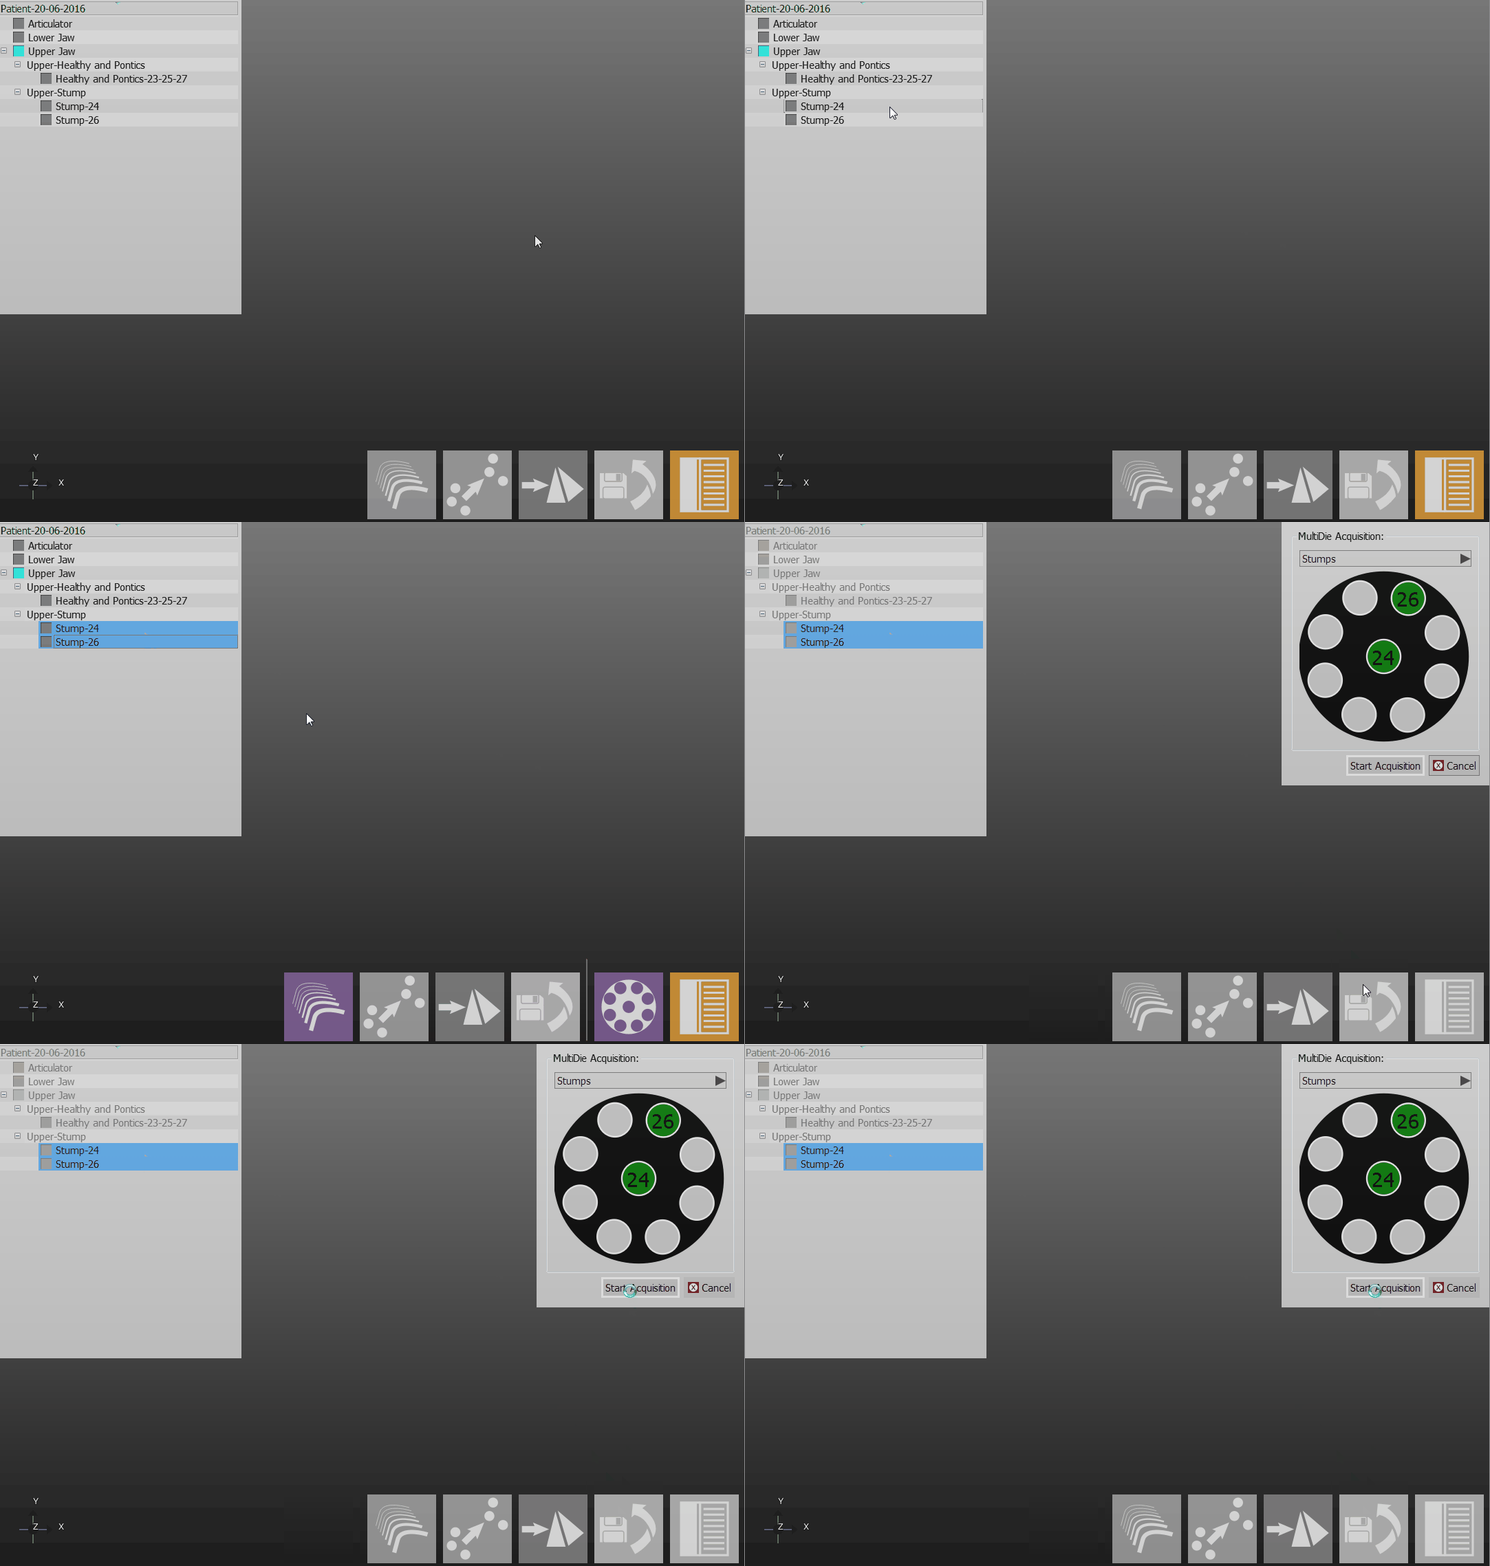
To acquire multiple dies in a single scan, even from both jaws at the same time, using the multi-die support:
- Selecione a partir do Projeto Arvore todas matrizes a serem digitalizados
- Clique no botão Aquisição Multi-Die que aparece na Principal Barra de Ferramentas. Pelo menos 2 matrizes têm que ser seleccionados na Projeto Arvore
- Coloque as matrizes em cada espaço do suporte, como mostrado pelo software na janela superior direita e colocaque o suporte Multi-Die dentro do escaner
- Clique o botão Iniciar Aquisição
O escaner irá adquirir os dados, identificando cada dado e atualizando o status do Projeto Arvore
Individual
Para adquirir uma única imagem 3D, e não um objeto de reconstrução a 360 ° (para teste ou para adquirir uma grande articulação em um pequeno escaner):
- Coloque o objeto dentro do scanner, da melhor maneira possível
- Uso o Acquisição Individual ferramenta
O software irá realizar uma única aquisição sem mover o sistema de motores
Integração
Depois que um objeto tenha sido adquirido no scanner, pode haver a necessidade de adicionar mais informações para o escaneamento inicial. Por exemplo, parte do objeto pode estar faltando devido a sombras ou porque a estratégia de aquisição não cobriu um ponto de vista específico.
In order to integrate additional information, use the Integrate Acquisition button on the Main Toolbar. This will launch the Integration Mode, providing 3 different integration tools. It is possible to switch from one tool to another. Confirm the modification with the Apply ![]() button or discard it with the Cancel
button or discard it with the Cancel ![]() button.
button.
It is possible to add an unlimited number of acquisitions but adding to much data could slow down the project and increase the project disk size.
Individual
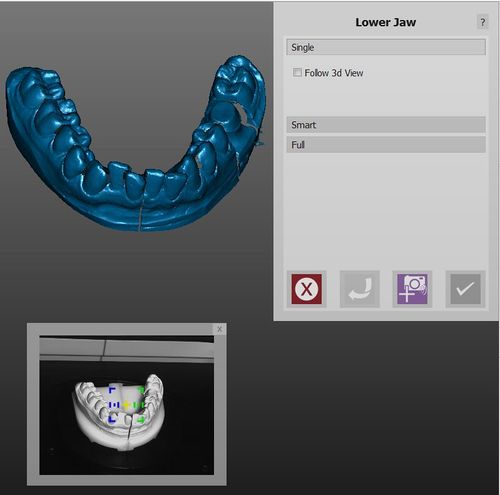
O modo de integração individual permite adicionar informações a partir de um ponto de vista específico. Para adicionar informações:
- Girar a visualização 3D de modo que a tela irá mostrar exatamente a parte do objeto a ser integrada
- Clique em Iniciar Integração
 icon
icon
If you wish for the plate to replicate the virtual movements you apply to the image, check the Follow 3d View Box
Se a última aquisição adicionada não for boa, inútil ou problemática, é possível removê-lo com o botão Desfazer ![]() .
.
If the object is not in the original scanning position, the software can not correctly integrate the information. It is possible to try to fix this problem using the Calc Integration Position button.
Smart
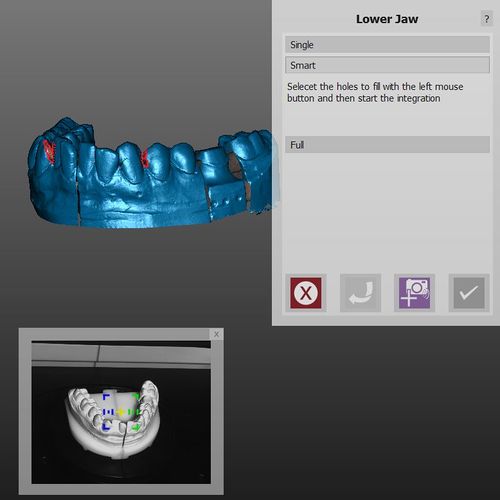
The Smart mode, instead of scanning one position at a time, allows to identify the holes on the virtual model and, if possible, close them with a scanning sequence.
Para adicionar uma posição:
- Rotate the 3D view to identify the holes, and left click on the ones that need to be closed
- Click the
 button to start the integration sequence
The images will be added to the scan and then aligned all together at the end of the acquisition
Completo
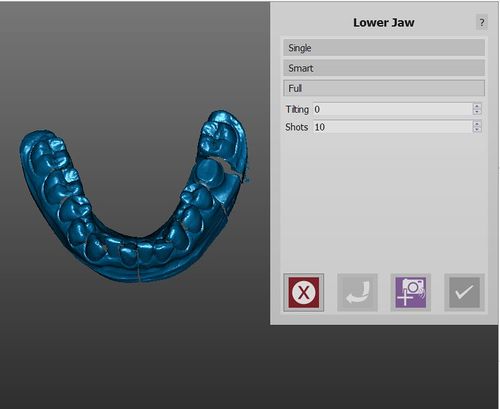
A integração completa é o modo mais fácil: permite selecionar quantas posições forem necessárias, e em que grau a placa deve inclinar para completar a imagem.
Em seguida, clicando o botão Inicie a Integração ![]() , o escaner irá inclinar o modelo e realizar uma aquisição de 360 ° usando o número selecionado de posições.
, o escaner irá inclinar o modelo e realizar uma aquisição de 360 ° usando o número selecionado de posições.
Mudar Estratégia
Quando o Projeto Arvore é criado, o software irá selecionar uma estratégia específica para cada elemento, tentando maximizar a qualidade da digitalização e economia de espaço. Para alterar a estratégia de um elemento do projeto
- Botão direito do mouse sobre o elemento na árvore do projeto
- Selecione Alterar Estratégia
- Selecione a nova estratégia no menu suspenso
Another scan of the object will be carried out using the new strategy instead of the old one.
