Difference between revisions of "Man Acquisition"
(Marked this version for translation) |
|||
| (27 intermediate revisions by 3 users not shown) | |||
| Line 1: | Line 1: | ||
| − | + | {{Language bar}} | |
| − | {{DISPLAYTITLE:Acquisition}} | + | {{DISPLAYTITLE:Acquisition|noerror}} |
<translate> | <translate> | ||
= Acquisitions = <!--T:1--> | = Acquisitions = <!--T:1--> | ||
| Line 8: | Line 8: | ||
<!--T:2--> | <!--T:2--> | ||
| − | For | + | For additional information about the Step-By-Step Wizard, check the [[Wiz_Acquisition|Wizard Acquisition]] page. |
<!--T:11--> | <!--T:11--> | ||
| − | In a '''Structured Project''' outside | + | In a '''Structured Project''' outside the wizard, there are 3 procedures to acquire data from the scanner. |
== Simple == <!--T:3--> | == Simple == <!--T:3--> | ||
<!--T:12--> | <!--T:12--> | ||
| − | This is the | + | This is the easiest way to acquire data, and the most used: |
<!--T:13--> | <!--T:13--> | ||
| − | # Put the object inside the scanner | + | # Put the object inside the scanner on the appropriate model holder |
| − | # | + | # In the ''Project Tree'', select the object to scan |
| − | # Click the Acquisition | + | # Click the Acquisition icon on the [[Main_Toolbar|Main Toolbar]] |
<!--T:14--> | <!--T:14--> | ||
| − | The scanner will then acquire the object | + | The scanner will then acquire the object using the strategy of the selected element and the status of the ''Project Tree'' will be updated. |
<!--T:15--> | <!--T:15--> | ||
| − | [[File:Denta_2_5_simpleAcquisition.gif| | + | [[File:Denta_2_5_simpleAcquisition.gif]] |
| + | |||
| + | <!--T:56--> | ||
| + | If the models are prepared to be mounted in an articulator, they could be too tall to be mounted on the tall model holder and be properly focused by the scanner. For this reason, the model holder base can be detached from the plate itself to allow the user to scan taller models on the low support. | ||
| + | |||
| + | <!--T:57--> | ||
| + | [[File:piattello-da-staccare.jpg]] | ||
| + | [[File:piattello-staccato.jpg]] | ||
| + | |||
| + | === Advanced Parameters === <!--T:49--> | ||
| + | |||
| + | <!--T:50--> | ||
| + | To use an acquisition strategy different from the default, hold the {{Inline button|Key shift.png}} button when clicking on the Acquisition icon. | ||
| + | |||
| + | <!--T:51--> | ||
| + | [[File:Adv-acqui.JPG]] | ||
| + | |||
| + | <!--T:52--> | ||
| + | An addittional dialog will allow to choose a different strategy and a color for the object that needs to be acquired | ||
| + | |||
| + | === Dynamic Articulation === <!--T:53--> | ||
| + | |||
| + | <!--T:45--> | ||
| + | If the '''Dynamic Articulation Module''' is enabled and in use, the software will remind the user to scan the jaw on top of the adequate base. | ||
| + | |||
| + | <!--T:46--> | ||
| + | [[File:Msg art.PNG]] | ||
| + | |||
| + | <!--T:47--> | ||
| + | The base to be used depends on the '''type of articulator''' chosen in the project definition. | ||
| + | |||
| + | <!--T:48--> | ||
| + | {{Important|If the base type doesn't match the type of articulator, the positioning in Exocad Virtual Articulator won't be correct.}} | ||
== Multi-Die == <!--T:16--> | == Multi-Die == <!--T:16--> | ||
<!--T:17--> | <!--T:17--> | ||
| − | To acquire multiple dies in | + | To acquire multiple dies in a single scan, even from both jaws at the same time, using the multi-die support: |
<!--T:18--> | <!--T:18--> | ||
# Select from the ''Project Tree'' all the dies to be scanned | # Select from the ''Project Tree'' all the dies to be scanned | ||
| − | # Click the Multi-Die Acquisition button that will appear on the [[Main_Toolbar|Main Toolbar]] | + | # Click the Multi-Die Acquisition button that will appear on the [[Main_Toolbar|Main Toolbar]]. At least 2 dies have to be selected in the ''Project Tree'' |
| − | # Put the dies in the support as the software | + | # Put the dies in each space of the support, as shown by the software in the top right window, and put the Multi-Die support inside the scanner |
# Click the ''Start Acquisition'' button | # Click the ''Start Acquisition'' button | ||
<!--T:19--> | <!--T:19--> | ||
| − | The scanner will acquire the data, | + | The scanner will acquire the data, identifying every single die and updating the status of the ''Project Tree'' |
<!--T:20--> | <!--T:20--> | ||
| − | [[File:Dental_2_5_multiDieAcquisition.gif | + | [[File:Dental_2_5_multiDieAcquisition.gif]] |
== Single == <!--T:21--> | == Single == <!--T:21--> | ||
<!--T:22--> | <!--T:22--> | ||
| − | To acquire a single | + | To acquire a single 3D image, and not a 360° object reconstruction (for testing or to acquire a big articulation in a small scanner): |
<!--T:23--> | <!--T:23--> | ||
| − | # Put the object inside the scanner in the best way | + | # Put the object inside the scanner, in the best possible way |
# Use the [[Support_Toolbars_And_Menus#Tools|Single Acquisition]] tool | # Use the [[Support_Toolbars_And_Menus#Tools|Single Acquisition]] tool | ||
<!--T:24--> | <!--T:24--> | ||
| − | The software will | + | The software will carry out a single acquisition without moving the motors system |
= Integration = <!--T:25--> | = Integration = <!--T:25--> | ||
<!--T:26--> | <!--T:26--> | ||
| − | After | + | After an object has been acquired in the scanner, there could be the need to add further information to the starting scan. For example, part of the object may be missing due to shadows or because the acquisition strategy has not covered a specific point of view. |
<!--T:4--> | <!--T:4--> | ||
| − | + | In order to integrate additional information, use the '''Integrate Acquisition''' button on the [[Main_Toolbar|Main Toolbar]]. This will launch the ''Integration Mode'', providing 3 different integration tools. It is possible to switch from one tool to another. Confirm the modification with the '''Apply''' {{Inline button|AcceptButton.jpg}} button or discard it with the '''Cancel''' {{Inline button|Dental_2_5_cancelButton.png}} button. | |
<!--T:27--> | <!--T:27--> | ||
| − | It is possible to add an | + | It is possible to add an unlimited number of acquisitions but '''adding to much data could slow down the project and increase the project disk size'''. |
== Single == <!--T:5--> | == Single == <!--T:5--> | ||
| Line 75: | Line 107: | ||
<!--T:29--> | <!--T:29--> | ||
| − | # Rotate the 3D view | + | # Rotate the 3D view so that the screen will show exactly the part of the object to be integrated |
| − | # Click the Start Integration | + | # Click on the Start Integration {{Inline button|Dental_2_5_startIntegrationButton.png}} icon |
| + | |||
| + | <!--T:54--> | ||
| + | If you wish for the plate to replicate the virtual movements you apply to the image, check the '''Follow 3d View''' Box | ||
<!--T:6--> | <!--T:6--> | ||
| − | If the last added acquisition is not good, | + | If the last added acquisition is not good, useless or problematic, it is possible to remove it with the '''Undo''' {{Inline button|Dental_2_5_undoLastIntegrationBtn.png}} button. |
<!--T:30--> | <!--T:30--> | ||
| − | If the object is not in the original scanning position the software can not integrate the information | + | If the object is not in the original scanning position, the software can not correctly integrate the information. It is possible to try to fix this problem using the ''Calc Integration Position'' button. |
<!--T:31--> | <!--T:31--> | ||
| − | + | {{Screenshot|dental_3_5_integrateSingle.jpg}} | |
| − | == | + | == Smart == <!--T:7--> |
<!--T:32--> | <!--T:32--> | ||
| − | The | + | The Smart mode, instead of scanning one position at a time, allows to identify the holes on the virtual model and, if possible, close them with a scanning sequence. <br /> |
<!--T:33--> | <!--T:33--> | ||
| Line 96: | Line 131: | ||
<!--T:34--> | <!--T:34--> | ||
| − | # Rotate the 3D view | + | # Rotate the 3D view to identify the holes, and left click on the ones that need to be closed |
| − | # Click the | + | # Click the {{Inline button|Dental_2_5_startIntegrationButton.png}} button to start the integration sequence |
| − | |||
| − | |||
| − | |||
| − | |||
| − | |||
| − | |||
| − | |||
| − | <!--T: | + | <!--T:55--> |
| − | + | The images will be added to the scan and then aligned all together at the end of the acquisition | |
<!--T:38--> | <!--T:38--> | ||
| − | + | {{Screenshot|dental_3_5_integrateMulti.JPG}} | |
== Full== <!--T:39--> | == Full== <!--T:39--> | ||
<!--T:40--> | <!--T:40--> | ||
| − | The full integration is the easiest: | + | The full integration is the easiest mode: it allows to select as many positions as needed and in which degree the plate must tilt to complete the image. <br /> |
| − | Then by clicking the Start Integration [[File:Dental_2_5_startIntegrationButton.png|x35px]] button the scanner will tilt the model and | + | Then, by clicking the Start Integration [[File:Dental_2_5_startIntegrationButton.png|x35px]] button, the scanner will tilt the model and carry out a 360° acquisition using the selected number of positions. |
<!--T:41--> | <!--T:41--> | ||
| − | + | {{Screenshot|dental_3_5_integrateFull.JPG}} | |
= Change Strategy = <!--T:8--> | = Change Strategy = <!--T:8--> | ||
<!--T:42--> | <!--T:42--> | ||
| − | When the ''Project Tree'' is created the software will select a specific strategy for every element | + | When the ''Project Tree'' is created, the software will select a specific strategy for every element, trying to maximize the scan quality and saving space. To change the strategy of an element of the project: |
<!--T:43--> | <!--T:43--> | ||
# Right click on the element in the project tree | # Right click on the element in the project tree | ||
| − | # Select Change Strategy | + | # Select ''Change Strategy'' |
# Select the new strategy from the dropdown menu | # Select the new strategy from the dropdown menu | ||
<!--T:44--> | <!--T:44--> | ||
| − | + | Another scan of the object will be carried out using the new strategy instead of the old one. | |
| − | |||
| − | |||
</translate> | </translate> | ||
| + | {{Navigation|Man_ProjctCreation|Man_DataEditing}} | ||
Latest revision as of 10:35, 7 September 2016
Contents
Acquisitions
Acquiring data from the scanner and creating a virtual 3D representation of an object is the primary function of the OpticalRevEng Dental software.
For additional information about the Step-By-Step Wizard, check the Wizard Acquisition page.
In a Structured Project outside the wizard, there are 3 procedures to acquire data from the scanner.
Simple
This is the easiest way to acquire data, and the most used:
- Put the object inside the scanner on the appropriate model holder
- In the Project Tree, select the object to scan
- Click the Acquisition icon on the Main Toolbar
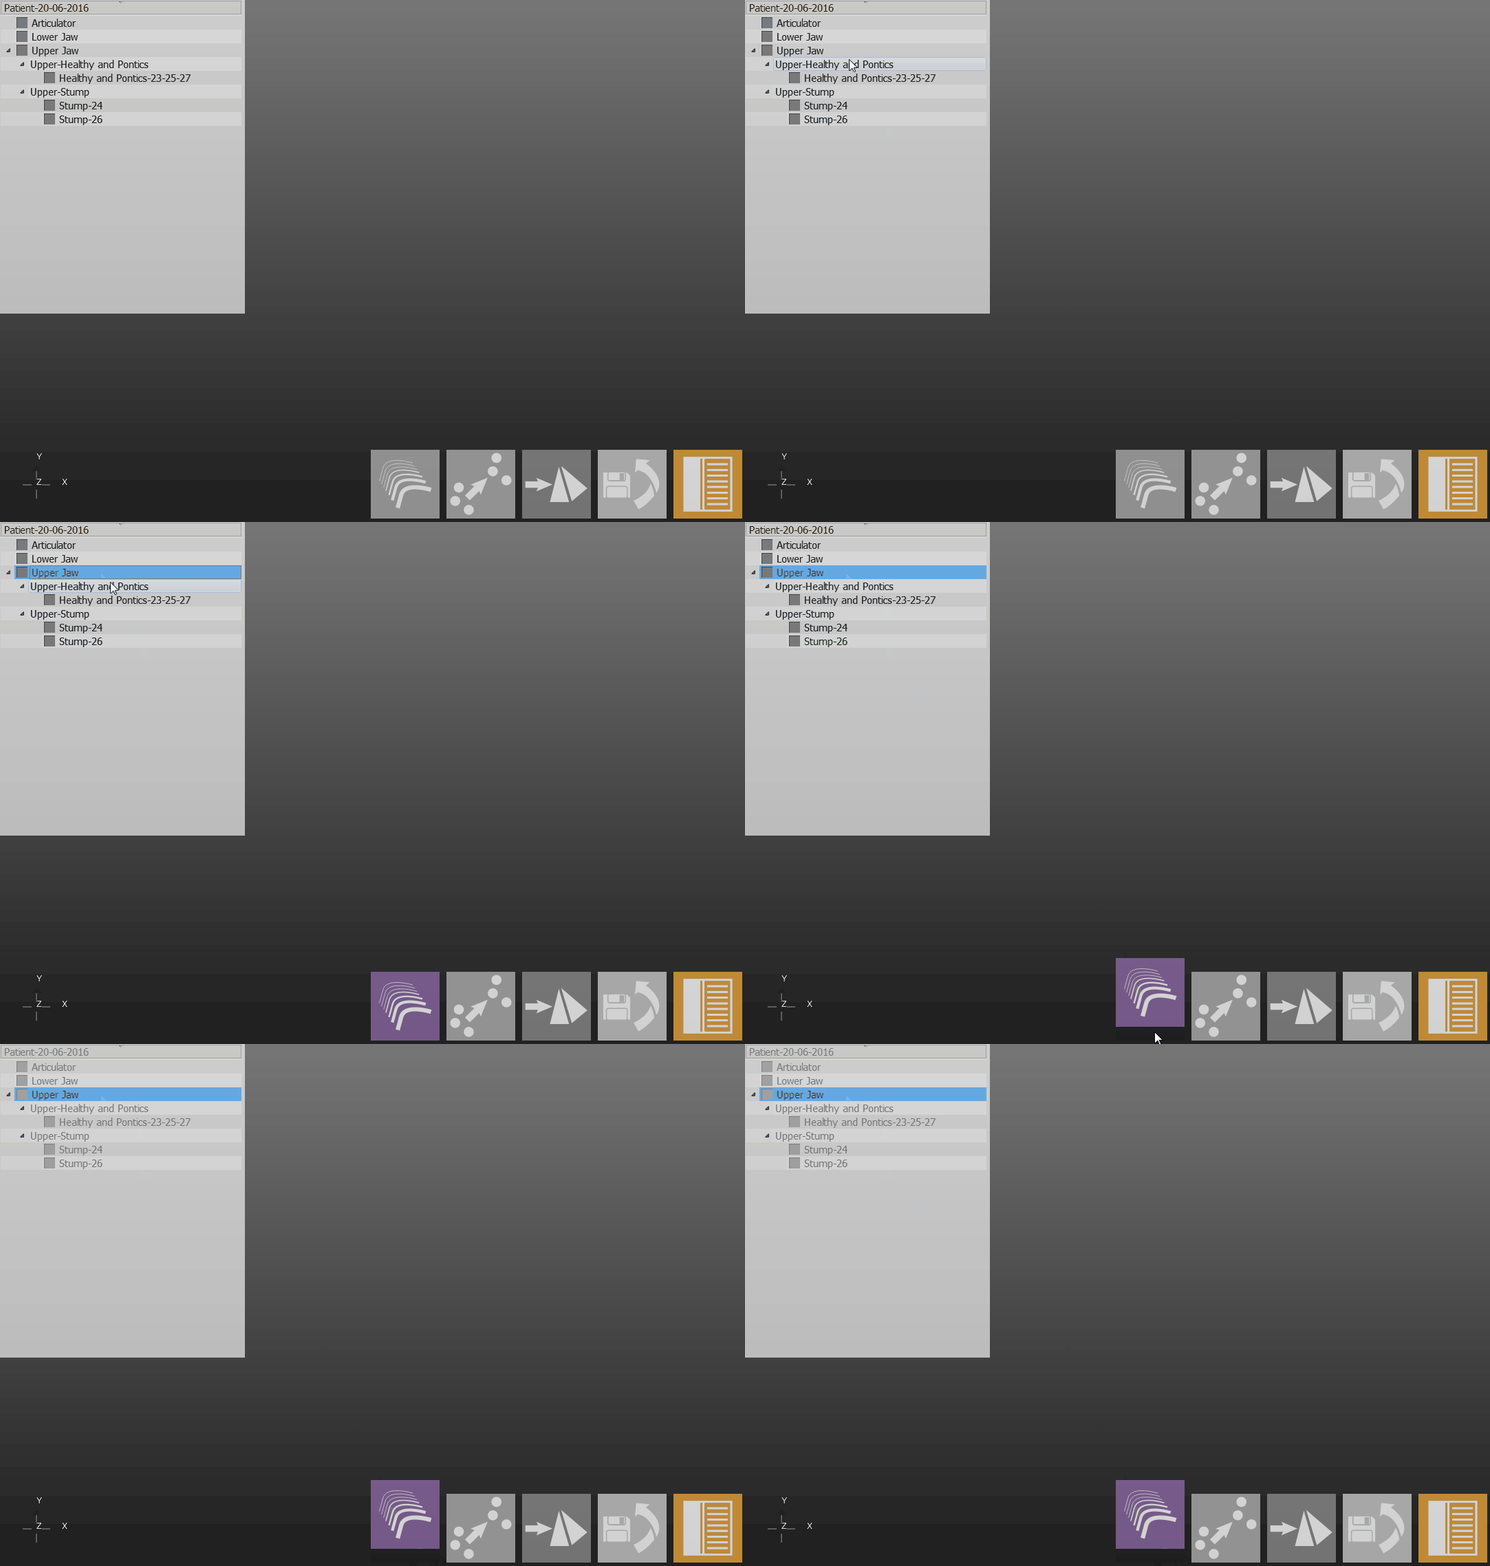
The scanner will then acquire the object using the strategy of the selected element and the status of the Project Tree will be updated.
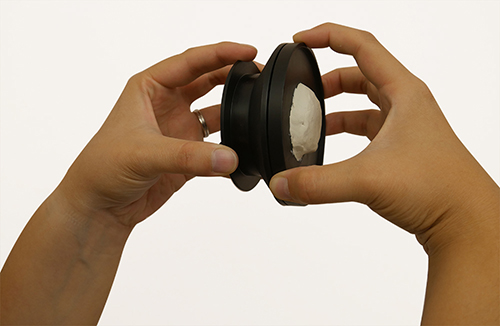
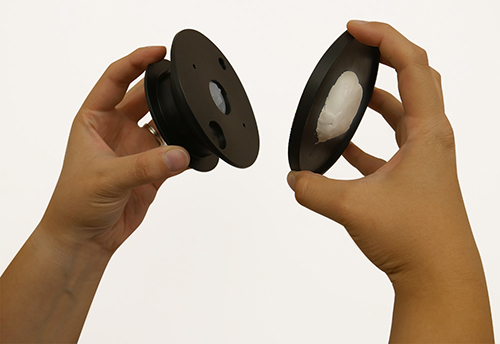
If the models are prepared to be mounted in an articulator, they could be too tall to be mounted on the tall model holder and be properly focused by the scanner. For this reason, the model holder base can be detached from the plate itself to allow the user to scan taller models on the low support.
Advanced Parameters
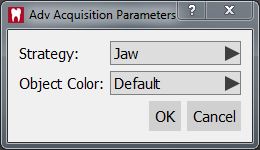
To use an acquisition strategy different from the default, hold the ![]() button when clicking on the Acquisition icon.
button when clicking on the Acquisition icon.
An addittional dialog will allow to choose a different strategy and a color for the object that needs to be acquired
Dynamic Articulation
If the Dynamic Articulation Module is enabled and in use, the software will remind the user to scan the jaw on top of the adequate base.
The base to be used depends on the type of articulator chosen in the project definition.
Multi-Die
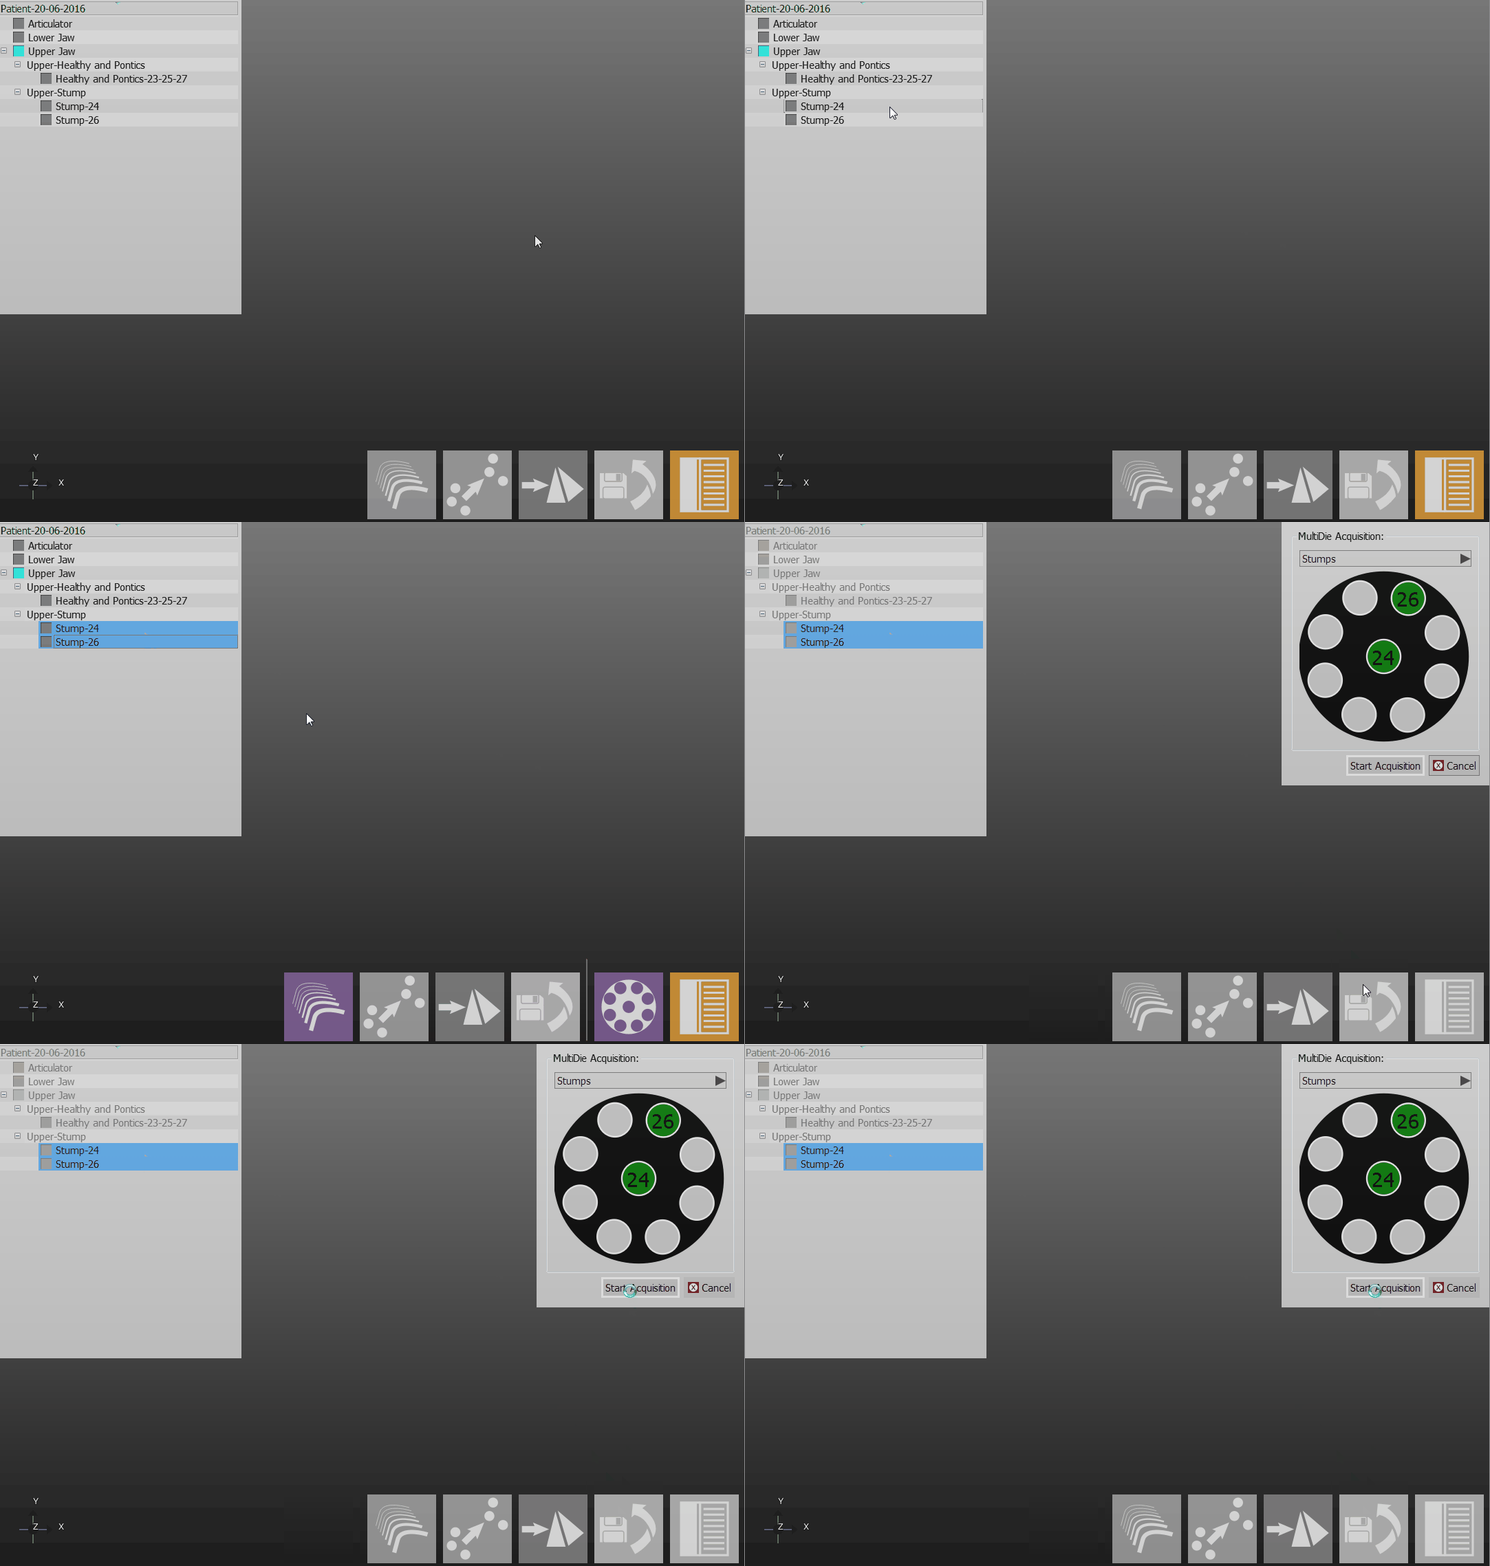
To acquire multiple dies in a single scan, even from both jaws at the same time, using the multi-die support:
- Select from the Project Tree all the dies to be scanned
- Click the Multi-Die Acquisition button that will appear on the Main Toolbar. At least 2 dies have to be selected in the Project Tree
- Put the dies in each space of the support, as shown by the software in the top right window, and put the Multi-Die support inside the scanner
- Click the Start Acquisition button
The scanner will acquire the data, identifying every single die and updating the status of the Project Tree
Single
To acquire a single 3D image, and not a 360° object reconstruction (for testing or to acquire a big articulation in a small scanner):
- Put the object inside the scanner, in the best possible way
- Use the Single Acquisition tool
The software will carry out a single acquisition without moving the motors system
Integration
After an object has been acquired in the scanner, there could be the need to add further information to the starting scan. For example, part of the object may be missing due to shadows or because the acquisition strategy has not covered a specific point of view.
In order to integrate additional information, use the Integrate Acquisition button on the Main Toolbar. This will launch the Integration Mode, providing 3 different integration tools. It is possible to switch from one tool to another. Confirm the modification with the Apply ![]() button or discard it with the Cancel
button or discard it with the Cancel ![]() button.
button.
It is possible to add an unlimited number of acquisitions but adding to much data could slow down the project and increase the project disk size.
Single
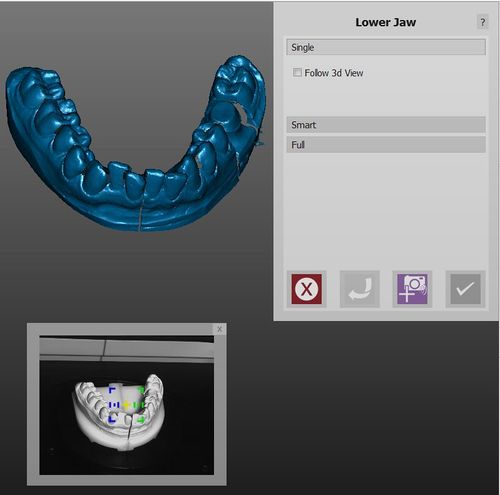
The single integration mode allows to add information from a specific point of view. To add information:
- Rotate the 3D view so that the screen will show exactly the part of the object to be integrated
- Click on the Start Integration
 icon
icon
If you wish for the plate to replicate the virtual movements you apply to the image, check the Follow 3d View Box
If the last added acquisition is not good, useless or problematic, it is possible to remove it with the Undo ![]() button.
button.
If the object is not in the original scanning position, the software can not correctly integrate the information. It is possible to try to fix this problem using the Calc Integration Position button.
Smart
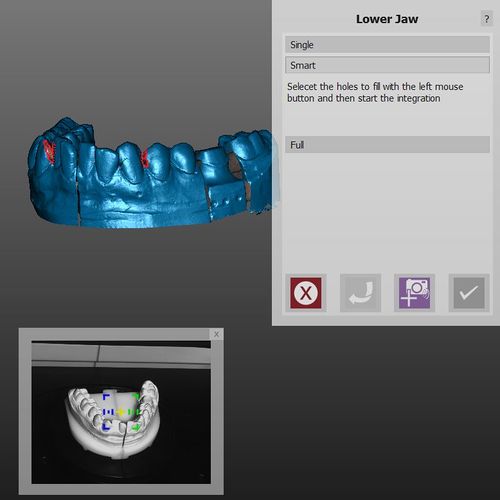
The Smart mode, instead of scanning one position at a time, allows to identify the holes on the virtual model and, if possible, close them with a scanning sequence.
To add a position:
- Rotate the 3D view to identify the holes, and left click on the ones that need to be closed
- Click the
 button to start the integration sequence
The images will be added to the scan and then aligned all together at the end of the acquisition
Full
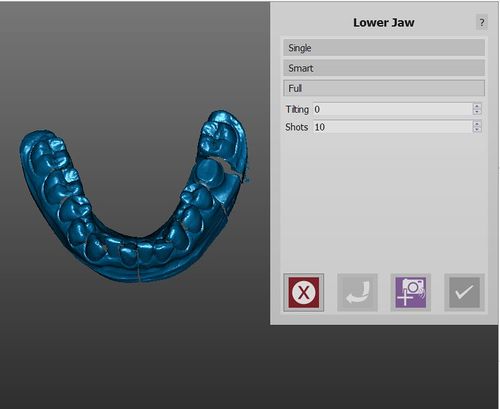
The full integration is the easiest mode: it allows to select as many positions as needed and in which degree the plate must tilt to complete the image.
Then, by clicking the Start Integration ![]() button, the scanner will tilt the model and carry out a 360° acquisition using the selected number of positions.
button, the scanner will tilt the model and carry out a 360° acquisition using the selected number of positions.
Change Strategy
When the Project Tree is created, the software will select a specific strategy for every element, trying to maximize the scan quality and saving space. To change the strategy of an element of the project:
- Right click on the element in the project tree
- Select Change Strategy
- Select the new strategy from the dropdown menu
Another scan of the object will be carried out using the new strategy instead of the old one.
