Difference between revisions of "Project Tree"
(Marked this version for translation) |
|||
| (11 intermediate revisions by 3 users not shown) | |||
| Line 1: | Line 1: | ||
| − | + | {{Language bar}} | |
| − | {{DISPLAYTITLE:Project Tree}} | + | {{DISPLAYTITLE:Project Tree|noerror}} |
<translate> | <translate> | ||
= Project Tree = <!--T:1--> | = Project Tree = <!--T:1--> | ||
<!--T:27--> | <!--T:27--> | ||
| − | The top left box of the software Interface is the | + | The top left box of the software Interface is the management panel of the project, it contains all the acquired and modified data. |
<!--T:2--> | <!--T:2--> | ||
| − | The project | + | The project trees of the structured and free mode are different. |
== Structured Project == <!--T:3--> | == Structured Project == <!--T:3--> | ||
<!--T:4--> | <!--T:4--> | ||
| − | This image shows an example of a Project Tree | + | This image shows an example of a Structured Project Tree: |
<!--T:5--> | <!--T:5--> | ||
| − | + | {{Screenshot|Dental_3.5_projectTree.JPG}} | |
=== Data Status and Selection === <!--T:6--> | === Data Status and Selection === <!--T:6--> | ||
<!--T:7--> | <!--T:7--> | ||
| − | + | There are 3 different status that define each object of the project, each status is marked by different color boxes: | |
<!--T:28--> | <!--T:28--> | ||
| − | * ''No Data (Gray Box)'': | + | * ''No Data (Gray Box)'': this element is needed for the project to be complete but no data is available. This element needs to be imported or scanned. |
| − | * ''Acquired (Blue Box)'': | + | * ''Acquired (Blue Box)'': there is an '''acquisition''' of this element. It is possible to align this data with the rest of the project, edit it or convert it into mesh format. |
| − | * ''Meshed (Green Box)'': | + | * ''Meshed (Green Box)'': there is a '''mesh''' of this element. It is possible to edit this data and export it. |
<!--T:8--> | <!--T:8--> | ||
| Line 38: | Line 38: | ||
<!--T:9--> | <!--T:9--> | ||
| − | All the selected items will be visible in the 3D View and the software will activate the buttons for all the available actions of the | + | All the selected items will be visible in the 3D View and the software will activate the buttons for all the available actions of the menus, the [[Main_Toolbar|Main Toolbar]] and the [[Support_Toolbars|Support Toolbars]] according to the current selection. |
<!--T:10--> | <!--T:10--> | ||
| − | The information is layed out as a tree | + | The information is layed out as a tree; each element can have ''children'' elements. This scheme represents the information dependency in the project. For example a single stump is part of a jaw so it's a child of the jaw and the software, when asked to '''align''' the stump to the rest of the project, will align it to its parent jaw. |
== Context Menu == <!--T:11--> | == Context Menu == <!--T:11--> | ||
<!--T:12--> | <!--T:12--> | ||
| − | By right clicking on a Project Tree element a context menu will appear | + | By right clicking on a Project Tree element, a context menu will appear: |
<!--T:13--> | <!--T:13--> | ||
| − | + | {{Screenshot|Dental_3_5_projectTreeMenu.JPG}} | |
<!--T:14--> | <!--T:14--> | ||
| − | The context menu | + | The context menu shows: |
<!--T:30--> | <!--T:30--> | ||
| Line 59: | Line 59: | ||
* A '''Change Color''' button that will change the ''assigned color'' of this element, used in the 3D View | * A '''Change Color''' button that will change the ''assigned color'' of this element, used in the 3D View | ||
* A '''Change Strategy''' button that will change the ''scan and mesh strategy'' of this element | * A '''Change Strategy''' button that will change the ''scan and mesh strategy'' of this element | ||
| − | * | + | * An '''Import...''' button that will import an acquisition or mesh from the disk, in the supported formats |
| − | * | + | * An '''Export...''' button that will export the acquisition or mesh to the disk, in a supported format |
| − | * | + | * An '''Export Visible''' button that will merge and export all the current selected meshes in one single file |
== Drag And Drop == <!--T:15--> | == Drag And Drop == <!--T:15--> | ||
| Line 69: | Line 69: | ||
<!--T:17--> | <!--T:17--> | ||
| − | + | {{Screenshot|Dental_3_5_projectTreeClone.gif}} | |
<!--T:18--> | <!--T:18--> | ||
| Line 77: | Line 77: | ||
* '''Clone''' to create a copy of this element | * '''Clone''' to create a copy of this element | ||
* '''Move To ...''' to clone the element and remove the original one | * '''Move To ...''' to clone the element and remove the original one | ||
| + | * '''Swap''' to swap the mesh or acquisition information of two elements | ||
| + | * '''Remove Common Points''' to automatically remove the common points from a Range Image | ||
| − | == Free Project == <!--T:19--> | + | == Free Project == <!--T:19--> |
<!--T:20--> | <!--T:20--> | ||
| Line 84: | Line 86: | ||
<!--T:21--> | <!--T:21--> | ||
| − | + | {{Screenshot|Dental_3_5_projectTreeFree.gif}} | |
<!--T:22--> | <!--T:22--> | ||
| − | In | + | In the Free Project mode, the software has no way of knowing the dependencies between the data. So there's no tree, no children. Only a list of objects. |
<!--T:23--> | <!--T:23--> | ||
| Line 93: | Line 95: | ||
<!--T:24--> | <!--T:24--> | ||
| − | + | This project type usually works as the ''Structured Project''. | |
<!--T:25--> | <!--T:25--> | ||
| Line 99: | Line 101: | ||
<!--T:32--> | <!--T:32--> | ||
| − | * To create a copy of a data | + | * To create a copy of a data, it is necessary to open the context menu and select the ''Clone'' function. |
| − | * | + | * By dragging one element above another, it is possible to choose between: |
| − | ** The ''Direct | + | ** The ''Direct Alignment'': action to automatically align the two elements. |
| − | ** The ''Manual | + | ** The ''Manual Alignment'': action to manually align the two elements. |
| + | ** The ''Remove Common Points'': action to automatically remove common parts from a Range Image | ||
| − | |||
| − | |||
| − | |||
| − | |||
</translate> | </translate> | ||
| + | {{Navigation|Interaction|Main Toolbar}} | ||
Latest revision as of 12:43, 16 June 2016
Contents
Project Tree
The top left box of the software Interface is the management panel of the project, it contains all the acquired and modified data.
The project trees of the structured and free mode are different.
Structured Project
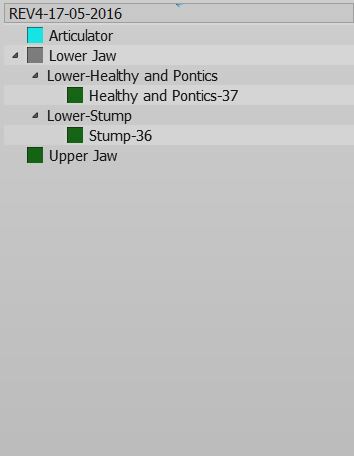
This image shows an example of a Structured Project Tree:
Data Status and Selection
There are 3 different status that define each object of the project, each status is marked by different color boxes:
- No Data (Gray Box): this element is needed for the project to be complete but no data is available. This element needs to be imported or scanned.
- Acquired (Blue Box): there is an acquisition of this element. It is possible to align this data with the rest of the project, edit it or convert it into mesh format.
- Meshed (Green Box): there is a mesh of this element. It is possible to edit this data and export it.
It is possible to interact with the Project Tree:
- Left Click on an element to select it
- Left Click keeping CTRL pressed on an element to add it to the current selection
- Right click on an element to open the Element Context Menu
- Left Click outside the list to clear the current selection
All the selected items will be visible in the 3D View and the software will activate the buttons for all the available actions of the menus, the Main Toolbar and the Support Toolbars according to the current selection.
The information is layed out as a tree; each element can have children elements. This scheme represents the information dependency in the project. For example a single stump is part of a jaw so it's a child of the jaw and the software, when asked to align the stump to the rest of the project, will align it to its parent jaw.
Context Menu
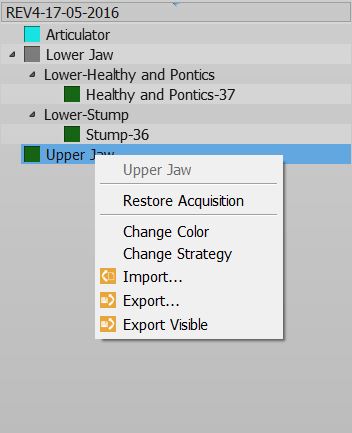
By right clicking on a Project Tree element, a context menu will appear:
The context menu shows:
- A Sub Menu with the tools for the selected element (Mesh, Acquisition)
- A Restore Acquisition button that will remove a mesh and recover the previous acquisition
- A Change Color button that will change the assigned color of this element, used in the 3D View
- A Change Strategy button that will change the scan and mesh strategy of this element
- An Import... button that will import an acquisition or mesh from the disk, in the supported formats
- An Export... button that will export the acquisition or mesh to the disk, in a supported format
- An Export Visible button that will merge and export all the current selected meshes in one single file
Drag And Drop
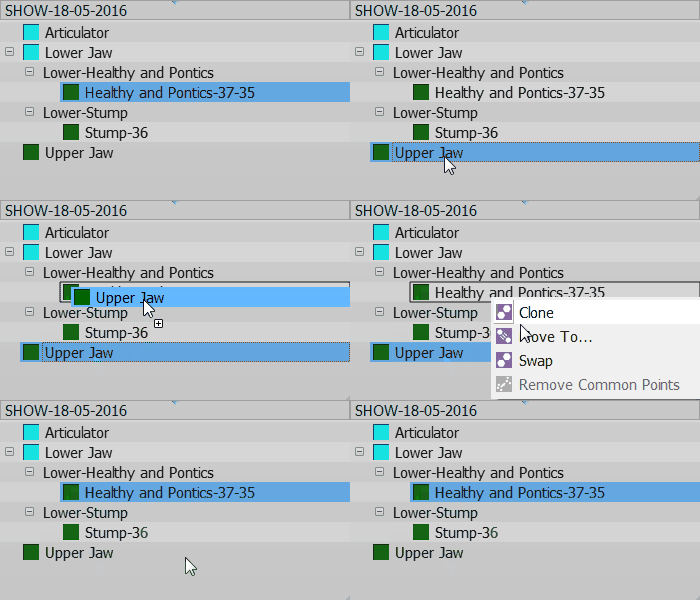
You can drag one element and drop it over a different one
The available actions will be:
- Clone to create a copy of this element
- Move To ... to clone the element and remove the original one
- Swap to swap the mesh or acquisition information of two elements
- Remove Common Points to automatically remove the common points from a Range Image
Free Project
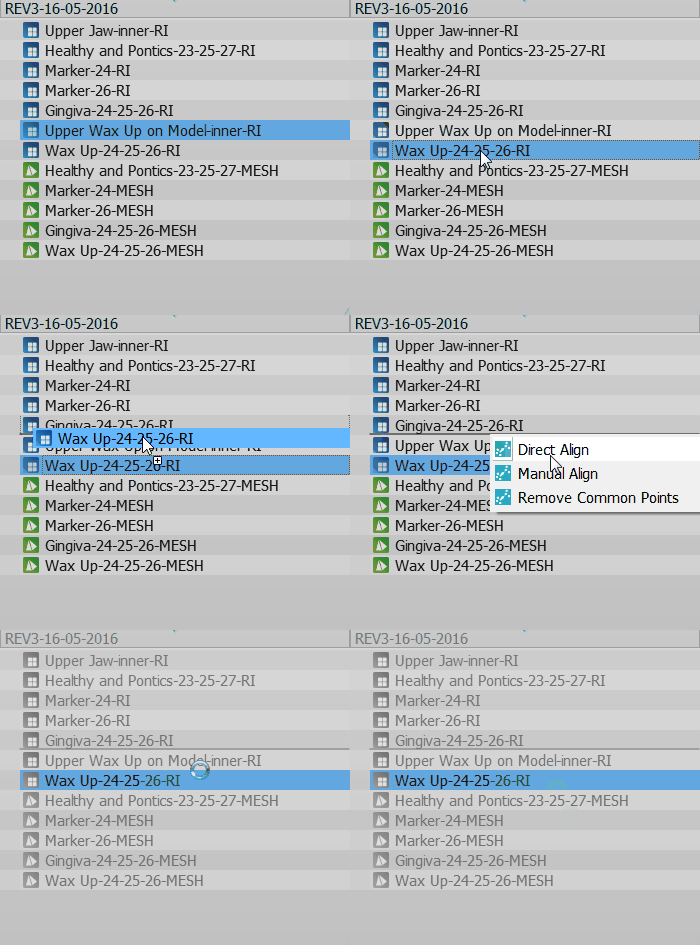
This is a screenshot of a Free Project Tree
In the Free Project mode, the software has no way of knowing the dependencies between the data. So there's no tree, no children. Only a list of objects.
The objects can be of 2 types. Acqusitions (blue icon) or Meshes (green icon).
This project type usually works as the Structured Project.
The differences are:
- To create a copy of a data, it is necessary to open the context menu and select the Clone function.
- By dragging one element above another, it is possible to choose between:
- The Direct Alignment: action to automatically align the two elements.
- The Manual Alignment: action to manually align the two elements.
- The Remove Common Points: action to automatically remove common parts from a Range Image


