Difference between revisions of "Man ImplantAlign/pt-br"
(Created page with "Após a geração das malhas, selecionando a malha de um marcador de implante da árvore do projeto, o botão '' Implant Alinhamento '' será exibido no Principal_Barra de F...") |
(Created page with "Este diálogo é feito por:") |
||
| Line 20: | Line 20: | ||
{{Screenshot|Dental_2_5_implantSelection.jpg}} | {{Screenshot|Dental_2_5_implantSelection.jpg}} | ||
| − | + | Este diálogo é feito por: | |
# A tooth position selection (the button with three dots ...) that can be used only in [[Free_Mode|Free Mode]] to select the tooth position of an implant | # A tooth position selection (the button with three dots ...) that can be used only in [[Free_Mode|Free Mode]] to select the tooth position of an implant | ||
Revision as of 18:09, 28 September 2015
Aquisição Implante
Ao adquirir os dados para um projeto sobre os implantes, adquirir o próprio implante é realmente difícil. Não é como um munhão ou uma peça do modelo de gesso. A conecção/ interface do implante é normalmente pequena e metálica.
Além disso, o encaixe tem que ser mecanicamente perfeito, sem margem de erro.
Para resolver este problema, a conecção do implante não é escaneada diretamente , mas é utilizado um 'Marcador de Implante ' em seu lugar. Um marcador de implante é um objeto específico, concebido para ser escaneado, que se encaixa exatamente sobre o implante.
O escaneamento somente do marcador do implante não é suficiente: os dados resultantes serão utilizados para calcular a posição exata da interface do implante. A fim de realizar esta operação, é necessária uma Biblioteca de Implantes Implante Biblioteca.
O alinhamento com a biblioteca de implante pode ser realizada no software CAD. No entanto, usando uma biblioteca de implantes para a Plataforma de Exocad, o usuário pode executar essa operação diretamente no software de escaneamento OpticalRevEng Dental, a fim de obter melhores resultados.
Seleção de Implantes
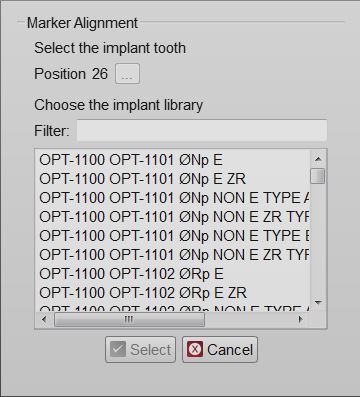
Após a geração das malhas, selecionando a malha de um marcador de implante da árvore do projeto, o botão Implant Alinhamento será exibido no Barra de Ferramentas Principal. Clique neste botão para abrir o diálogo Implante Seleção .
Este diálogo é feito por:
- A tooth position selection (the button with three dots ...) that can be used only in Free Mode to select the tooth position of an implant
- An implant list with all the implants available in the current Implant Library
- A Filter box where it is possible to write part of the name of the needed implant. All the implants that match the name will be showed in the implant list
Select the implant to be used and click the Select Button.
Attention while choosing the right implant from the library. Many implant libraries have different versions of every implant connection. For example:
- Engaging Connections : the connection used can not rotate on the implant, for abutments or single restorations
- Not-Engaging Connections : the connection used can rotate on the implant, for bars and bridges
- For Zirconia : connections with specific shapes, suited for zirconia restorations
If the wrong implant is selected, it is possible to repeat the procedure to replace the old aligned connection with a new one.
If the CAD design is launched using a wrong connection it will be necessary to restart all the design from the beginning
Implant Alignment
When selecting the implant connection, the software will start the Manual Alignment mode.
The acquired marker mesh will need to be aligned to the library marker shape. From this data the connection position will be computed.
This procedure has to be performed for every implant of the project. The CAD Export will issue a warning if one or more implant alignments are missing.


