Marker Alignment
Scannen der Implantate
Bei Projekten auf Implantaten ist es nicht möglich, Informationen zur Implantatsverbindung direkt zu erfassen. Diese sind nämlich klein und metallisch und sind nicht so gut sichtbar wie ein Zahnstumpf oder ein Gipsmodell.
Die Ausrichtung muss außerdem mechanisch makellos erfolgen.
Um die relevanten Informationen zu bekommen, wird das Scannen eines Implantatsmarkers oder eines Scan Body notwendig sein. Es handelt sich um ein bestimmtes Objekt, der speziell für das Scannen konzipiert wurde und einfach am Implantat anzubringen ist.
Das Scannen vom Scan Body ist an sich allerdings nicht genügend: Die vom Scannen entstehenden Daten werden für die Berechnung der genauen Implantatsposition verwendet. Voraussetzung für diese Berechnung ist es, ein Implantatsverzeichnis zu haben.
Die Ausrichtung des Implantatsverzeichnis kann in der CAD-Software erfolgen. Die Benutzung der OpticalRevEng Dental-Scansoftware liefert allerdings bessere Ergebnisse.
Implantatsauswahl
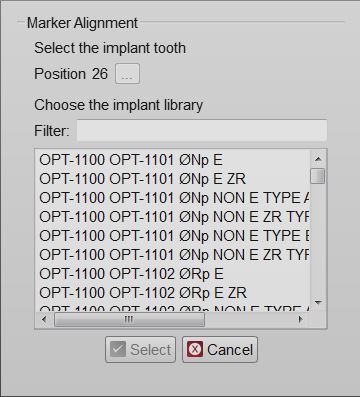
Wenn nach der Mesherstellung ein Implantatselement im Projektbaum ausgewählt wird, wird ein Icon für die Implantatsausrichtung in der Hauptwerkzeugleiste verfügbar. Auf dieses Icon klicken, um das Dialogmenü für die "Implantatsauswahl" zu öffnen.
In this Dialog there are:
- A tooth position selection (the button with three dots ...) that can be used only in Free Mode to select the tooth position of an implant
- An implant list with all the implants available in the current Implant Library
- A Filter box where it is possible to write part of the name of the needed implant. All the implants that match the name will be showed in the implant list
Select the implant to be used and click the Select Button.
Attention while choosing the right implant from the library. Many implant libraries have different versions of every implant connection. For example:
- Engaging Connections : the connection can not rotate on the implant, suggested for abutments or single restorations
- Not-Engaging Connections : the connection can rotate on the implant, suggested for bars and bridges
- For Zirconia : connections with specific shapes, suited for zirconia restorations
If the wrong implant is selected, it is possible to repeat the procedure to replace the old aligned connection with a new one.
If the CAD design is launched using a wrong connection it will be necessary to restart all the design from the beginning
Marker Alignment
When selecting the implant connection, the software will start the Manual Alignment mode.
The acquired marker mesh will need to be aligned to the library marker shape. From this data the connection position will be computed.
This procedure has to be performed for every marker of the project. The CAD Export will issue a warning if one or more marker alignments are missing.


