Man MeshEditing
Contents
Meshbearbeitung
Nach der Konversion ins Meshformat, könnten einige Änderungen notwendig sein, um die Daten für den gewünschten Verwendungszweck möglichst geeignet zu machen.
Die Meshes könnten Makel, Rauschen oder Löcher aufweisen, die entfernt werden müssen.
OpticalRevEng Dental already applies a specific mesh generation strategy for each element. However, there could be the need to further edit the meshes before exporting them to another software.
In this page, there is a description of the Mesh Editing tools that can be found either in the Mesh Menu or in the Mesh Toolbar.
Remove Spikes
A spike in a mesh is defined as a tiny part of the surface that is not actually part of the 3D object acquired by the scanner.
Usually, these spikes are automatically corrected by the software during mesh generation but, if the meshes have been imported from another system, some spikes could be present.
This tool automatically removes all the spikes and repairs the mesh.
Sharpen
The sharpening tool carries out two actions: it smooths the planar parts of the surface and, at the same time, it sharpens the edges, using two parameters:
- T [°] : this angle identifies what an edge is. All the parts of the surface that have an angle smaller than T° will be sharpened. When this value is at 0, all the surface will be smoothed
- Normal Iterations : how many times the software will pass over the surface to carry out the sharpening. The higher the value, the more the mesh will be smoothed and sharpened
The software applies this tool automatically, using specific parameters. The use of this tool with the wrong parameters may modify the shape and the dimension of the objects.
Smooth
This tool is similar to the Mesh Sharpening but it applies a smoothing to the whole surface, without preserving the edges.
The software applies this tool automatically, using specific parameters. The use of this tool with wrong parameters may modify the shape and the dimension of the objects.
Adv Smoothing
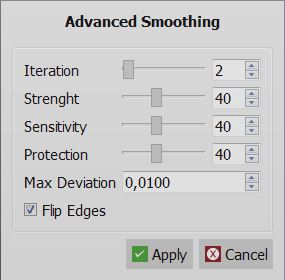
The Advanced Smoothing tool is an improved version of the Smooth tool because it grants more control, more parameters and better results.
The parameters are:
- Iteration
- Number of times the tool will be applied.
- Strenght
- How much the tool can change the object surface. The higher the value the more the mesh is smoothed and sharpened.
- Sensitivity
- How many parts of the surface will be identified as 'Details' (margins, edges). The details parts will be sharpened, but not smoothed.
- Protection
- : How many 'Detail' parts will not be sharpened. The higher the value the less the small details are sharpened.
- Max Deviation
- How much the tool can modify the shape of the mesh. This is the maximum distance every point of the final mesh can have from the original mesh.
- Flip Edges
- If this option is enabled the tool will rearrange the mesh structure to better represent edges.
Decimate
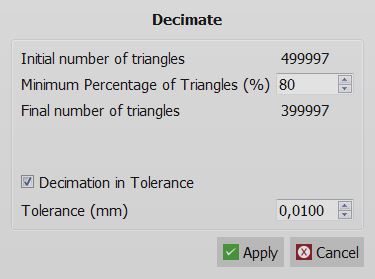
This tool reduces the number of triangles in a mesh, to save more space, trying to preserve as much detail as possible.
On the top is specified the current number of triangles of the selected meshes.
It is possible to insert a percentage of triangles to be kept (For example 50% to halve the mesh size).
It is also possible to establish a tolerance value. If the tolerance is enabled, the software will stop the decimation when this would modify the mesh more than the tolerance parameter.
Just click on Apply to see the result.
Defeature
This tool takes a selection of the mesh and it removes all the details, leaving the surface as plane as possible. It removes holes, spikes, noises. To use this tool:
- Select the area in which it is necessary to remove all the features with the Selection Tools
- Apply the Mesh Defeature
Catenate
This tool can be used only in Free Mode. It takes all the selected meshes and creates a single mesh, merging all of the selected meshes together.
Flip Normals
Every mesh has an inside and an outside. The software gives them two different colors. This tool inverts the inside and the outside of the selected meshes.
Fill All Holes
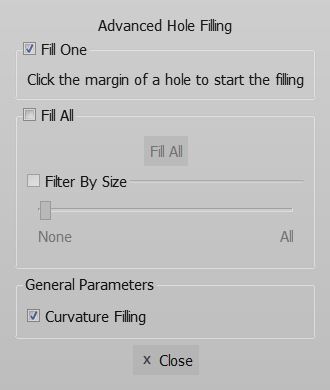
This is an interactive tool that allows to fill the holes in the currently selected mesh.
This tool can work in 2 different ways
Fill One
In the fill one mode, the software will highlight the hole near the mouse cursor. By clicking with the left mouse button on the highlighted hole it will be filed.
Fill All
In the fill all mode, the software will try to close all the holes. With the Filter By Size function, it is possible to select all the holes below one size and fill them. The selected holes will be highlighted in real time by the sofware.
Curvature Filling
There is an additional option: curvature filling. If this option is enabled, the software will try to close the hole following the curvature of the rest of the surface. If it's disabled, the software will ignore the rest of the surface and close the hole with a straight plane.
Close Denture
When scanning a whole jaw, the base information will not be acquired. This tool has been created to recreate that information. Closing the dunture with the Fill All Holes tool takes too much time and the final result will not be good enough.
With the close denture tool, the mesh will be closed with a perfect plane in a reduced amount of time.
Fix Mesh
Removes all the possible defects and noises of a mesh.
Mesh Offset
This tool creates a bigger/smaller version of the selected mesh. The Offset [mm] parameter allows to select how much the mesh will change.
The three flags (Remesh, Sharpen and Optimize Vertices) have to be checked.
Usually, none of these tools is necessary to work because the strategies already apply a selected sequence of specific tools to each element.


