Difference between revisions of "Man StartScreen/it"
(Created page with "In entrambi i casi, il software avvierà una procedura di Controllo di Sistema e mostrerà un messaggio. Se il sistema è operativo e lo scanner è collegato correttamente app...") |
(Created page with "In entrambe le schermate, il bottone {{Inline button|Dental 2 5 actionOptions.png}} apre la Finestra Opzioni.") |
||
| Line 8: | Line 8: | ||
In entrambi i casi, il software avvierà una procedura di Controllo di Sistema e mostrerà un messaggio. Se il sistema è operativo e lo scanner è collegato correttamente apparirà il messaggio di conferma '''Scanner inizializzato correttamente'''. Se, per ragioni diverse, lo scanner non fosse operativo, verrà mostrato un messaggio specifico al tipo di errore riscontrato. | In entrambi i casi, il software avvierà una procedura di Controllo di Sistema e mostrerà un messaggio. Se il sistema è operativo e lo scanner è collegato correttamente apparirà il messaggio di conferma '''Scanner inizializzato correttamente'''. Se, per ragioni diverse, lo scanner non fosse operativo, verrà mostrato un messaggio specifico al tipo di errore riscontrato. | ||
| − | In | + | In entrambe le schermate, il bottone {{Inline button|Dental 2 5 actionOptions.png}} apre la [[Dental_Options|Finestra Opzioni]]. |
== Project Ready Start-Up == | == Project Ready Start-Up == | ||
Revision as of 09:47, 12 October 2015
Iniziare
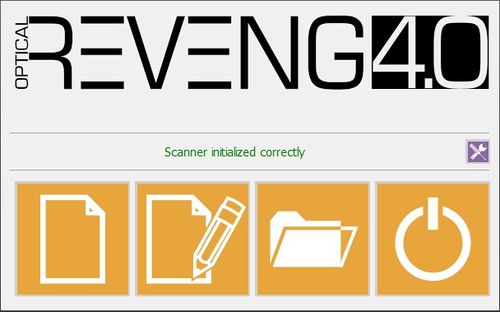
La Schermata Iniziale è la prima finestra che appare quando si avvia il software.
Le Schermate Inziali possono essere due. Una appare quando l'utente avvia il software direttamente, l'altra quando il software viene aperto da un altro software in cui si è stabilito il progetto.
In entrambi i casi, il software avvierà una procedura di Controllo di Sistema e mostrerà un messaggio. Se il sistema è operativo e lo scanner è collegato correttamente apparirà il messaggio di conferma Scanner inizializzato correttamente. Se, per ragioni diverse, lo scanner non fosse operativo, verrà mostrato un messaggio specifico al tipo di errore riscontrato.
In entrambe le schermate, il bottone ![]() apre la Finestra Opzioni.
apre la Finestra Opzioni.
Project Ready Start-Up
This is the Start Screen that appears when the software is launched having already set a project in an Invoking Software, for example if started from the Exocad DentalDB. Template:Big Image
On the left, some Advenced Import Options are available:
- Unsectioned Model : enable this option if the model to be scanned is not sectioned, the scanner will not require a separate scan for every die
- Impression Scan : if the Impression Scan Module is enabled in the license, check this option to scan an impression and not a stone model
- Face Scan : if a Real Time Scanner is available, check the Face Scan option to add the Real Time Face Scan of the patient to the project
On the right, there are 2 buttons:
 Start Project
 - Creates a specific Scan Project using data coming from the Invoking Sofware, with the selected options, and starts the Step-By-Step Wizard
 Close
Close - Closes the software without starting the project
Direct Launch
This is the Start Screen that appears when launching the software directly
In this case, no project is ready so the software will ask to create a new project or to load a previously created project.
 New Free Project
 - Only present if the Free Module is enabled. It allows to create a project in Free Mode
 New Project
 - Allows to create a Structured Project and start a Step-By-Step Wizard
 Load Project
 - Allows to load a previous project
 Close
Close - Closes the software without starting the project


