Difference between revisions of "Man ImplantAlign/de"
(Created page with "'''Bibliothek'''") |
|||
| Line 29: | Line 29: | ||
{{Screenshot|Dental_3_5_implantSelectionPanel.JPG}} | {{Screenshot|Dental_3_5_implantSelectionPanel.JPG}} | ||
| − | ''' | + | '''Bibliothek''' |
For choosing the general connection and implant family, contains: | For choosing the general connection and implant family, contains: | ||
Revision as of 12:33, 15 June 2016
Scannen der Implantate
Bei Projekten auf Implantaten ist es nicht möglich, Informationen zur Implantatsverbindung direkt zu erfassen. Diese sind nämlich klein und metallisch und sind nicht so gut sichtbar wie ein Zahnstumpf oder ein Gipsmodell.
Die Ausrichtung muss außerdem mechanisch makellos erfolgen.
Um die relevanten Informationen zu bekommen, wird das Scannen eines Implantatsmarkers oder eines Scan Body notwendig sein. Es handelt sich um ein bestimmtes Objekt, der speziell für das Scannen konzipiert wurde und einfach am Implantat anzubringen ist.
Das Scannen vom Scan Body ist an sich allerdings nicht genügend: Die vom Scannen entstehenden Daten werden für die Berechnung der genauen Implantatsposition verwendet. Voraussetzung für diese Berechnung ist es, ein Implantatsverzeichnis zu haben.
Die Ausrichtung des Implantatsverzeichnis kann in der CAD-Software erfolgen. Die Benutzung der OpticalRevEng Dental-Scansoftware liefert allerdings bessere Ergebnisse.
Implantatsauswahl
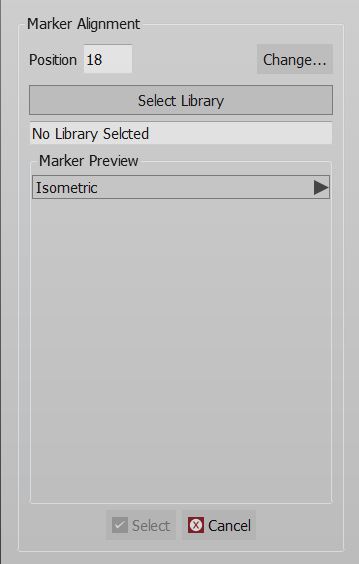
Wenn nach der Mesherstellung ein Implantatselement im Projektbaum ausgewählt wird, wird ein Icon für die Implantatsausrichtung in der Hauptwerkzeugleiste verfügbar. Auf dieses Icon klicken, um das Dialogmenü für die "Implantatsauswahl" zu öffnen.
Das Dialogmenü enthält:
- Eine Option für die Auswahl der Implantatsposition (Icon mit drei Punkten …), nur im Freimodus verfügbar
- Die Taste Bibliothek auswӓhlen öffnet das Fenster zur Bibliothekauswahl.
- Das Menü "Markervorschau" zeigt die STL-Datei des sich in der Programmbibliothek befindenden Markers, nachdem die richtige Verbindung zu dem aktiven Element ausgewӓhlt worden ist. Die Auswahl verschiedener Beobachtungsarten ist möglich, um die Markerform zu uberprüfen.
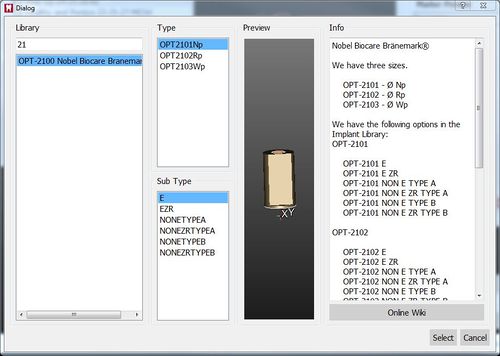
Um sich weiter mit der Markerauswahl zu beschӓftigen, auf der Taste Programmbibliothek auswӓhlen klicken. Das in 4 Teilen gegliederte Fenster zur Implantatauswahl wird geöffnet.
Bibliothek
For choosing the general connection and implant family, contains:
- A Filter box where it is possible to write part of the name of the needed implant. All the implants that match the name will be showed in the implant list
- An implant list with all the implants available in the current Implant Library
Type and Sub Type
For Choosing the diameter and type of connection. There can be many of these types, in our libraries for instance there are:
- Engaging Connections : the connection can not rotate on the implant, suggested for abutments or single restorations
- Not-Engaging Connections : the connection can rotate on the implant, suggested for bars and bridges
- For Zirconia : connections with specific shapes, suited for zirconia restorations
Preview
Shows the preview of the STL marker present in the library
Info
If the library is correctly configured to work with our software, in this section it is possible to have a small overview of the libraries with additional information on the availabe diameters and implant types. All our libraries are provided with this feature and, being connected to this wiki, the Open in browser button opens the wiki on the implant list page.
To accept the implant selection click on Select, otherwise Cancel.
Sollte das falsche Zahnimplantat ausgewählt werden, ist es möglich, den Prozess zu wiederholen und die vorher ausgerichteten Verbindung mit einer neuen zu ersetzen.
Wenn das Projekt mit einer falschen Implantatsverbindung ins CAD exportiert wird, muss der Modellierungsprozess neu gestartet werden.
Implantatsausrichtung
Nach der Auswahl der Implantatverbindung startet die Software den Manuellen Modus für die Ausrichtung.
Es ist also notwendig, das Mesh des Scan Bodys der mathematischen Form des Verzeichnis auszurichten. Die entstandenen Daten dienen zur Berechnung der Verbindungsposition.
Dieser Vorgang muss für jedes Implantat im Projekt wiederholt werden. Die CAD-Exportierung informiert den Nutzer, falls Daten einer oder mehreren Verbindungen fehlen.


