Difference between revisions of "Man StartScreen/es"
(Created page with "En ambos casos el software iniciará una Verificación del Sistema y mostrará un mensaje. Si el sistema es operativo y el escáner está conectado correctamente, la pantalla...") |
(Created page with "En las dos Pantallas Iniciales, este botón {{Inline button|Dental 2 5 actionOptions.png}} abre la Ventana Opciones.") |
||
| Line 7: | Line 7: | ||
En ambos casos el software iniciará una Verificación del Sistema y mostrará un mensaje. Si el sistema es operativo y el escáner está conectado correctamente, la pantalla mostrará el mensaje "El escáner se ha iniciado correctamente". Si el escáner no funciona correctamente, será visualizado un mensaje de error específico. | En ambos casos el software iniciará una Verificación del Sistema y mostrará un mensaje. Si el sistema es operativo y el escáner está conectado correctamente, la pantalla mostrará el mensaje "El escáner se ha iniciado correctamente". Si el escáner no funciona correctamente, será visualizado un mensaje de error específico. | ||
| − | + | En las dos Pantallas Iniciales, este botón {{Inline button|Dental 2 5 actionOptions.png}} abre la [[Dental_Options|Ventana Opciones]]. | |
== Project Ready Start-Up == | == Project Ready Start-Up == | ||
Revision as of 10:26, 4 January 2016
La Pantalla Inicial es la primera ventana que se visualiza al iniciar el sofware.
Hay dos tipos de pantalla inicial. Una se visualiza cuando el usuario inicia el software directamente, la otra cuando el software se inicia por otro software con un proyecto ya guardado.
En ambos casos el software iniciará una Verificación del Sistema y mostrará un mensaje. Si el sistema es operativo y el escáner está conectado correctamente, la pantalla mostrará el mensaje "El escáner se ha iniciado correctamente". Si el escáner no funciona correctamente, será visualizado un mensaje de error específico.
En las dos Pantallas Iniciales, este botón ![]() abre la Ventana Opciones.
abre la Ventana Opciones.
Project Ready Start-Up
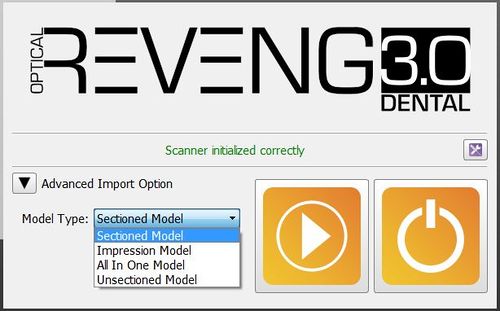
This is the Start Screen that appears when the software is launched having already set a project in an Invoking Software, for example if started from the Exocad DentalDB.
On the left, under 'Advenced Import Options' select a 'Model Type' to change the software workflow:
- Sectioned Model
- default workflow, in which every element is acquired separately and all the information gets merged at the end
- Impression Scan
- if the Impression Scan Module is enabled in the license, check this option to scan an impression and not a stone model
- All In One
- if the All In One Scan Module is enabled, it is possible to scan all the parts of a Quadrant Trye in just one step
- Unsectioned Model
- enable this option if the model to be scanned is not sectioned, the scanner will not require a separate scan for every die
On the right, there are 2 buttons:
 Start Project
 - Creates a specific Scan Project using data coming from the Invoking Sofware, with the selected options, and starts the Step-By-Step Wizard
 Close
Close - Closes the software without starting the project
Direct Launch
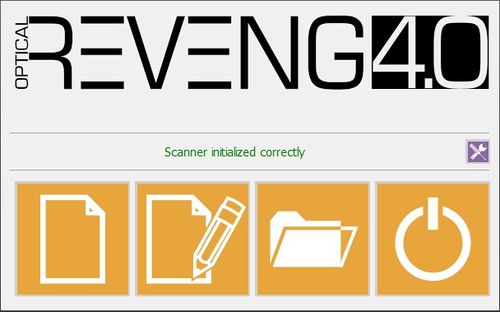
This is the Start Screen that appears when launching the software directly
In this case, no project is ready so the software will ask to create a new project or to load a previously created project.
 New Free Project
 - Only present if the Free Module is enabled. It allows to create a project in Free Mode
 New Project
 - Allows to create a Structured Project and start a Step-By-Step Wizard
 Load Project
 - Allows to load a previous project
 Close
Close - Closes the software without starting the project


