Difference between revisions of "Man Align/pt-br"
(Created page with "Existem 4 áreas diferentes nesta tela:") |
|||
| (13 intermediate revisions by 3 users not shown) | |||
| Line 5: | Line 5: | ||
Quando mais de um objeto é escaneado pelo escaner, a posição de cada item não está relacionada com a posição dos outros. A fim de trabalhar corretamente com os dados escaneados, todas as aquisições precisam estar localizados no mesmo sistema de referência. | Quando mais de um objeto é escaneado pelo escaner, a posição de cada item não está relacionada com a posição dos outros. A fim de trabalhar corretamente com os dados escaneados, todas as aquisições precisam estar localizados no mesmo sistema de referência. | ||
| − | + | Firstly, the user has to identify an Acquisition that will be used as reference for all the others. In the '''Structured Projects''', the software automatically carries out this procedure. | |
| − | + | Every time a new information is acquired, it is necessary to ''align'' the new data to the '''Reference Acquisition''' or to '''another acquisition already aligned to the rest of the project''' | |
Toda a informação adquirida terá uma específica '' 'Referência de Aquisição' ''. O '' Projeto Arvore '' irá mostrar esta relação, cada filho será alinhado ao seu nó pai na árvore. | Toda a informação adquirida terá uma específica '' 'Referência de Aquisição' ''. O '' Projeto Arvore '' irá mostrar esta relação, cada filho será alinhado ao seu nó pai na árvore. | ||
| Line 13: | Line 13: | ||
= Alinhamento Direto = | = Alinhamento Direto = | ||
| − | OpticalRevEng Dental | + | OpticalRevEng Dental can automatically align the Acquisitions: |
# Selecione pela árvore de projeto o elemento que tem de ser alinhado com o resto do projeto | # Selecione pela árvore de projeto o elemento que tem de ser alinhado com o resto do projeto | ||
| − | # Clique o ''Botão Alinhamento'' na [[ | + | # Clique o ''Botão Alinhamento'' na [[Main_Toolbar|Principal Barra de Ferramentas]] |
| − | The software will | + | The software will choose the reference, it will analyze the selected acquisition and the reference and it will identify the correct position of the selected item with respect to the reference. <br/> |
If no alignment can be identified by the software, a '''Manual Alignment''' will start. | If no alignment can be identified by the software, a '''Manual Alignment''' will start. | ||
= Alinhamento Manual = | = Alinhamento Manual = | ||
| − | O alinhamento manual começa cada vez que o software não pode completar um '' 'Alinhamento Direto' '' ou segurando o botão {{ | + | O alinhamento manual começa cada vez que o software não pode completar um '' 'Alinhamento Direto' '' ou segurando o botão {{Inline button|Key shift.png}} ao clicar no '' Botão de Alinhamento '' no [[Main_Toolbar|Principal Barra de ferramentas]] |
== Interface == | == Interface == | ||
| − | + | The picture here below shows the interface of the manual alignment: | |
{{Screenshot|Dental_2_5_manualAlignment.jpg}} | {{Screenshot|Dental_2_5_manualAlignment.jpg}} | ||
| Line 33: | Line 33: | ||
Existem 4 áreas diferentes nesta tela: | Existem 4 áreas diferentes nesta tela: | ||
| − | * On the '''top left''' | + | * On the '''top left''' is displayed the ''reference object'', which gives the reference position for all the project data |
| − | * On the '''top right''' | + | * On the '''top right''' is shown the ''moving object'', that has to be moved from its current position and placed in the same reference system of all the other project data |
| − | * On the '''bottom''' | + | * On the '''bottom''' are displayed both objects, so that the user can check the current position of the moving object |
* On the '''bottom right''' some options and a ''Numeric Report'' are available | * On the '''bottom right''' some options and a ''Numeric Report'' are available | ||
| − | == | + | == Procedimento == |
| − | + | Para alinhar manualmente os elementos: | |
| − | # | + | # Place both the reference object and the moving object in the same point of view, until the parts in common are visible |
# Click on the same point on both the objects | # Click on the same point on both the objects | ||
| − | # Check in the 3D view below if the position is more or less correct (it's not necessary, at this stage, to find the perfect position) | + | # Check in the 3D view below, if the position is more or less correct (it's not necessary, at this stage, to find the perfect position) |
# Click the '''Best Fit''' button on the right | # Click the '''Best Fit''' button on the right | ||
| − | If the two objects have enough common | + | If the two objects have enough points in common, the software will find the best alignment between them. Visually check the alignment on the bottom 3D View or by reading the values in the Numeric Report. |
| − | If the alignment is | + | If the alignment is correct, click '''Ok''' to confirm the new position of the ''moving object''. |
| − | + | Otherwise, click the '''Reset''' button and restart the alignment. | |
[[File:Dental_2_5_manualAlignmentAnim.gif]] | [[File:Dental_2_5_manualAlignmentAnim.gif]] | ||
| − | == | + | == Opções == |
| − | + | Existem duas opções disponíveis durante o Alinhamento manual: | |
| − | # '''Fine Alignment''' : | + | # '''Fine Alignment''' : usually ''Best Fit'' moves the object up to 1mm closer to the reference. If the parts in common between the two objects are really small ,use '''Fine Aligment''' to move the object not more than 0.1mm closer to the reference |
| − | # '''Ignore Normals''' : the | + | # '''Ignore Normals''' : allows the user to align the internal part of an object to the external part of another, and viceversa. |
{{Navigation|Man_DataEditing|Man_MeshGen}} | {{Navigation|Man_DataEditing|Man_MeshGen}} | ||
Latest revision as of 08:57, 5 February 2016
Contents
Alinhamento
Quando mais de um objeto é escaneado pelo escaner, a posição de cada item não está relacionada com a posição dos outros. A fim de trabalhar corretamente com os dados escaneados, todas as aquisições precisam estar localizados no mesmo sistema de referência.
Firstly, the user has to identify an Acquisition that will be used as reference for all the others. In the Structured Projects, the software automatically carries out this procedure.
Every time a new information is acquired, it is necessary to align the new data to the Reference Acquisition or to another acquisition already aligned to the rest of the project
Toda a informação adquirida terá uma específica 'Referência de Aquisição' . O Projeto Arvore irá mostrar esta relação, cada filho será alinhado ao seu nó pai na árvore.
Alinhamento Direto
OpticalRevEng Dental can automatically align the Acquisitions:
- Selecione pela árvore de projeto o elemento que tem de ser alinhado com o resto do projeto
- Clique o Botão Alinhamento na Principal Barra de Ferramentas
The software will choose the reference, it will analyze the selected acquisition and the reference and it will identify the correct position of the selected item with respect to the reference.
If no alignment can be identified by the software, a Manual Alignment will start.
Alinhamento Manual
O alinhamento manual começa cada vez que o software não pode completar um 'Alinhamento Direto' ou segurando o botão ![]() ao clicar no Botão de Alinhamento no Principal Barra de ferramentas
ao clicar no Botão de Alinhamento no Principal Barra de ferramentas
Interface
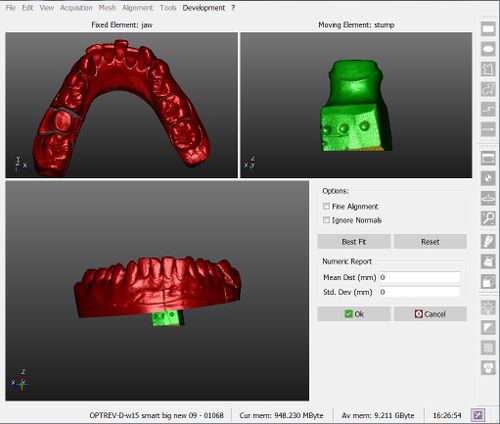
The picture here below shows the interface of the manual alignment:
Existem 4 áreas diferentes nesta tela:
- On the top left is displayed the reference object, which gives the reference position for all the project data
- On the top right is shown the moving object, that has to be moved from its current position and placed in the same reference system of all the other project data
- On the bottom are displayed both objects, so that the user can check the current position of the moving object
- On the bottom right some options and a Numeric Report are available
Procedimento
Para alinhar manualmente os elementos:
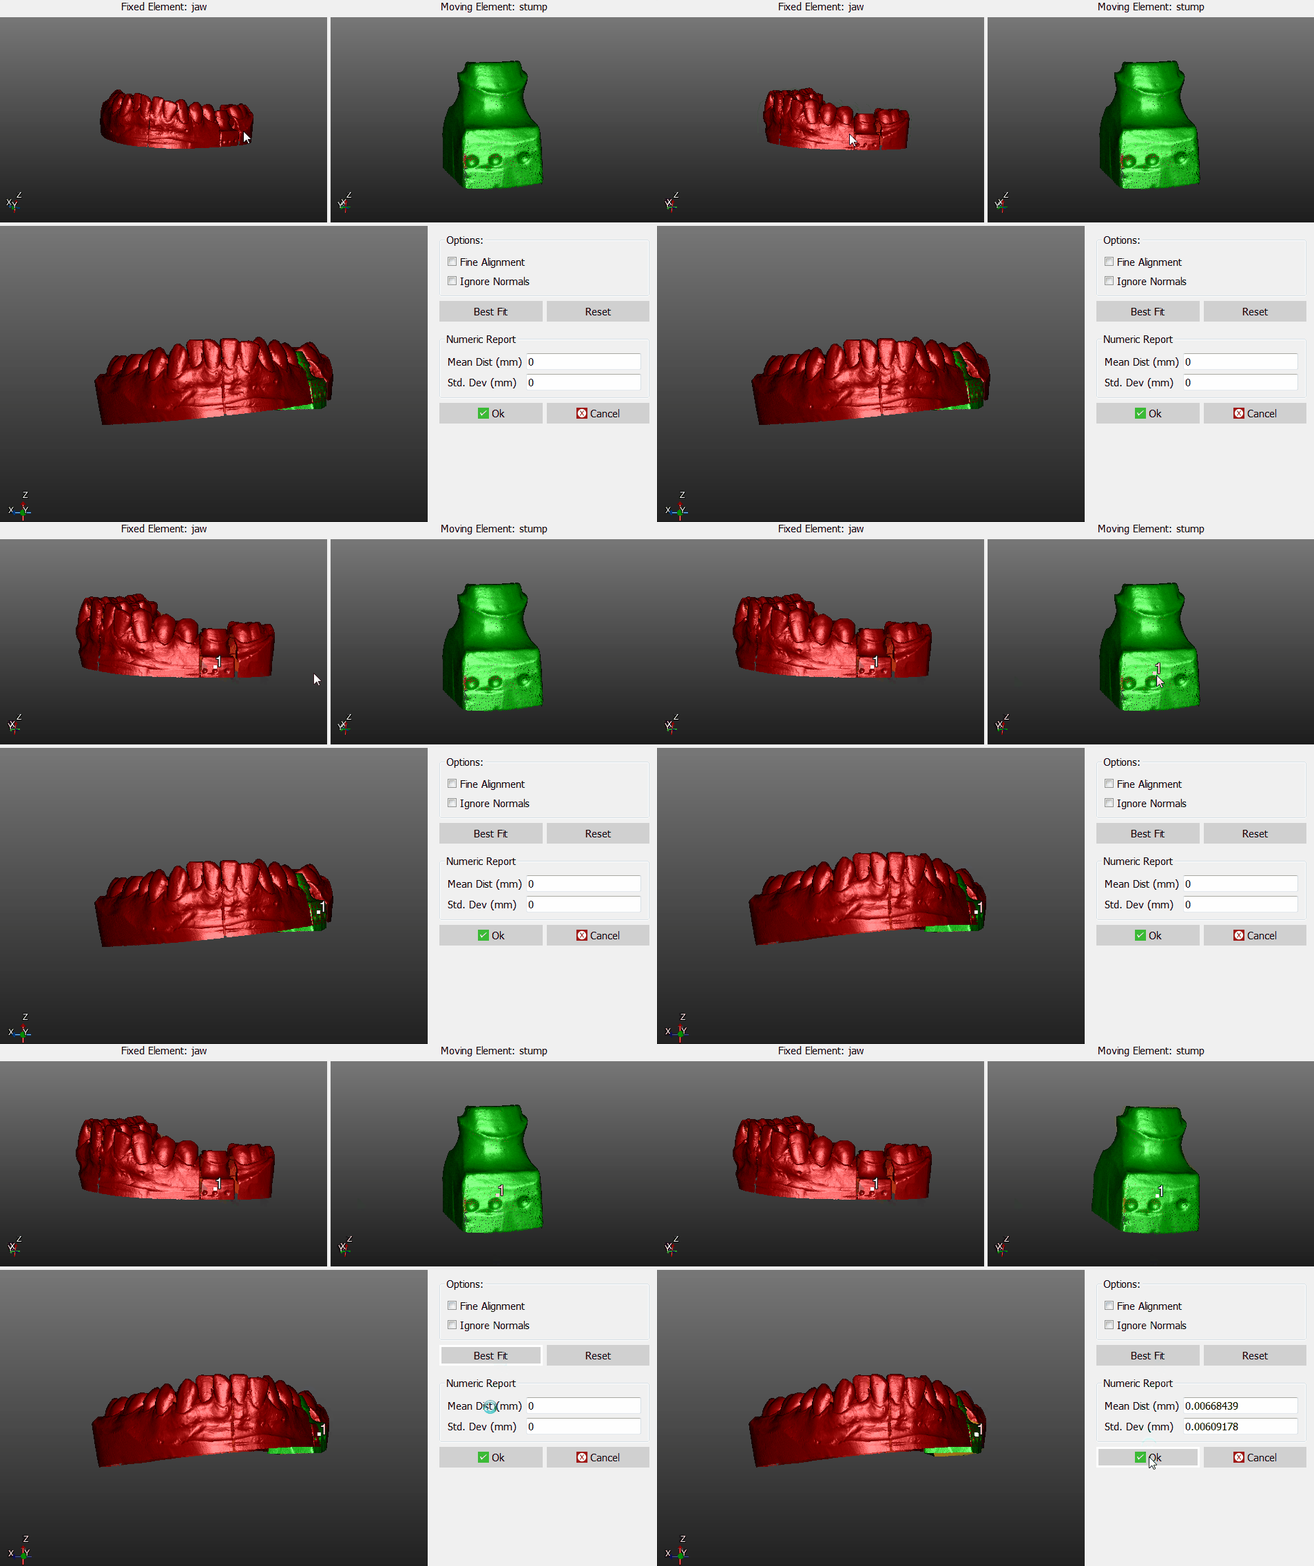
- Place both the reference object and the moving object in the same point of view, until the parts in common are visible
- Click on the same point on both the objects
- Check in the 3D view below, if the position is more or less correct (it's not necessary, at this stage, to find the perfect position)
- Click the Best Fit button on the right
If the two objects have enough points in common, the software will find the best alignment between them. Visually check the alignment on the bottom 3D View or by reading the values in the Numeric Report.
If the alignment is correct, click Ok to confirm the new position of the moving object.
Otherwise, click the Reset button and restart the alignment.
Opções
Existem duas opções disponíveis durante o Alinhamento manual:
- Fine Alignment : usually Best Fit moves the object up to 1mm closer to the reference. If the parts in common between the two objects are really small ,use Fine Aligment to move the object not more than 0.1mm closer to the reference
- Ignore Normals : allows the user to align the internal part of an object to the external part of another, and viceversa.


