Difference between revisions of "Man Align/zh-hant"
Democenter (talk | contribs) (Created page with "每一次獲得新採集的資訊, 新資料必須與 '''參考採集''' 或 '''專案剩下已對齊的其他採集'''去''對齊''") |
(Importing a new version from external source) |
||
| (20 intermediate revisions by one other user not shown) | |||
| Line 1: | Line 1: | ||
{{Language bar}} | {{Language bar}} | ||
{{DISPLAYTITLE:Alignment|noerror}} | {{DISPLAYTITLE:Alignment|noerror}} | ||
| − | = | + | =对齐= |
| − | + | 当超过一个对象被扫描仪采集时,每一个项目的位置都与其他项目的位置无关。为了正确处理扫描数据,所有的采集都要处在相同的参考系统。 | |
| − | + | 首先,使用者须确认一个采集,其他采集将以其作为参考。在'''结构化项目'''中,软件会自动执行这个程序。 | |
| − | + | 每一次采集新的信息,新数据必须与'''参考采集'''或'''项目剩下已对齐的其他采集'''''对齐'' | |
| − | + | 每一个采集信息都有一个具体的'''参考采集'''。''项目树形图''将显示这种关系,每一个子项目都会对齐到树形图中的父节点。 | |
| − | = | + | = 直接对齐 = |
| − | OpticalRevEng | + | OpticalRevEng Dental能自动对齐这些采集: |
| − | # | + | # 从项目树形图选择的项目需要与剩下的组件对齐 |
| − | # | + | # 点击[[Main_Toolbar|主工具栏]]中的''对齐按钮'' |
| − | + | 软件将选择参考,它将分析选定的采集与参考,并将确认对照参考的选定项目正确位置。<br /> | |
| − | + | 如果软件没有确认对齐,将启动'''手动对齐'''。 | |
| − | = | + | = 手动对齐 = |
| − | + | 每次软件无法执行'''直接对齐'''时将启动手动对齐。用户也可以按住{{Inline button|Key shift.png}}点击[[Main_Toolbar|主工具栏]]中的''对齐按钮''使用这个工具 | |
| − | == | + | == 界面 == |
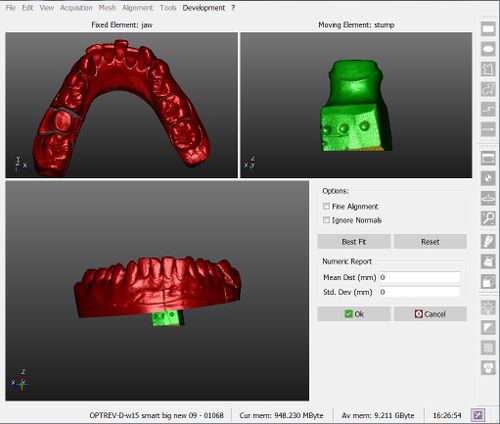
| − | + | 下图显示了手动对齐的界面: | |
{{Screenshot|Dental_2_5_manualAlignment.jpg}} | {{Screenshot|Dental_2_5_manualAlignment.jpg}} | ||
| − | + | 这个屏幕上有4个不同的区域: | |
| − | * | + | * '''左上'''显示''参考对象'',提供所有项目数据的参考位置 |
| − | * | + | * '''右上'''显示''移动对象'',它可以从现在的位置移动并放置到与其他项目数据相同的参考系统 |
| − | * | + | * '''下方'''显示两个对象,这样用户可以检查移动对象的当前位置 |
| − | * | + | * '''右下''' 是一些可用的选项和''数值报告'' |
| − | == | + | == 程序 == |
| − | + | 手动对齐组件: | |
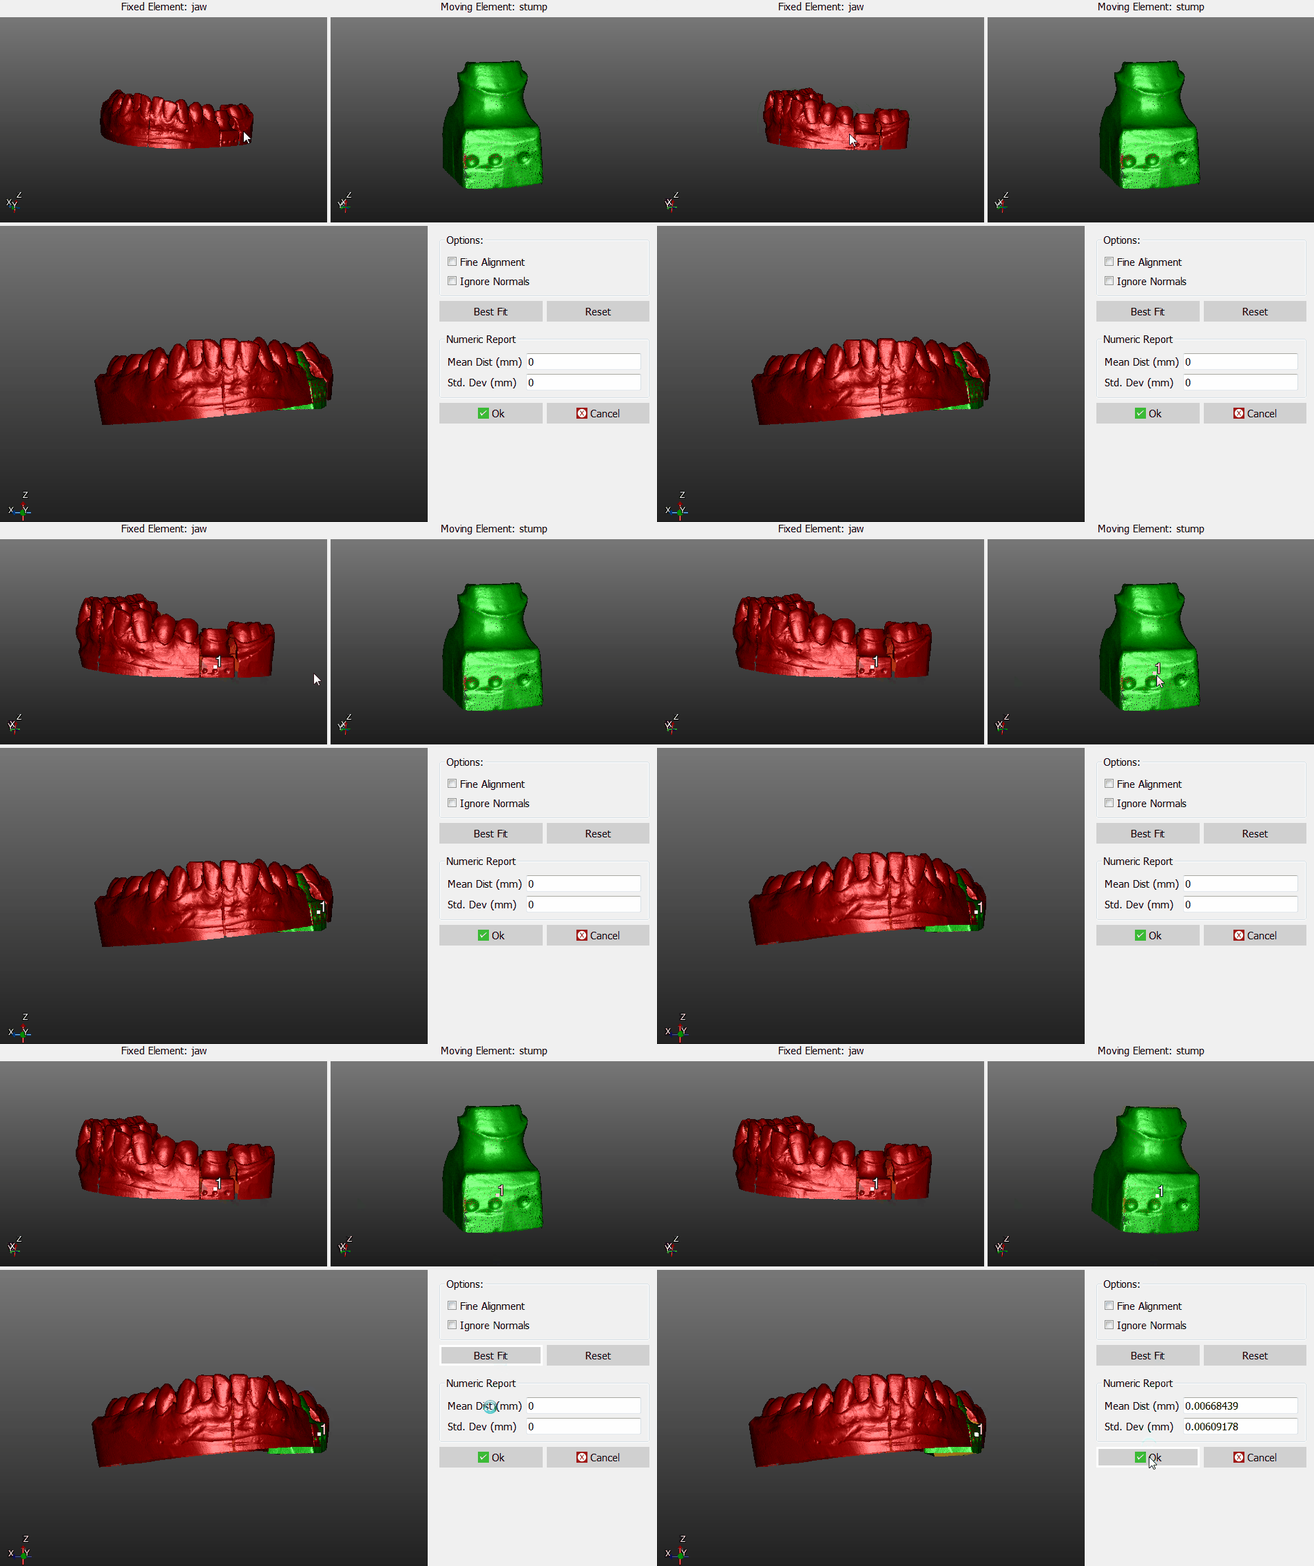
| − | # | + | # 放置参考对象及移动对象于相同的视点,直到可看到相同的部分 |
| − | # | + | # 点击两个对象的相同点 |
| − | # | + | # 如果位置大概是正确的,检查下方的3D视图(在这一阶段寻找完美位置是不必要的) |
| − | # | + | # 点击右边的'''最佳适配'''按钮 |
| − | + | 如果两个对象有足够的共同点,软件会找到最佳的对齐方式。目视检查底部3D视图的对齐或者通过读取数值报告中的值检查。 | |
| − | + | 如果定位是正确的,点击'''确认'''确认''移动对象''的新位置。 | |
| − | + | 否则,点击'''重设'''按钮并重新对齐。 | |
[[File:Dental_2_5_manualAlignmentAnim.gif]] | [[File:Dental_2_5_manualAlignmentAnim.gif]] | ||
| − | == | + | == 选项 == |
| − | + | 在手动对齐有两个选项可用: | |
| − | # ''' | + | # '''微调对齐''' : 通常''最佳适配''将对象向参考位置靠近最大1mm。如果两个对象的共同部分很小,使用'''微调对齐'''以移动对象向参考位置靠近小于 0.1mm |
| − | # ''' | + | # '''忽略法线''' : 允许用户对齐一个对象的内部与另一个对象的外部,反之亦然。 |
{{Navigation|Man_DataEditing|Man_MeshGen}} | {{Navigation|Man_DataEditing|Man_MeshGen}} | ||
Latest revision as of 12:16, 1 August 2017
对齐
当超过一个对象被扫描仪采集时,每一个项目的位置都与其他项目的位置无关。为了正确处理扫描数据,所有的采集都要处在相同的参考系统。
首先,使用者须确认一个采集,其他采集将以其作为参考。在结构化项目中,软件会自动执行这个程序。
每一次采集新的信息,新数据必须与参考采集或项目剩下已对齐的其他采集对齐
每一个采集信息都有一个具体的参考采集。项目树形图将显示这种关系,每一个子项目都会对齐到树形图中的父节点。
直接对齐
OpticalRevEng Dental能自动对齐这些采集:
- 从项目树形图选择的项目需要与剩下的组件对齐
- 点击主工具栏中的对齐按钮
软件将选择参考,它将分析选定的采集与参考,并将确认对照参考的选定项目正确位置。
如果软件没有确认对齐,将启动手动对齐。
手动对齐
每次软件无法执行直接对齐时将启动手动对齐。用户也可以按住![]() 点击主工具栏中的对齐按钮使用这个工具
点击主工具栏中的对齐按钮使用这个工具
界面
下图显示了手动对齐的界面:
这个屏幕上有4个不同的区域:
- 左上显示参考对象,提供所有项目数据的参考位置
- 右上显示移动对象,它可以从现在的位置移动并放置到与其他项目数据相同的参考系统
- 下方显示两个对象,这样用户可以检查移动对象的当前位置
- 右下 是一些可用的选项和数值报告
程序
手动对齐组件:
- 放置参考对象及移动对象于相同的视点,直到可看到相同的部分
- 点击两个对象的相同点
- 如果位置大概是正确的,检查下方的3D视图(在这一阶段寻找完美位置是不必要的)
- 点击右边的最佳适配按钮
如果两个对象有足够的共同点,软件会找到最佳的对齐方式。目视检查底部3D视图的对齐或者通过读取数值报告中的值检查。
如果定位是正确的,点击确认确认移动对象的新位置。
否则,点击重设按钮并重新对齐。
选项
在手动对齐有两个选项可用:
- 微调对齐 : 通常最佳适配将对象向参考位置靠近最大1mm。如果两个对象的共同部分很小,使用微调对齐以移动对象向参考位置靠近小于 0.1mm
- 忽略法线 : 允许用户对齐一个对象的内部与另一个对象的外部,反之亦然。


