Difference between revisions of "Man Align/ja"
(Created page with "=アライメント=") |
|||
| (38 intermediate revisions by the same user not shown) | |||
| Line 1: | Line 1: | ||
{{Language bar}} | {{Language bar}} | ||
{{DISPLAYTITLE:Alignment|noerror}} | {{DISPLAYTITLE:Alignment|noerror}} | ||
| − | = | + | =5、アライメント= |
| − | + | スキャナーで複数のオブジェクトが取得された場合、各アイテムの位置は、他のアイテムの位置とは関係がない状態となっています。スキャンされたデータで正しく作業するには、すべての取得データを同じ参照システム内で位置づける必要があります。 | |
| − | + | まずはじめに、他のアイテムに対する参照として使用される取得データを決める必要があります。'''構造プロジェクト'''では、ソフトウェアはこの手順を自動的に実行します。 | |
| − | + | 新しい情報が取得されるたびに、新しいデータを'''参照用取得データ'''または'''残りのプロジェクトへのアライメントがすでにされている別の取得データ'''に対して、''アライメント''をする必要があります。 | |
| − | + | 取得されたすべての情報は固有の'''参照用取得データ'''を持ちます。''プロジェクトツリー''にはこの関係が表示され、すべての子部品は、ツリー上で親となるノードへアライメントされます。 | |
| − | = | + | == 〇ダイレクトアライメント == |
| − | + | スキャニングソフトウェアは自動的に取得データをアライメントすることができます。 | |
| − | # | + | # プロジェクトツリーから、残りのプロジェクトへアライメントしたい部品を選択します。 |
| − | # | + | # [[Main_Toolbar|メインツールバー]]の''アライメントボタン''をクリックします。 |
| − | + | ソフトウェアは参照データを選択し、選択された取得データと参照データを分析して、選択されたアイテムの参照データに対する正しい位置を特定します。<br /> | |
| − | + | ソフトウェアがアライメントを特定することができなかった場合、'''手動アライメント'''が開始されます。 | |
| − | = | + | == 〇手動アライメント == |
| − | + | ソフトウェアが'''ダイレクトアライメント'''の実行に失敗した場合、手動アライメントが開始されます。また、{{Inline button|Key shift.png}}を押しながら、[[Main_Toolbar|メインツールバー]]の''アライメントボタン''をクリックして、このツールにアクセスすることもできます。 | |
| − | == | + | === ●インターフェース === |
| − | + | 下図は手動アライメントのインターフェースを示します。 | |
{{Screenshot|Dental_2_5_manualAlignment.jpg}} | {{Screenshot|Dental_2_5_manualAlignment.jpg}} | ||
| − | + | この画面には4つの領域があります。 | |
| − | * | + | * 画面'''左上'''には、''参照オブジェクト''が表示されます。これは、すべてのプロジェクトデータに対して参照位置を提供します。 |
| − | * | + | * 画面'''右上'''には、''移動オブジェクト''が表示されます。これを現在の位置から移動させ、その他すべてのプロジェクトデータと同じ参照システム内に配置する必要があります。 |
| − | * | + | * 画面'''下部'''には両方のオブジェクトが表示されます。ここで移動オブジェクトの現在の位置を確認することができます。 |
| − | * | + | * 画面'''右下'''には、いくつかのオプションと''Numeric Report''(数値レポート)があります。 |
| − | == | + | === ●手順 === |
| − | + | 部品を手動でアライメントするには下記を参照下さい。 | |
| − | # | + | # 参照オブジェクトと移動オブジェクトを同じ視点にさせて、共通の部分が見えるようにします。 |
| − | # | + | # 両方のオブジェクトで、同じ点をクリックします。 |
| − | # | + | # 下の3Dビューを確認し、位置がある程度正しくなっていることを確認します。(この段階では、完全に適合している必要はありません) |
| − | # | + | # 右の'''Best Fit'''(ベストフィット)ボタンをクリックします。 |
| − | + | 2つのオブジェクトに共通となる点が十分ある場合、ソフトウェアが最適なアライメントを行います。下部の3Dビューで視覚的にアライメントを確認するか、またはNumeric Report(数値レポート)の値を確認します。 | |
| − | + | アライメントが正しければ、'''Ok'''をクリックして、''移動オブジェクト''の新しい位置を確定します。 | |
| − | + | 正しくなっていない場合、'''Reset'''(リセット)ボタンをクリックして、もう一度アライメントを行って下さい。 | |
[[File:Dental_2_5_manualAlignmentAnim.gif]] | [[File:Dental_2_5_manualAlignmentAnim.gif]] | ||
| − | == | + | === ●オプション === |
| − | + | 手動アライメントでは、2つのオプションがあります。 | |
| − | # '''Fine Alignment''' : | + | # '''Fine Alignment'''(ファイン調節) : 通常、''Best Fit''(ベストフィット)では、オブジェクトを参照オブジェクトに対して最大1mm近づけます。2つのオブジェクト間の共通部分が非常に小さい場合、'''Fine Alignment'''(ファイン調節)を使い、参照オブジェクトへのオブジェクトの移動を0.1mm以内にさせます |
| − | # '''Ignore Normals''' : | + | # '''Ignore Normals'''(法線を無視する) : あるオブジェクトの内部部分を、別のオブジェクトの外部部分へアライメントをしたり、その逆を行うことができます。 |
{{Navigation|Man_DataEditing|Man_MeshGen}} | {{Navigation|Man_DataEditing|Man_MeshGen}} | ||
Latest revision as of 08:01, 2 May 2016
5、アライメント
スキャナーで複数のオブジェクトが取得された場合、各アイテムの位置は、他のアイテムの位置とは関係がない状態となっています。スキャンされたデータで正しく作業するには、すべての取得データを同じ参照システム内で位置づける必要があります。
まずはじめに、他のアイテムに対する参照として使用される取得データを決める必要があります。構造プロジェクトでは、ソフトウェアはこの手順を自動的に実行します。
新しい情報が取得されるたびに、新しいデータを参照用取得データまたは残りのプロジェクトへのアライメントがすでにされている別の取得データに対して、アライメントをする必要があります。
取得されたすべての情報は固有の参照用取得データを持ちます。プロジェクトツリーにはこの関係が表示され、すべての子部品は、ツリー上で親となるノードへアライメントされます。
〇ダイレクトアライメント
スキャニングソフトウェアは自動的に取得データをアライメントすることができます。
- プロジェクトツリーから、残りのプロジェクトへアライメントしたい部品を選択します。
- メインツールバーのアライメントボタンをクリックします。
ソフトウェアは参照データを選択し、選択された取得データと参照データを分析して、選択されたアイテムの参照データに対する正しい位置を特定します。
ソフトウェアがアライメントを特定することができなかった場合、手動アライメントが開始されます。
〇手動アライメント
ソフトウェアがダイレクトアライメントの実行に失敗した場合、手動アライメントが開始されます。また、![]() を押しながら、メインツールバーのアライメントボタンをクリックして、このツールにアクセスすることもできます。
を押しながら、メインツールバーのアライメントボタンをクリックして、このツールにアクセスすることもできます。
●インターフェース
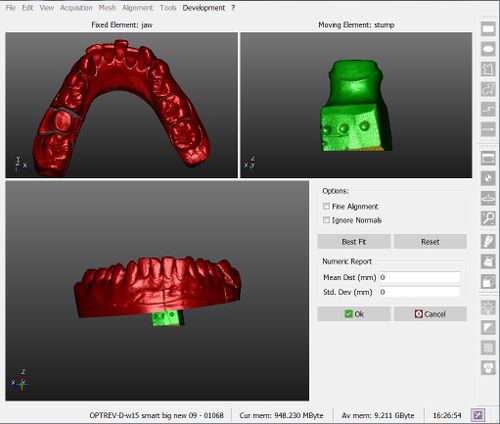
下図は手動アライメントのインターフェースを示します。
この画面には4つの領域があります。
- 画面左上には、参照オブジェクトが表示されます。これは、すべてのプロジェクトデータに対して参照位置を提供します。
- 画面右上には、移動オブジェクトが表示されます。これを現在の位置から移動させ、その他すべてのプロジェクトデータと同じ参照システム内に配置する必要があります。
- 画面下部には両方のオブジェクトが表示されます。ここで移動オブジェクトの現在の位置を確認することができます。
- 画面右下には、いくつかのオプションとNumeric Report(数値レポート)があります。
●手順
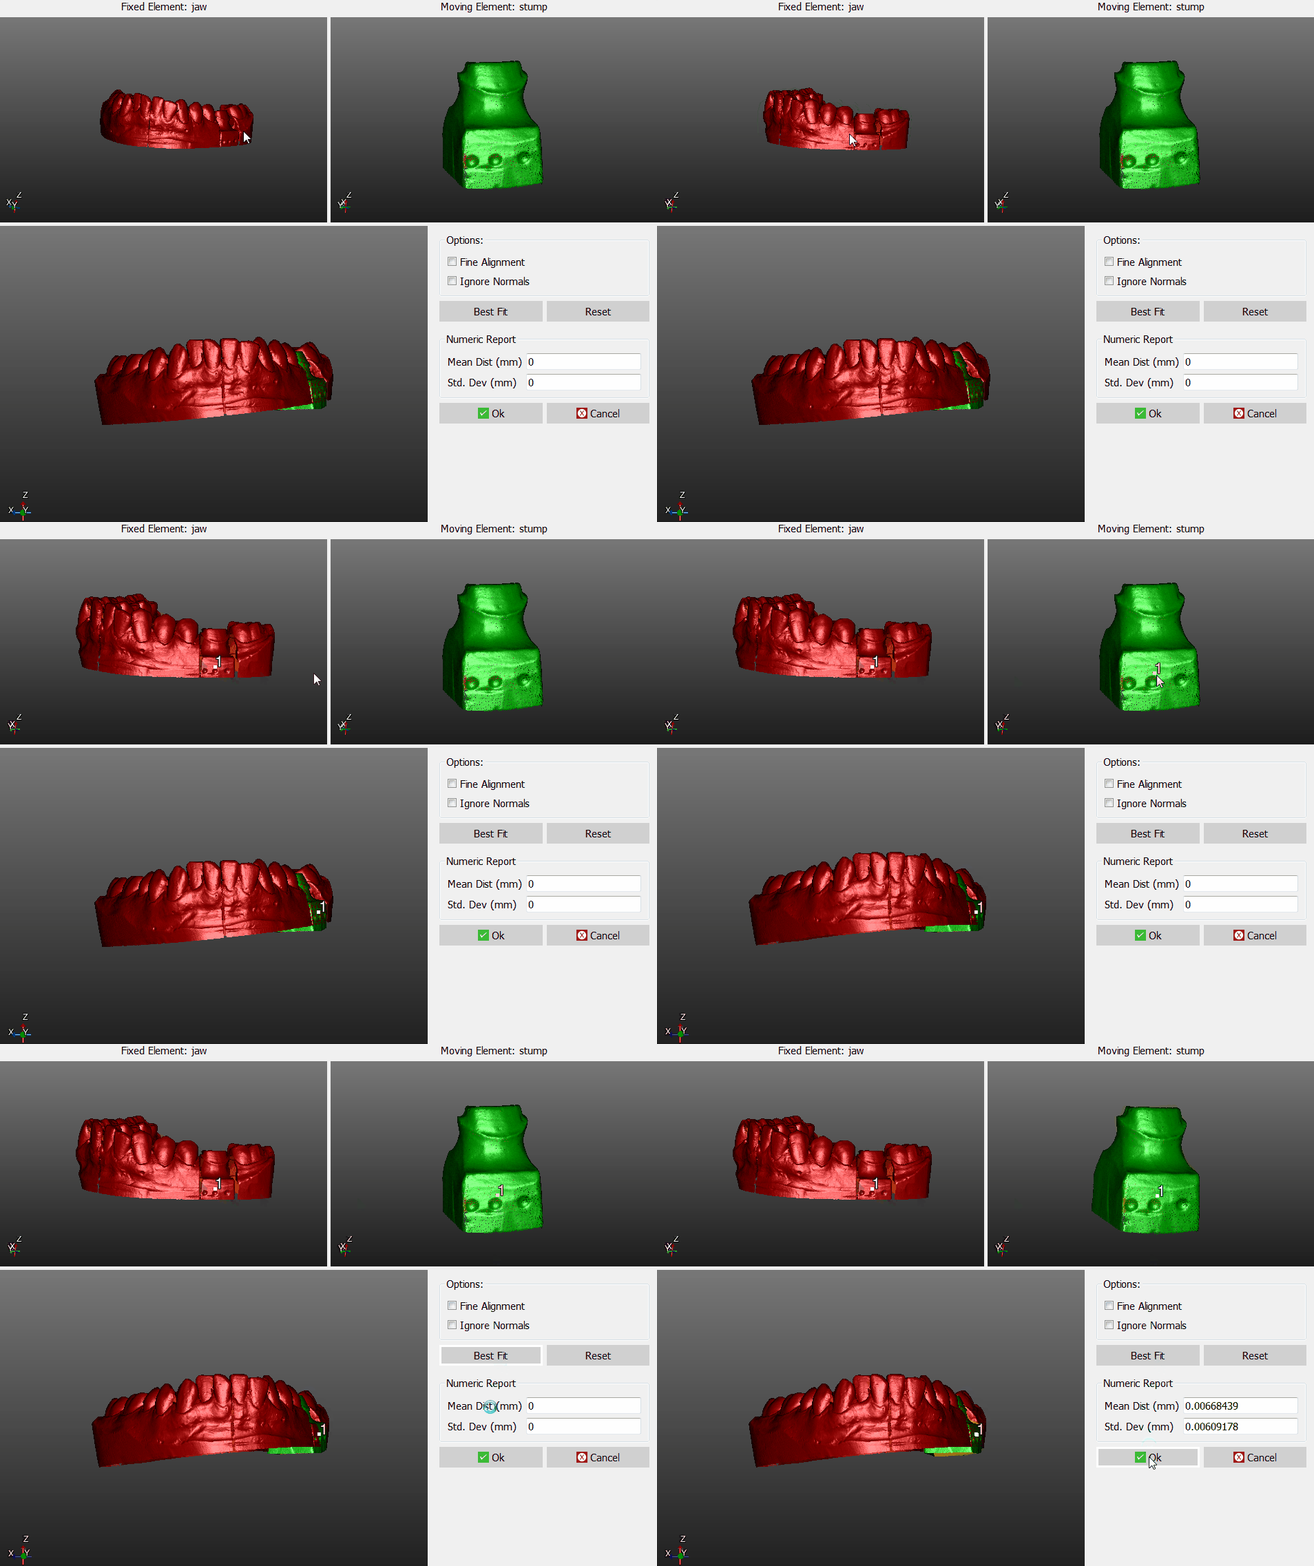
部品を手動でアライメントするには下記を参照下さい。
- 参照オブジェクトと移動オブジェクトを同じ視点にさせて、共通の部分が見えるようにします。
- 両方のオブジェクトで、同じ点をクリックします。
- 下の3Dビューを確認し、位置がある程度正しくなっていることを確認します。(この段階では、完全に適合している必要はありません)
- 右のBest Fit(ベストフィット)ボタンをクリックします。
2つのオブジェクトに共通となる点が十分ある場合、ソフトウェアが最適なアライメントを行います。下部の3Dビューで視覚的にアライメントを確認するか、またはNumeric Report(数値レポート)の値を確認します。
アライメントが正しければ、Okをクリックして、移動オブジェクトの新しい位置を確定します。
正しくなっていない場合、Reset(リセット)ボタンをクリックして、もう一度アライメントを行って下さい。
●オプション
手動アライメントでは、2つのオプションがあります。
- Fine Alignment(ファイン調節) : 通常、Best Fit(ベストフィット)では、オブジェクトを参照オブジェクトに対して最大1mm近づけます。2つのオブジェクト間の共通部分が非常に小さい場合、Fine Alignment(ファイン調節)を使い、参照オブジェクトへのオブジェクトの移動を0.1mm以内にさせます
- Ignore Normals(法線を無視する) : あるオブジェクトの内部部分を、別のオブジェクトの外部部分へアライメントをしたり、その逆を行うことができます。


