Difference between revisions of "Man StartScreen/pt-br"
(Updating to match new version of source page) |
(Updating to match new version of source page) |
||
| Line 1: | Line 1: | ||
{{Language bar}} | {{Language bar}} | ||
| − | = | + | {{DISPLAYTITLE:Start Screen|noerror}} |
| − | + | =Start= | |
| + | The Start Screen is the first dialog that appears when launching the software. | ||
Existem dois tipos diferentes de tela inicial. Uma aparecerá quando o software é lançado diretamente pelo usuário, a outra quando o software é lançado por um outro software, tendo já definido um projeto. | Existem dois tipos diferentes de tela inicial. Uma aparecerá quando o software é lançado diretamente pelo usuário, a outra quando o software é lançado por um outro software, tendo já definido um projeto. | ||
| Line 15: | Line 16: | ||
{{Screenshot|Dental_2_5_startPopUp-Exocad.jpg}} | {{Screenshot|Dental_2_5_startPopUp-Exocad.jpg}} | ||
| − | On the left, under 'Advenced Import Options' | + | On the left, under 'Advenced Import Options' select a 'Model Type' to change the software workflow: |
| − | ; Sectioned Model : this is the default workflow, | + | ; Sectioned Model : this is the default workflow, in which every element is acquired separately and all the information gets merged at the end |
; Impression Scan : if the ''Impression Scan Module'' is enabled in the license, check this option to scan an impression and not a stone model | ; Impression Scan : if the ''Impression Scan Module'' is enabled in the license, check this option to scan an impression and not a stone model | ||
| − | ; All In One : if | + | ; All In One : if the ''All In One Scan Module'' is enabled, it is possible to scan all the parts of a Quadrant Trye in just one step |
; Unsectioned Model : enable this option if the model to be scanned is not sectioned, the scanner will not require a separate scan for every die | ; Unsectioned Model : enable this option if the model to be scanned is not sectioned, the scanner will not require a separate scan for every die | ||
Revision as of 19:35, 2 December 2015
Start
The Start Screen is the first dialog that appears when launching the software.
Existem dois tipos diferentes de tela inicial. Uma aparecerá quando o software é lançado diretamente pelo usuário, a outra quando o software é lançado por um outro software, tendo já definido um projeto.
Em ambos os casos, o software irá executar uma Verificação do Sistema e mostrar uma mensagem. Se tudo estiver pronto para trabalhar e o escaner estiver conectado corretamente, a tela mostrará a frase 'Escaner inicializado corretamente' . Se, por qualquer motivo, o escaner não estiver funcionando corretamente, uma mensagem de erro específica será exibida.
Em ambos Telas Iniciais, este botão Template:Botão inline abre as Opções Dialogo.
Projeto Pronto Iniciar
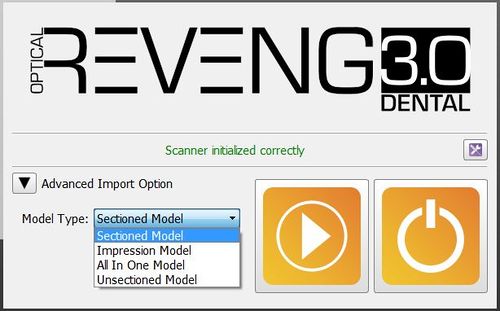
This is the Start Screen that appears when the software is launched having already set a project in an Invoking Software, for example if started from the Exocad DentalDB.
On the left, under 'Advenced Import Options' select a 'Model Type' to change the software workflow:
- Sectioned Model
- this is the default workflow, in which every element is acquired separately and all the information gets merged at the end
- Impression Scan
- if the Impression Scan Module is enabled in the license, check this option to scan an impression and not a stone model
- All In One
- if the All In One Scan Module is enabled, it is possible to scan all the parts of a Quadrant Trye in just one step
- Unsectioned Model
- enable this option if the model to be scanned is not sectioned, the scanner will not require a separate scan for every die
À direita, há 2 botões:
 Projeto Inicial
 - Cria um projeto de escaneamento específico usando dados provenientes do Software Convocação, com as opções selecionadas, e inicia o Assistente passo a passo
 Fechar
 - Fecha o software sem iniciar o projeto.
Lançamento Direto
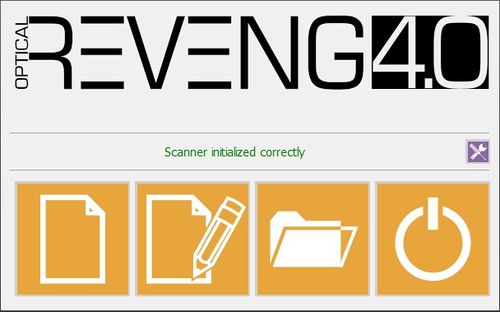
Esta é a tela inicial que aparece ao iniciar o software diretamente
Neste caso, nenhum projeto está pronto portanto o software irá pedir para criar um novo projeto ou para carregar um projeto criado anteriormente.
 Novo Projeto Livre
- Apresente somente se o Módulo Livre estiver habilitado. Ele permite criar um projeto em Modo Livre
 Novo Projeto
 - Permite criar um Structured Project e iniciar o Assistene passo a passo
 Carregar Projeto
- Permite carregar um projeto anterior
 Fechar
- Fecha o software sem iniciar o projeto


