Difference between revisions of "Pc Connection/zh-hant"
Democenter (talk | contribs) |
(Importing a new version from external source) |
||
| (One intermediate revision by one other user not shown) | |||
| Line 2: | Line 2: | ||
{{DISPLAYTITLE:Scanner's connection|noerror}} | {{DISPLAYTITLE:Scanner's connection|noerror}} | ||
| − | == | + | == 连接扫描器 == |
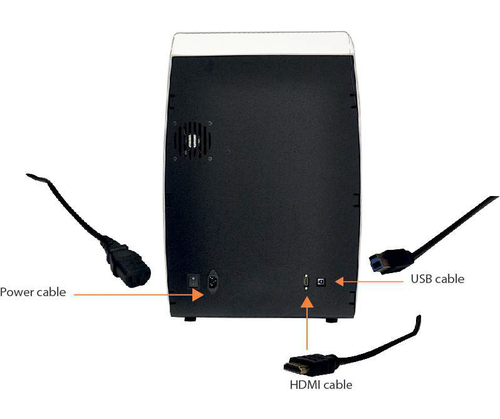
| − | + | 如下图所示,扫描器的背面自左至右为:电源开关、电源线接口、HDMI端口和USB端口: | |
{{Big image|Big.png}} | {{Big image|Big.png}} | ||
| − | '' | + | ''扫描器连接Big/Deluxe'' |
{{Big image|Small.png}} | {{Big image|Small.png}} | ||
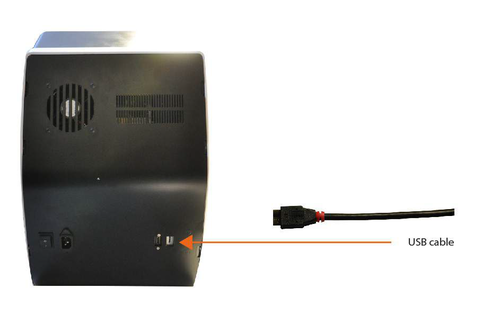
| − | '' | + | ''扫描器连接(Small)'' |
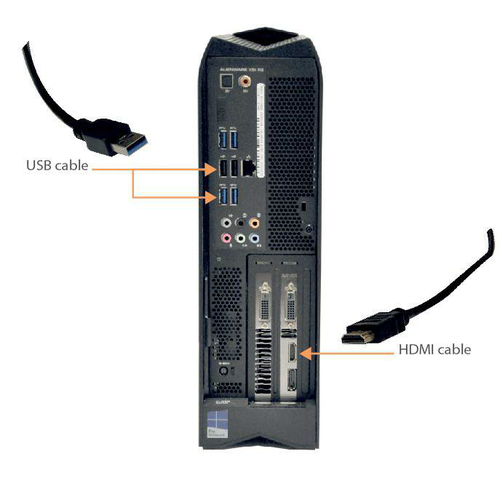
| − | + | 电源电缆的平均电压为230V,必须连接到可以在工作所有阶段保持该电压的电源线上,并且防止过载和短路。<br/>HDMI电缆必须连接到计算机显卡的HDMI端口中。计算机中此端口的位置可能会根据不同计算机品牌和型号而有所不同。在我们提供的计算机Dell的Alienware i5和i7中,这个HDMI端口位于左下方: | |
{{Big image|Pc.png}} | {{Big image|Pc.png}} | ||
| − | + | USB接线的连接取决于扫描器的型号 | |
| − | + | 在Easy和Smart型号(Small和Big)中都有USB 2.0组件,在 | |
| − | + | Deluxe型号上是USB 3.0接口。因此,Easy与Smart型号的USB接线必须插入USB 2.0的端口,Delux型号的接线必须插入USB3.0的端口。这些接口通常是颜色编码的,所以可以区分,2.0是黑色,3.0是蓝色。Open Technologies在扫描器上提供的连接线是USB 3.0(蓝色)的,然而上述的说明依然有效,即使接线是3.0,在连接Easy或Smart型号时还是要插入USB2.0接口。 | |
| − | |||
| − | |||
| − | |||
| − | |||
| − | |||
| − | |||
| − | |||
Latest revision as of 12:13, 1 August 2017
连接扫描器
如下图所示,扫描器的背面自左至右为:电源开关、电源线接口、HDMI端口和USB端口:
扫描器连接Big/Deluxe
扫描器连接(Small)
电源电缆的平均电压为230V,必须连接到可以在工作所有阶段保持该电压的电源线上,并且防止过载和短路。
HDMI电缆必须连接到计算机显卡的HDMI端口中。计算机中此端口的位置可能会根据不同计算机品牌和型号而有所不同。在我们提供的计算机Dell的Alienware i5和i7中,这个HDMI端口位于左下方:
USB接线的连接取决于扫描器的型号 在Easy和Smart型号(Small和Big)中都有USB 2.0组件,在 Deluxe型号上是USB 3.0接口。因此,Easy与Smart型号的USB接线必须插入USB 2.0的端口,Delux型号的接线必须插入USB3.0的端口。这些接口通常是颜色编码的,所以可以区分,2.0是黑色,3.0是蓝色。Open Technologies在扫描器上提供的连接线是USB 3.0(蓝色)的,然而上述的说明依然有效,即使接线是3.0,在连接Easy或Smart型号时还是要插入USB2.0接口。


