Data Editing
Contents
Editare
După achiziționarea unor informații de la scaner, este posibil să fie necesară curățarea datelor de la piese sau zgomote nedorite sau eliminarea unor părți nedorite dintr-un mesh.
Selectarea Datelor
Mai întâi selectați partea de imagine care urmează să fie eliminată. Selection Tools pot fi utilizate atât pe achiziții, cât și pe meshuri, în timp ce funcția Select Outliers funcționează numai pe achiziții.
Instrumente de Selecție
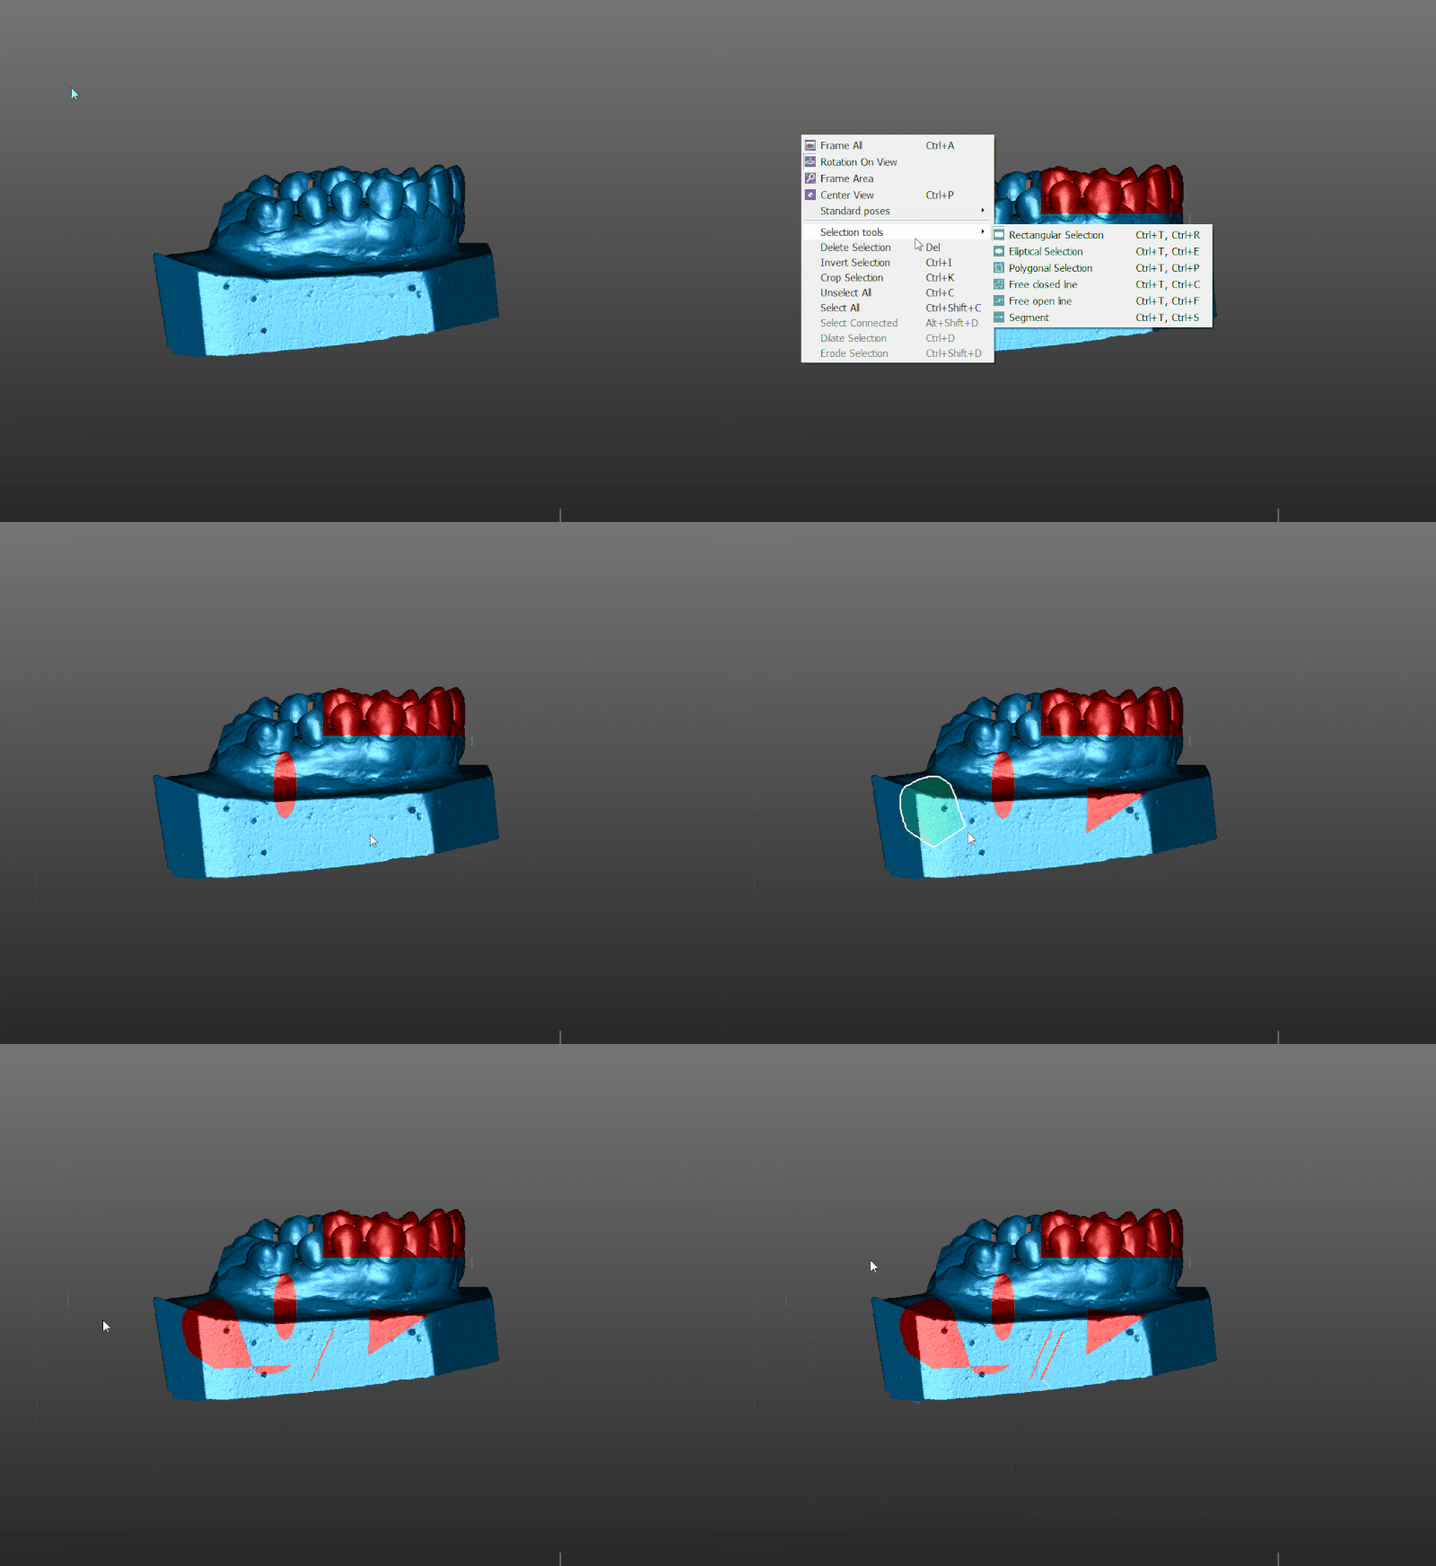
Instrumentele de selecție sunt instrumente interactive care pot fi utilizate prin deplasarea mouse-ului pe vizualizarea 3D și menținerea butonului stânga. O formă va apărea, urmând mouse-ul, iar toate informațiile din interiorul acestuia vor fi selectate.
Instrumentele sunt:
- Rectangular: atrage un dreptunghi care pornește de la punctul de clic și crește după mouse; pentru a selecta, eliberați butonul stâng al mouse-ului
- Eliptical: atrage o elipsă centrat în punctul de clic care crește după mouse; pentru a selecta, eliberați butonul stâng al mouse-ului
- Poligonal: faceți clic în două puncte diferite pentru a desena o linie și un al treilea punct pentru a crea un poligon. Faceți dublu clic pentru a închide poligonul și pentru a selecta toată zona din interiorul acestuia
- Linie liberă închisă: faceți clic și țineți apăsat butonul stâng al mouse-ului pentru a începe desenarea unei linii care urmează mouse-ul. Eliberați butonul stâng al mouse-ului pentru a închide linia și a selecta toată zona din interiorul margini
- Free Open Line: faceți clic și țineți apăsat butonul stâng al mouse-ului pentru a începe desenarea unei linii care urmează mouse-ul. Eliberați butonul stâng al mouse-ului pentru a selecta toate datele exact sub linia trasată
- Segment: faceți clic și țineți apăsat butonul stâng al mouse-ului pentru a desena o linie și eliberați butonul stâng al mouse-ului pentru a selecta toate datele exact sub segment.
Anulați selectarea datelor
În timp ce utilizați unul dintre instrumente, țineți ![]() pentru a deselecta datele în loc să le selectați.
pentru a deselecta datele în loc să le selectați.
Selecție Pass-Through
Selecția Pass through selection, modifică comportamentul selecției și funcționează doar pe datele de mesh.
În mod normal, toate datele din interiorul zonei desenate vor fi selectate, chiar dacă nu sunt vizibile sau ascunse în spatele altor suprafețe ale meshurilor.
Prin menținerea ![]() la finalizarea selecției, va fi selectată numai partea vizibilă a meshlui. Toate părțile ascunse sau părțile de pe cealaltă parte a obiectului nu vor fi selectate.
la finalizarea selecției, va fi selectată numai partea vizibilă a meshlui. Toate părțile ascunse sau părțile de pe cealaltă parte a obiectului nu vor fi selectate.
Outlier Cleaning
Outliers are all the points of an acquisition that are not part of the object surface, such as noises, reflections or acquisition defects.
Each acquisition strategy already applies a specific outlier cleaning process. Therefore, data is often ready to be aligned and converted in mesh directly after the acquisition.
In order to remove outliers manually, use one of the three Select Outliers tools.
Select Outliers
This tool identifies all the points that are isolated, far from all the other points. Click on this tool button to open a window containing two parameters
- Selectivity : how many points have to be near each other to consider them either isolated or not. The higher the value, the more points get selected
- Strength : how close two points have to be to consider them as not isolated. The higher the value, the more points get selected
When changing the parameters, the software will show the selection in real time. Click ok to confirm the selection.
Select Outliers by Angle
This Outliers selection provides only one parameter: an angle. A point is considered an outlier only if there are no points near it that create an angle smaller than the one established by the parameters. The smaller the angle, the less points selected.
When changing the parameters, the software will show the selection in real time. Click ok to confirm the selection.
Select Outliers Segmentation
This Outliers selection tool analyses blocks of points and not single points.
Base Selection
To remove the Base of the acquisition (the part of the acquisition near the model holder) use the Cut Height Acquisition Tool.
A slider will appear, which controls the height value. All the points below the chosen height will be selected.
When moving the slider, the software will show the selection in real time. Click ok to confirm the selection.
Editing Functions
When a selection is performed, use one of the following editing functions either from the 3D View Context Menu, from the Edit Menu or using the related keyboard shortcuts:
- Delete Selection (DEL) : deletes the currently selected data
- Crop Selection (
 + K) : keeps only the selected data and removes all the rest
 - Invert Selection (
 + I) : selects all the data that is not selected and deselects the selected data
 - Clear Selection (
 + C) : deselects all the data
 - Select All (
 +
+  + C) : selects all the data
 - Select Connected (
 +
+  + D) : (only for meshes) extends the selection to get all the parts connected to the current selection area
 - Dilate Selection (
 + D) : extends the selection to the data adjacent to the actual selection
 - Erode Selection (
 +
+  + D) : reduces the margins of the selection


