Alignment
Contents
Alinhamento
Quando mais de um objeto é escaneado pelo escaner, a posição de cada item não está relacionada com a posição dos outros. A fim de trabalhar corretamente com os dados escaneados, todas as aquisições precisam estar localizados no mesmo sistema de referência.
Em primeiro lugar, o utilizador tem de identificar uma aquisição que vai ser utilizada como uma referência para todos os outros. Nos 'Projetos Estruturados' o software executa automaticamente este procedimento.
Cada vez que uma nova informação é adquirida, é necessário alinhar os novos dados para a 'Aquisição de Referência' ou para 'mais uma aquisição já alinhada no resto do projeto'
Toda a informação adquirida terá uma específica 'Referência de Aquisição' . O Projeto Arvore irá mostrar esta relação, cada filho será alinhado ao seu nó pai na árvore.
Alinhamento Direto
OpticalRevEng Dental pode alinhar as Aquisições por si só. Somente:
- Selecione pela árvore de projeto o elemento que tem de ser alinhado com o resto do projeto
- Clique o Botão Alinhamento na Principal Barra de Ferramentas
The software will select the most appropriate reference item, analyze the selected acquisition and the reference item and try to identify the correct position of the selected item inside the reference item.
If no alignment can be identified by the software, a Manual Alignment will start.
Alinhamento Manual
O alinhamento manual começa cada vez que o software não pode completar um 'Alinhamento Direto' ou segurando o botão Template:Inline botão ao clicar no Botão de Alinhamento no Principal Barra de ferramentas
Interface
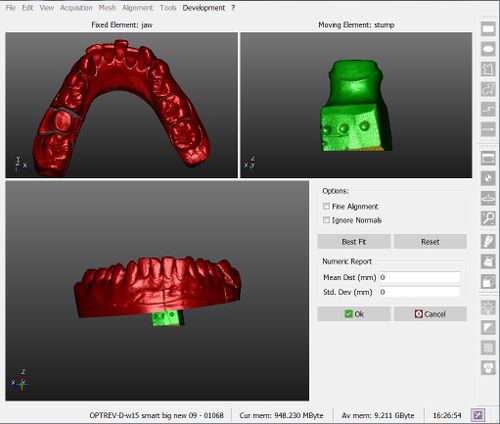
Durante o alinhamento manual, a interface vai mudar.
Existem 4 áreas diferentes nesta tela:
- On the top left there is the reference object, which gives the reference position for all the project data
- On the top right there is the moving object, that has to be moved from its current position and placed in the same reference system of all the other project data
- On the bottom there are, at the same time, both the objects, so that the user can check the current position of the moving object
- On the bottom right some options and a Numeric Report are available
Procedure
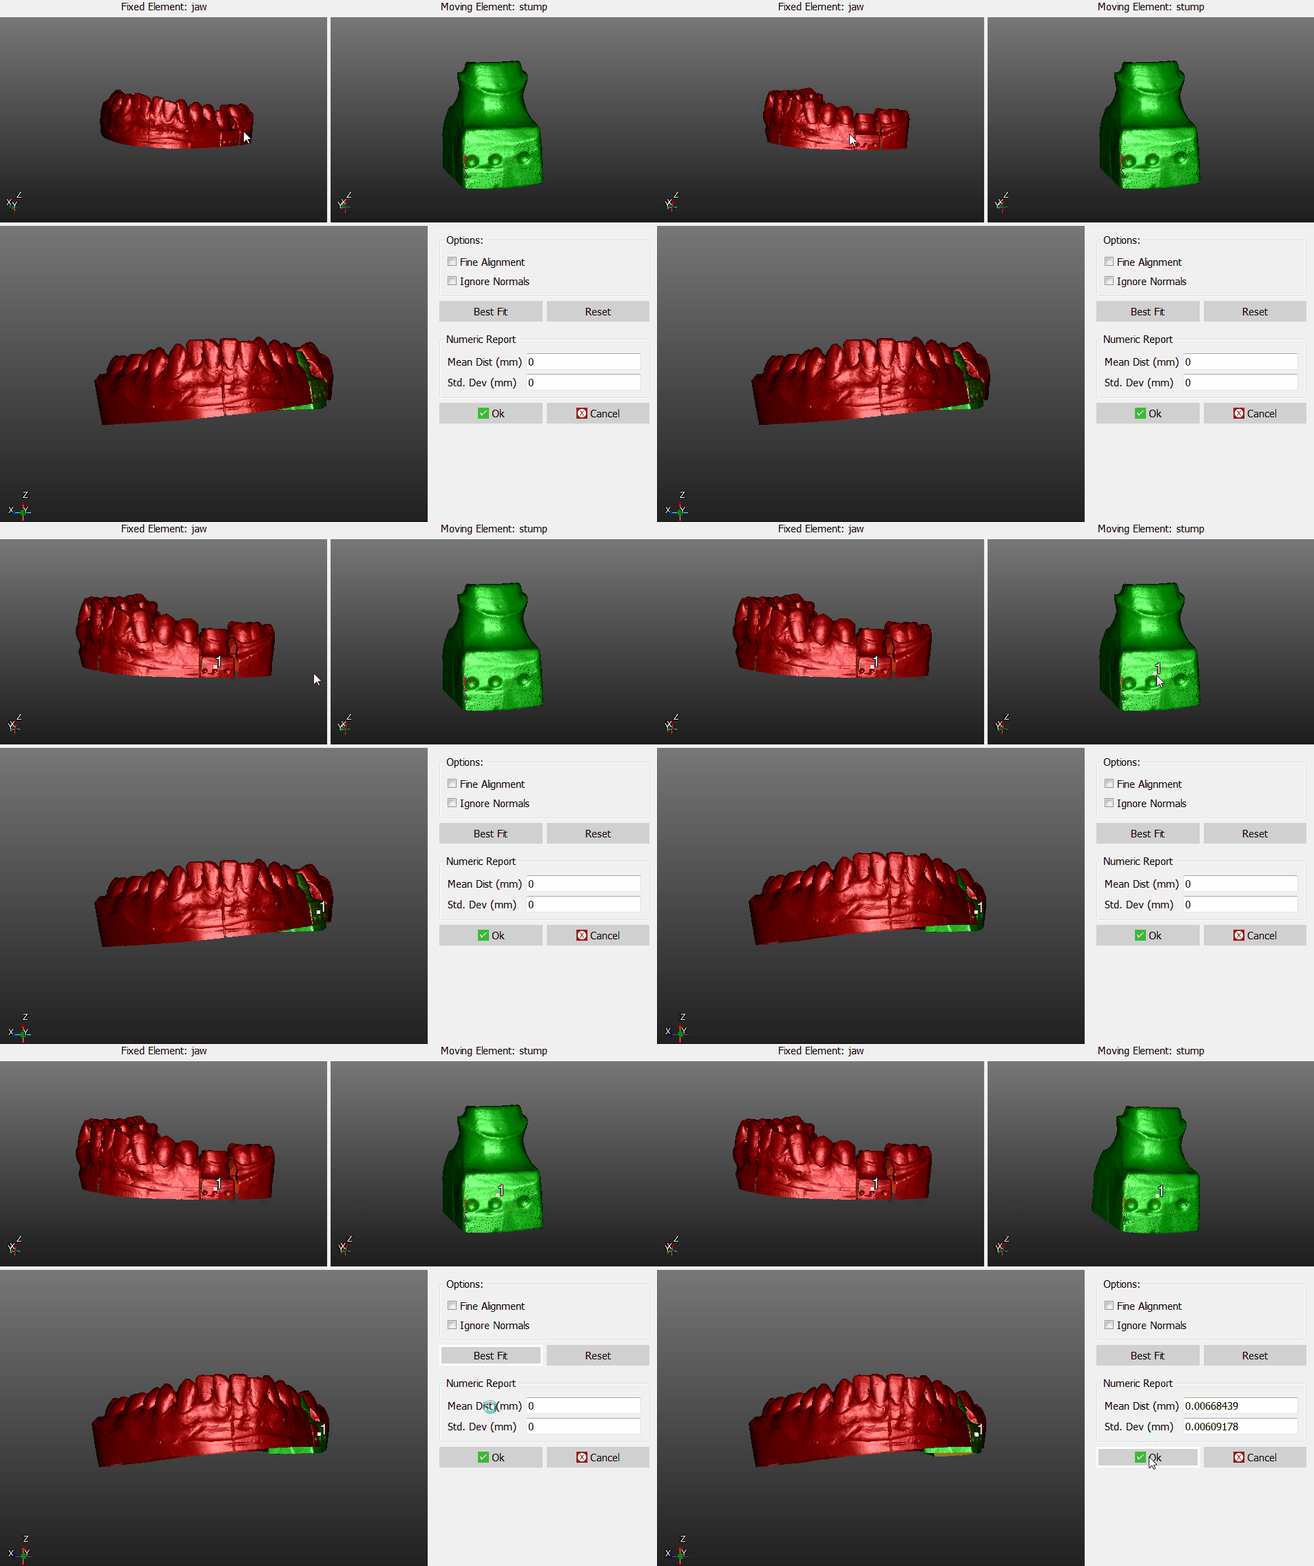
To manually align the elements:
- Rotate both the reference object and the moving object in the same point of view, until the parts in common are visible
- Click on the same point on both the objects
- Check in the 3D view below if the position is more or less correct (it's not necessary, at this stage, to find the perfect position)
- Click the Best Fit button on the right
If the two objects have enough common points, the software will find the best alignment between them. Visually check the alignment on the bottom 3D View or by reading the values in the Numeric Report.
If the alignment is good, click Ok to confirm the new position of the moving object.
If the alignment is not good enough, click the Reset button and start the alignment again.
Options
There are two options available during the manual aligment:
- Fine Alignment : by clicking Best Fit the software will try to move the moving object up to 1mm, to find a better alignment. This can create problems if the parts in common between the two objects are really small. With the option Fine Aligment enabled, the software will move the moving object not more than 0.1mm
- Ignore Normals : the objects have an inside and an outside. When the software looks for an alignment, it doesn't align the inside of one object with the outside of the other. To ignore the differences between inside and outside, flag the Ignore Normals option


