Difference between revisions of "Man DataEditing/ja"
(Created page with "選択ツールはインタラクティブなツールで、マウスの左ボタンを使って、3Dビュー上でドラッグ操作できます。マウスの動作に従...") |
|||
| (49 intermediate revisions by the same user not shown) | |||
| Line 1: | Line 1: | ||
{{Language bar}} | {{Language bar}} | ||
{{DISPLAYTITLE:Data Editing|noerror}} | {{DISPLAYTITLE:Data Editing|noerror}} | ||
| − | = | + | =4、データ編集= |
スキャナーから情報を取得した後、不必要な部分やノイズを取り除いてデータをきれいにしたり、メッシュから不必要な部品を取り除く必要がある場合があります。 | スキャナーから情報を取得した後、不必要な部分やノイズを取り除いてデータをきれいにしたり、メッシュから不必要な部品を取り除く必要がある場合があります。 | ||
| − | = | + | == 〇データの選択 == |
まず、画像で削除する部分を選択します。'''選択ツール'''は、取得データおよびメッシュの両方に使うことができますが、'''アウトライアー選択'''機能は、取得データのみで使用できます。 | まず、画像で削除する部分を選択します。'''選択ツール'''は、取得データおよびメッシュの両方に使うことができますが、'''アウトライアー選択'''機能は、取得データのみで使用できます。 | ||
| − | == | + | === ●選択ツール === |
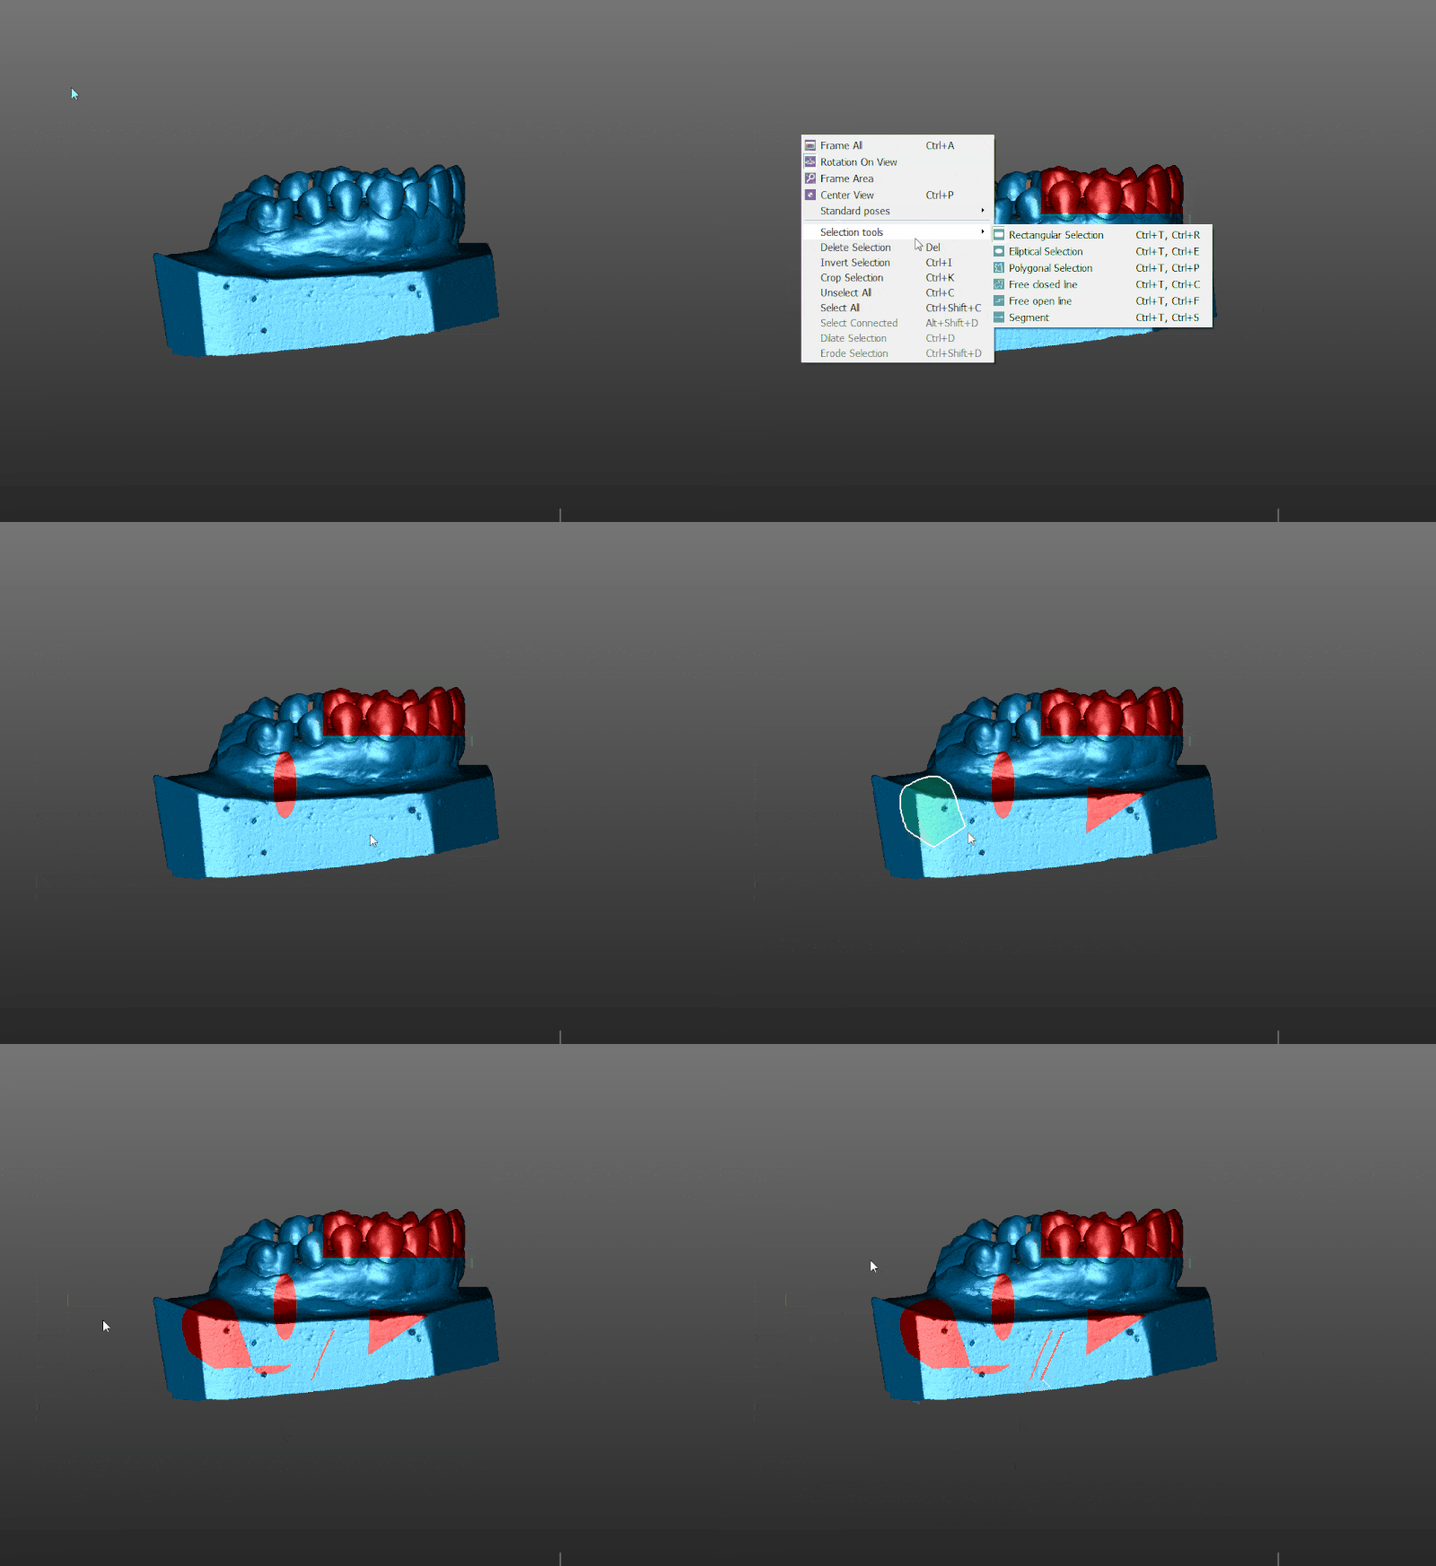
選択ツールはインタラクティブなツールで、マウスの左ボタンを使って、3Dビュー上でドラッグ操作できます。マウスの動作に従って形状が生成され、その境界線内の情報がすべて選択されます。 | 選択ツールはインタラクティブなツールで、マウスの左ボタンを使って、3Dビュー上でドラッグ操作できます。マウスの動作に従って形状が生成され、その境界線内の情報がすべて選択されます。 | ||
| − | + | ツール: | |
| − | * '''Rectangular''' | + | * '''Rectangular'''(長方形):最初にクリックした点から始まる長方形を描写します。マウスの左ボタンを離すと、選択範囲が決定します。 |
| − | * '''Elliptical''' | + | * '''Elliptical'''(楕円):最初にクリックした点を中心とした楕円を描写します。マウスの左ボタンを離すと、選択範囲が決定します。 |
| − | * '''Polygonal''' | + | * '''Polygonal'''(多角形):2点をクリックして線を引き、3点目から多角形を描写します。ダブルクリックで多角形を閉じ、その境界線内のすべての領域が選択されます。 |
| − | * '''Free Closed Line''' | + | * '''Free Closed Line'''(フリー閉曲線):マウスの左ボタンをドラッグして閉曲線を描写します。マウスの左ボタンを離して線を閉じ、その境界線内のすべての領域が選択されます。 |
| − | * '''Free Open Line''' | + | * '''Free Open Line'''(フリー開曲線):マウスの左ボタンをドラッグして開曲線を描写します。マウスの左ボタンを離すと、描写した線の下にあるデータがすべて選択されます。 |
| − | * '''Segment''' | + | * '''Segment'''(セグメント):マウスのドラッグ操作で線を引き、マウスの左ボタンを離すと、そのセグメント直下のデータがすべて選択されます。 |
[[File:Dental_2_5_selectionTools.gif]] | [[File:Dental_2_5_selectionTools.gif]] | ||
| − | === | + | === ●データの選択解除 === |
| − | + | ツールのいずれかを使う際に、{{Inline button|Key ctrl.png}}を押すことで、選択する代わりに、選択解除します。 | |
| − | === | + | === ●パススルー選択 === |
| − | + | ''パススルー選択''で、選択の振る舞いを変更します。これはメッシュデータでのみ利用できます。 | |
| − | + | 通常は、他のメッシュ表面の後ろに隠れている部分を含む、描写領域内部のすべてのデータが選択されます。 | |
| − | + | 選択の最終決定を行う際、{{Inline button|Key shift.png}}を押しながら行うと、メッシュの表示されている(見えている部分)のみが選択されます。非表示(隠れている)部分や、オブジェクトの向こう側の部分は選択されません。 | |
| − | == | + | == 〇アウトライアーのクリーニング == |
| − | '' | + | ''アウトライアー''は、ノイズ、反射、取得不良など、オブジェクト表面の一部ではないすべての取得点です。 |
| − | + | それぞれの取得計画には、すでに固有のアウトライアークリーニングプロセスが適用されています。このため、多くの場合において、データを取得した後、そのデータは、アライメントを行い、直接メッシュに変換できる準備ができています。 | |
| − | + | アウトライアーを手動で取り除くには、下記の3つの''アウトライアー選択''ツールのどれかを使って下さい。 | |
| − | === | + | === ●アウトライアー選択 === |
| − | + | このツールは、他の点から離れていて、''孤立''しているすべての点を特定します。このツールボタンをクリックして、2つのパラメータを含むウィンドウを開きます。 | |
| − | * | + | * Selectivity(分離度):孤立しているどうかを判断する基準として、どのくらいの数の点がお互いの近くにある必要があるかどうかを設定します。この値が高いほど、より多くの点が選択されます。 |
| − | * | + | * Strength(強度):孤立していないと判断される、2点間の距離を設定します。この値が高いほど、より多くの点が選択されます。 |
| − | + | パラメータを変更する際、ソフトウェアはリアルタイムで選択内容を表示します。''ok''をクリックして、選択を確定します。 | |
| − | === | + | === ●アウトライアー選択(角度) === |
| − | + | このアウトライアー選択のパラメータは、角度のみとなります。ある点の近くに、このパラメータで指定されている角度よりも小さい角度を生成する点がない場合、この点はアウトライアーとみなされます。角度が小さいほど、より少ない点が選択されます。 | |
| − | + | パラメータを変更する際、ソフトウェアはリアルタイムで選択内容を表示します。''ok''をクリックして、選択を確定します。 | |
| − | === | + | === ●アウトライアー選択(セグメンテーション) === |
| − | + | このアウトライアー選択ツールは、単一の点ではなく、点のブロックを分析します。 | |
| − | == | + | == 〇ベース選択 == |
| − | + | 取得の''ベース''(モデルホルダーに近い部分)を取り除くには、''高さカット''取得ツールを使用します。 | |
| − | + | 高さの値をコントロールできるスライダーが表示されます。選択された高さより下にあるすべての点が選択されます。 | |
| − | + | スライダーで調節する際、ソフトウェアはリアルタイムで選択内容を表示します。''ok''をクリックして、選択を確定します。 | |
| − | = | + | == 〇編集機能 == |
| − | + | 選択を実行する際は、以下のいずれかの編集機能(3Dビューコンテクストメニュー、編集メニュー、またはキーボードショートカットからアクセス可能)を使用します。 | |
| − | * | + | * 削除選択 (DEL) : 現在選択しているデータを削除します。 |
| − | * | + | * クロップ選択 ({{Inline button|Key ctrl.png}}+ K) : 選択したデータのみを残し、残りをすべて削除します。 |
| − | * | + | * 選択反転 ({{Inline button|Key ctrl.png}}+ I) : 選択されていないすべてのデータを選択し、選択されているデータを選択解除します。 |
| − | * | + | * 選択クリア ({{Inline button|Key ctrl.png}}+ C) : すべてのデータの選択を解除します。 |
| − | * | + | * 全選択 ({{Inline button|Key ctrl.png}}+ {{Inline button|Key shift.png}}+ C) : すべてのデータを選択します。 |
| − | * | + | * 接続部分の選択 ({{Inline button|Key alt.png}}+ {{Inline button|Key shift.png}}+ D) : (メッシュのみ)現在選択されている領域に接続されているすべての部品へ選択を広げます。 |
| − | * | + | * 選択拡張 ({{Inline button|Key ctrl.png}}+ D) : 実際に選択されている部分の隣のデータまで選択を広げます。 |
| − | * | + | * エロード選択 ({{Inline button|Key ctrl.png}}+ {{Inline button|Key shift.png}}+ D) : 選択のマージンを減らします。 |
{{Navigation|Man_Acquisition|Man_Align}} | {{Navigation|Man_Acquisition|Man_Align}} | ||
Latest revision as of 08:08, 12 April 2016
Contents
4、データ編集
スキャナーから情報を取得した後、不必要な部分やノイズを取り除いてデータをきれいにしたり、メッシュから不必要な部品を取り除く必要がある場合があります。
〇データの選択
まず、画像で削除する部分を選択します。選択ツールは、取得データおよびメッシュの両方に使うことができますが、アウトライアー選択機能は、取得データのみで使用できます。
●選択ツール
選択ツールはインタラクティブなツールで、マウスの左ボタンを使って、3Dビュー上でドラッグ操作できます。マウスの動作に従って形状が生成され、その境界線内の情報がすべて選択されます。
ツール:
- Rectangular(長方形):最初にクリックした点から始まる長方形を描写します。マウスの左ボタンを離すと、選択範囲が決定します。
- Elliptical(楕円):最初にクリックした点を中心とした楕円を描写します。マウスの左ボタンを離すと、選択範囲が決定します。
- Polygonal(多角形):2点をクリックして線を引き、3点目から多角形を描写します。ダブルクリックで多角形を閉じ、その境界線内のすべての領域が選択されます。
- Free Closed Line(フリー閉曲線):マウスの左ボタンをドラッグして閉曲線を描写します。マウスの左ボタンを離して線を閉じ、その境界線内のすべての領域が選択されます。
- Free Open Line(フリー開曲線):マウスの左ボタンをドラッグして開曲線を描写します。マウスの左ボタンを離すと、描写した線の下にあるデータがすべて選択されます。
- Segment(セグメント):マウスのドラッグ操作で線を引き、マウスの左ボタンを離すと、そのセグメント直下のデータがすべて選択されます。
●データの選択解除
ツールのいずれかを使う際に、![]() を押すことで、選択する代わりに、選択解除します。
を押すことで、選択する代わりに、選択解除します。
●パススルー選択
パススルー選択で、選択の振る舞いを変更します。これはメッシュデータでのみ利用できます。
通常は、他のメッシュ表面の後ろに隠れている部分を含む、描写領域内部のすべてのデータが選択されます。
選択の最終決定を行う際、![]() を押しながら行うと、メッシュの表示されている(見えている部分)のみが選択されます。非表示(隠れている)部分や、オブジェクトの向こう側の部分は選択されません。
を押しながら行うと、メッシュの表示されている(見えている部分)のみが選択されます。非表示(隠れている)部分や、オブジェクトの向こう側の部分は選択されません。
〇アウトライアーのクリーニング
アウトライアーは、ノイズ、反射、取得不良など、オブジェクト表面の一部ではないすべての取得点です。
それぞれの取得計画には、すでに固有のアウトライアークリーニングプロセスが適用されています。このため、多くの場合において、データを取得した後、そのデータは、アライメントを行い、直接メッシュに変換できる準備ができています。
アウトライアーを手動で取り除くには、下記の3つのアウトライアー選択ツールのどれかを使って下さい。
●アウトライアー選択
このツールは、他の点から離れていて、孤立しているすべての点を特定します。このツールボタンをクリックして、2つのパラメータを含むウィンドウを開きます。
- Selectivity(分離度):孤立しているどうかを判断する基準として、どのくらいの数の点がお互いの近くにある必要があるかどうかを設定します。この値が高いほど、より多くの点が選択されます。
- Strength(強度):孤立していないと判断される、2点間の距離を設定します。この値が高いほど、より多くの点が選択されます。
パラメータを変更する際、ソフトウェアはリアルタイムで選択内容を表示します。okをクリックして、選択を確定します。
●アウトライアー選択(角度)
このアウトライアー選択のパラメータは、角度のみとなります。ある点の近くに、このパラメータで指定されている角度よりも小さい角度を生成する点がない場合、この点はアウトライアーとみなされます。角度が小さいほど、より少ない点が選択されます。
パラメータを変更する際、ソフトウェアはリアルタイムで選択内容を表示します。okをクリックして、選択を確定します。
●アウトライアー選択(セグメンテーション)
このアウトライアー選択ツールは、単一の点ではなく、点のブロックを分析します。
〇ベース選択
取得のベース(モデルホルダーに近い部分)を取り除くには、高さカット取得ツールを使用します。
高さの値をコントロールできるスライダーが表示されます。選択された高さより下にあるすべての点が選択されます。
スライダーで調節する際、ソフトウェアはリアルタイムで選択内容を表示します。okをクリックして、選択を確定します。
〇編集機能
選択を実行する際は、以下のいずれかの編集機能(3Dビューコンテクストメニュー、編集メニュー、またはキーボードショートカットからアクセス可能)を使用します。
- 削除選択 (DEL) : 現在選択しているデータを削除します。
- クロップ選択 (
 + K) : 選択したデータのみを残し、残りをすべて削除します。
 - 選択反転 (
 + I) : 選択されていないすべてのデータを選択し、選択されているデータを選択解除します。
 - 選択クリア (
 + C) : すべてのデータの選択を解除します。
 - 全選択 (
 +
+  + C) : すべてのデータを選択します。
 - 接続部分の選択 (
 +
+  + D) : (メッシュのみ)現在選択されている領域に接続されているすべての部品へ選択を広げます。
 - 選択拡張 (
 + D) : 実際に選択されている部分の隣のデータまで選択を広げます。
 - エロード選択 (
 +
+  + D) : 選択のマージンを減らします。


