Difference between revisions of "Pc Connection/ja"
(Created page with "''スキャナーの接続(ビック/デラックス)''") |
|||
| (7 intermediate revisions by the same user not shown) | |||
| Line 2: | Line 2: | ||
{{DISPLAYTITLE:Scanner's connection|noerror}} | {{DISPLAYTITLE:Scanner's connection|noerror}} | ||
| − | == | + | == スキャナーの接続 == |
| − | + | 下図のとおり、スキャナー背面には、左から、電源スイッチ、電源ケーブルポート、HDMIポート、USBポートがあります。 | |
{{Big image|Big.png}} | {{Big image|Big.png}} | ||
| − | '' | + | ''〇スキャナーの接続方法(ビック/デラックス)'' |
{{Big image|Small.png}} | {{Big image|Small.png}} | ||
| − | '' | + | ''〇スキャナーの接続方法(スモール)'' |
| − | + | 電源ケーブルは平均230Vのケーブルで、作業のすべての段階でこの電圧をサポートし、過負荷やショートより保護されている電力線に接続する必要があります。<br />HDMIケーブルはコンピュータのグラフィックカードのHDMIポートに接続する必要があります。ポートの位置は、コンピュータのブランドやモデルによって異なります。参照システム(Dell製Alienware i5およびi7)の場合、このHDMIポートは左下側にあります。 | |
| − | |||
| − | |||
{{Big image|Pc.png}} | {{Big image|Pc.png}} | ||
| − | + | USBケーブルの接続はスキャナーのモデルにより異なります。イージーモデルとスマートモデル(スモールおよびビッグ)ではUSB 2.0コンポーネントとなり、デラックスモデルではUSB 3.0コンポーネントとなります。このため、イージーおよびスマートスキャナーのUSBケーブルはUSB 2.0ポートに、デラックスモデルのUSBケーブルはUSB 3.0ポートに接続する必要があります。これらのポートは通常色付けされており、USB 2.0は黒色、USB 3.0は青色となっているので、見分けできます。オープンテクノロジーが提供しているスキャナーとコンピュータを接続するUSBケーブルは3.0 USBケーブル(青色)ですが、上記の指示事項は有効で、ケーブルが3.0であっても、スキャナーがイージーまたはスマートモデルの場合は、USB 2.0に接続する必要があります。 | |
| − | |||
| − | |||
| − | |||
| − | |||
| − | |||
| − | |||
| − | |||
| − | |||
| − | |||
Latest revision as of 06:46, 31 March 2016
スキャナーの接続
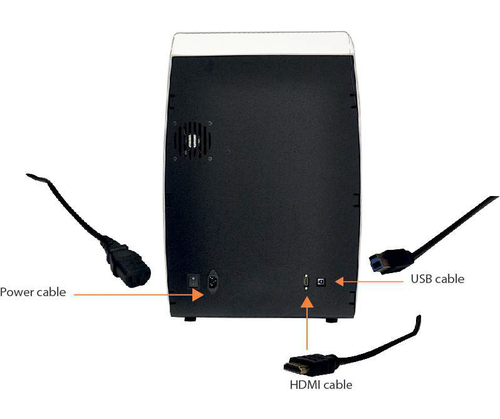
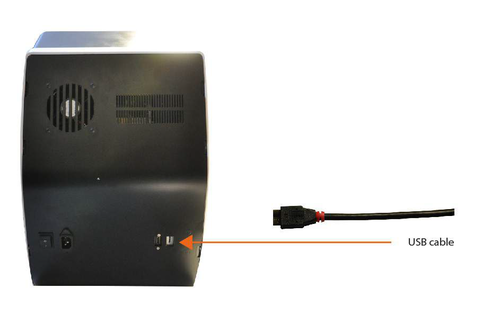
下図のとおり、スキャナー背面には、左から、電源スイッチ、電源ケーブルポート、HDMIポート、USBポートがあります。
〇スキャナーの接続方法(ビック/デラックス)
〇スキャナーの接続方法(スモール)
電源ケーブルは平均230Vのケーブルで、作業のすべての段階でこの電圧をサポートし、過負荷やショートより保護されている電力線に接続する必要があります。
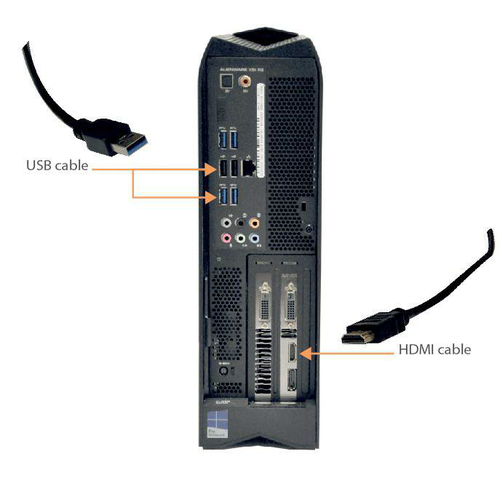
HDMIケーブルはコンピュータのグラフィックカードのHDMIポートに接続する必要があります。ポートの位置は、コンピュータのブランドやモデルによって異なります。参照システム(Dell製Alienware i5およびi7)の場合、このHDMIポートは左下側にあります。
USBケーブルの接続はスキャナーのモデルにより異なります。イージーモデルとスマートモデル(スモールおよびビッグ)ではUSB 2.0コンポーネントとなり、デラックスモデルではUSB 3.0コンポーネントとなります。このため、イージーおよびスマートスキャナーのUSBケーブルはUSB 2.0ポートに、デラックスモデルのUSBケーブルはUSB 3.0ポートに接続する必要があります。これらのポートは通常色付けされており、USB 2.0は黒色、USB 3.0は青色となっているので、見分けできます。オープンテクノロジーが提供しているスキャナーとコンピュータを接続するUSBケーブルは3.0 USBケーブル(青色)ですが、上記の指示事項は有効で、ケーブルが3.0であっても、スキャナーがイージーまたはスマートモデルの場合は、USB 2.0に接続する必要があります。


